Hearthstone Arena Strategies
So, you’re a little hesitant to step into Hearthstone’s Arena mode, or perhaps you already have and the games did not quite go as planned. I’m going to level with you: I’m not some grandmaster Hearthstone Arena player, although I break even (6+ wins) more times than not. What I can offer you is a collated batch of Arena strategies collected from either personal experience, from streams, and/or random tidbits from players better than myself. So read on, absorb what’s useful, and critique the rest in the comments.
Make Peace with the RNG
You will be screwed right out of the gate on occasion. From a poor selection of Heroes at the beginning, to a drafting process that offers you zero removal cards, to being faced against opponents with 2-3 Legendaries and all the right answers. It happens. So make your peace with its inevitability, and endeavor to learn something useful as you struggle uphill both ways.
Understand Card Advantage
Card Advantage is a concept that came out of Magic: the Gathering theory more than a decade ago, and is a key component in virtually all CCGs since then. The Wikipedia page on the topic is pretty robust, and I recommend taking the time to read through it – the concept of card advantage underpins every other strategy that follows.
Know Your Enemy
There are nine classes in Hearthstone, each with very specific Hero abilities and class-specific cards. Just like in any PvP situation in WoW or other games, the more you know about your opponent’s repertoire, the better your chance of predicting his/her moves and playing around them.

My creature placement turned a 2:1 into a 1:1, saving two critical creatures.
For example: when facing a Rogue or Mage, the positioning of your creatures matters. Betrayal is a potentially devastating Rogue card whose power is entirely dependent on how you order the creatures on your board – if you have a high-attack power minion inbetween two other creatures, bam, that Rogue just got a 2-for-1 because you got careless. Cone of Cold is more difficult to play around, but you can do funny things by placing your strongest creatures on the outside (forcing the Mage to choose which to become Frozen) or even mucking up the math by playing a Faerie Dragon intelligently. For example, if I had been facing a Mage in the picture above, the Cone of Cold could only ever hit two creatures since the Faerie Dragon couldn’t itself be targeted.
If you haven’t taken the opportunity to look up all the class-specific cards already, go ahead and click My Collection and then Crafting Mode (and make sure All Sets is on at the bottom). This will show you all the non-Basic cards for every class. As far as I can tell, the only way to see all the Basic cards is to earn them by leveling each class up to 10 yourself… which is a good idea anyway.
Assume the Removal
This is a subset of the previous point. Know what kind of removal that your opponent may have access to, assume that they have it in hand, then force them to use it. It’s Turn 7, and the Mage will likely devastate your board with a Flamestrike. Can you do anything about it? Yes, actually: force them to use it. Worst case scenario is that they generate a lot of card advantage by crippling your offense. But they were going to do that anyway. Best case is that you had enough threats on the table to force them to use it when you were expecting them to, and not at their leisure.
If you play conservatively and they don’t use the Flamestrike, all you’ve done is given up damage in exchange for nothing.

Assume the worst, hope for the best.
Here is a rough guide:
- Hunter: Multi-Shot at Turn 4. If it’s a Secret, assume it’s a Fire Trap.
- Mage: Sheep on Turn 4, Blizzard on Turn 5, Flamestrike on Turn 7. If you are at 11 HP or 7 HP, assume you will die next turn from Pryoblast or Fireball.
- Paladin: Consecration on Turn 4. Blessing of Kings on Turn 4.
- Rogue: Betrayal any time you have 3 creatures. Assassinate on Turn 5.
- Shaman: Bloodlust whenever they have more than 3 creatures out. Lightning Storm at the worst possible moment.
- Warrior: Assume a 2 or 3-power weapon the next turn, and/or creatures with Charge. Any useful creature that has taken damage will die.
- Priest: You will likely lose after Turn 8. Win before then.
- Druid: Swipe starting on Turn 4. Starfall on Turn 5 (it’s a rare card though). Assume 8/8 or 5/10 Taunt creatures after Turn 8.
- Warlock: Assume Hellfire whenever they don’t have a creature out.
Draft Bombs
A Drafting environment is worlds different than Constructed. You might be able to play around one Mind Control, but can you play around three? Ever face a Warlock with four Hellfires before? This is not meant to discourage you from doing Arena, but to recognize that you will encounter all sorts of outlandish situations. The only real thing you can do is draft the strongest possible cards you can, play them intelligently, and hope for the best.

Pictured: an insanely tough first pick. Went with Knife Juggler.
What are the strongest possible cards? Good question. I suggest starting with Trump’s Arena Card Rankings as a jumping off point, as it covers all Basic/Common cards. The fundamental take-away though, is asking yourself how any given card you play stacks up with other cards for the same cost. Does it trade favorably? While a Kobold Geomancer can turn an Arcane Explosion into a Consecration, it will have its lunch eaten by a vanilla 2/3 River Crocolisk who will still be a hungry 2/1 creature after the trade. Chillwind Yeti is the least interesting creature ever that turns entire games around with his big, dumb 4/5 for 4 self (bonus points for immunity to most Priest removal).
Of course, given the choice, I would take Amani Berserker over the River Crocolisk every day of the week. Point is: don’t discount efficient creatures. Considering it is entirely possible to have no opportunity to draft any removal, you may have to make due with what you have on the board.
Know When to Race, and When to Coast
It’s your turn 4 and you have two 3/2 creatures compared to your opponent’s lone 1/1 creature. What do you do?
If you said “It depends on what class your opponent is,” you win.
The difference between dealing 6 damage this turn and a Paladin casting Blessing of Kings on his 1/1 and taking out one of your creatures (and likely forcing you to trade next turn) is huge. If you manage to keep that Paladin’s board clear each turn, the Blessing of Kings is a dead card until at least Turn 6, and by then you’ll either have this game wrapped up or have something to deal with a 5/5. There have been more than one game where I lost simply because Dark Iron Dwarf was stranded in my hand (unlike the Shattered Sun Cleric, the dwarf has to target a creature if one exists, even your opponent’s).
At the same time, a commitment to killing everything your opponent plays every turn means that every creature they cast gains the text “and gain X life, where X is the HP of this creature.” At the end of the day, you win by reducing your opponent’s HP to zero, not keeping his board empty. Sure, there are many times in which I was trying my best to Jedi Mind Trick my opponent into attacking my face rather than killing creatures I had plans for, but giving a Control deck room to breathe is exactly what they want you to do.
Get Ahead, Stay Ahead… But the Long Game is Good Too
I once lost a match where the only creature that survived more than one turn was my opponent’s Faerie Dragon, which he/she had coined out on Turn 1. Every turn thereafter consisted of us trading cards and creatures. Which might have been okay, if it were not for the fact that trading one-for-one favors the person who played first. In other words, the early game matters. A lot.
At the same time, what you don’t want to do when drafting is neglect your late game. The vast majority of the Arena games I play end long after Turn 10. Having a front-loaded mana curve is great for punishing slower decks, but what are all your 2/2 and 3/3 creatures going to do when faced with a 8/8 or 5/10 meatwall with defender? Or a Flamestrike? There is nothing more frustrating in Hearthstone than running out of steam and watching your shot at victory slowly erode under the tremors of Stormwind Champions.
When I drafted a Paladin Aggro deck (e.g. zerg with cheap creatures) I about conceded on Turn 1 when the Mage I was fighting dropped a Mirror Image. I had a fist full of creatures, but many of them were 2/1s which would have died to a ping by the Mage’s Hero power before they could even attack once. If you mostly stick with the highest-value cards you can, you’re likely to walk out with a mid-range deck that can handle most situations. Specifically trying to shoehorn in a “theme” in an Arena environment is just asking for trouble.
Play Smart… Play S-Mart
While the exact depth of Hearthstone strategy is up for debate, there is absolutely opportunity to miss game-changing plays and/or epically screw yourself over by poor decision-making. For example, I am still facepalming over this scenario:
Don’t get greedy.
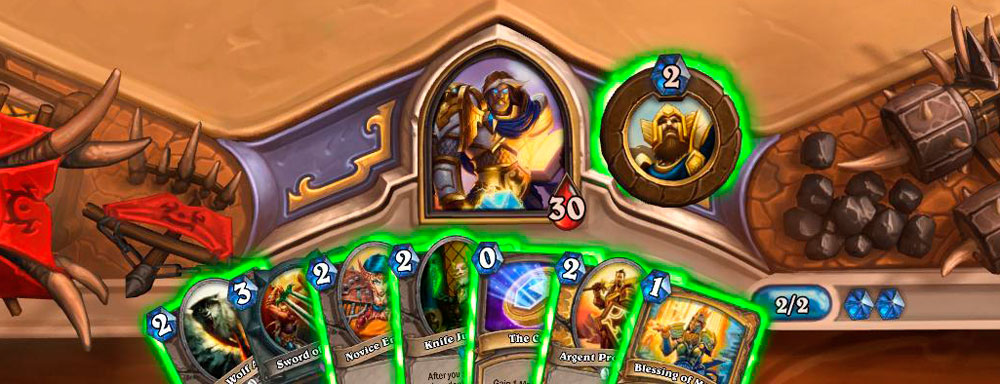
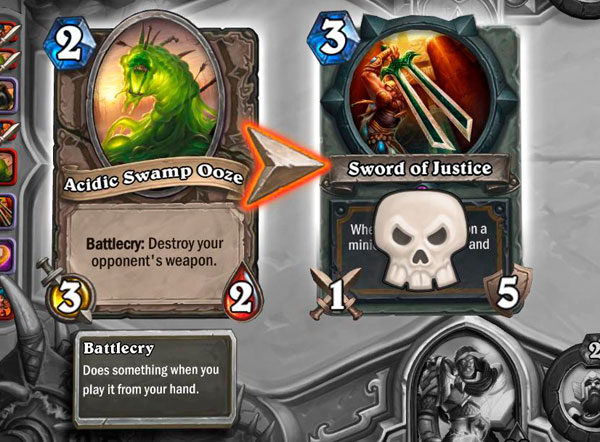
My Turn 2, opponent had played a Novice Engineer. Staring at a hand with a Sword of Justice and four cheap creatures, I got greedy by using the Coin to power out the SoJ and passed the turn. And that’s when this happened:
“What’s the worst that can happen? Oh.”
I pretty much lost the game right there. My opponent’s 3/2 and/or 1/2 would eat any creature I played or eat my face if I delayed long enough to cast the Knife Juggler + Argent Protector. Indeed, it did not really matter what I played, because my opponent got a 2-for-1 just by playing the Ooze, and arguably a 3-for-1 since I had to deal with the creature eventually. That was not a fun game.
There are times when you may need to go all-in to win. If my opponent didn’t have the Ooze, my card advantage would keep ticking higher each turn the Sword survived. A smarter play would have been to cast my own Novice Engineer and then see what kind of creature he played in response. Depending on what he/she played, I could have coined into a Knife Juggler + Argent Protector, or dropped a Dire Wolf Alpha and killed his Novice Engineer, or boosted my Engineer to take out a x/5 creature or whatever. Point being, playing Sword of Justice and passing the turn is the dumbest possible move you can make. Sometimes it’s the only move you can make, but it’s still dumb.
Beyond that scenario, there are all sorts of little things to keep in mind. Knowing how powerful Silence can be, for example, especially against opponents who spent their whole turn casting that 6/5 with Taunt creature only to see your full board go right for their face. Faerie Dragon placement, as mentioned earlier. Knowing that mass removal like Consecration and Hellfire will not trigger Cult Master’s card-drawing power as long as it dies at the same time as other creatures. Facing the tough choices like this one, and realizing that the obvious plays are not always the best ones:

Coining into a Flamestrike seems obvious… but it’s not always the best.
I don’t remember what sort of nonsense the Druid played after I killed the Cult Master with my Water Elemental, pinged the imp, and then played Ogre Magi. All I remember is that I was quite happy saving the Flamestrike for the following turn when he dumped his hand and then later using the Coin with Archmage Antonidas to jump-start the Fireball cascade.
_____________________________
Hopefully this guide has been of some use for you. The very bottom line when it comes to improving your Arena match outcomes is simple: learning from your mistakes. Did you really get screwed by the RNG, or was it the RNG + a bad early play on your part? Fix what you can and then try again.
Have fun… and maybe I’ll see you out there.
Posted on November 18, 2013, in Hearthstone and tagged Arena, Blizzard, CCG, Strategy. Bookmark the permalink. 2 Comments.

“Pictured: an insanely tough first pick.”
I would take the Drake there.
LikeLike
Hey, thanks for this! I think clearly I need to be more adaptive to whatever hero I’m up against. I know to, say, expect a turn 8 mind control, but positioning to avoid being borked by Betrayal never even occurred to me.
LikeLike