Blog Archives
The PlanetSide 2 Quickstart Guide
So you went and downloaded PlanetSide 2. Now what?
The following set of tips and tweaks that will hopefully make your beginning experience that much smoother in PlanetSide 2 (hereafter Ps2).
Why Bother in the First Place?
To be completely honest, the new player experience in Ps2 is awful. Right after character creation, you will be drop-podded down into the thickest fighting on the map as a Light Assault class, and probably killed in seconds before you even had the chance to look at the keybindings. You will empty a clip into the first enemy you see, and they will turn around and kill you with two bullets. Your HUD will be filled with icons that may as well be Egyptian hieroglyphics, there will be cooldowns and resources and cash shop items and oh my god get me out of here. The entire purpose of this quickstart guide is to soften the blow, but you are still going to be punched in the face. So why bother, especially with this F2P game?
Because this happens:

Escorting the 15-man Galaxy so it can break a stalemate.
And this happens:

Moments before your squad’s own deployment.
Oh, and this was yesterday:

Still frames doesn’t do the firefight justice.
I am not a part of a Guild/Outfit, I did not schedule my play session, I know none of the people I was playing with, and I likely won’t even see them again. Many people will say that the “correct” way to play Ps2 will be a part of an organized group of friends. That might be more fun, but it can be plenty fun logging in solo. Will you experience the sort of uniform fun that comes from playing a few maps of Battlefield 3? Not all the time, no. But I can say you will never get a moment in BF3 when you are flying in formation with 20+ other airplanes, raining havoc upon your foes. Or having the ability to create a tank on a whim, instead of waiting for a respawn.
Suffice it to say, when Ps2 is good, it’s really good. When it’s not, it’s not. This guide is about getting more of the former, and less of the latter.
Finding the Action
So you’ve just been killed within 30 seconds of starting the game for the first time, or maybe you have just been wandering around, lost and confused. Where is all the action taking place?
First, hit either Esc or M to bring up your main menu:

First thing I do whenever I log on.
- Click the Social button.
- Click the Join Squad button next to a squad you think will work for you.
- Click the Map button.
- In the lower-left part of the map, click Squad Leader and then Deploy.
If you follow the steps, you will be drop-podded near where the squad leader is located, which will typically be in the middle of a war-zone. From there, find some friendlies and follow them around, occasionally shooting bad guys. There is no guarantee that your squad knows what it is doing, but the idea is to get yourself acclimated to this particular FPS flow, with base layouts, how firefights play out, and so on.
When you die – and you will, many, many times – you will see a screen like this:

Get used to it.
First thing I’d recommend, if you haven’t already, is change your class: click on either the Combat Medic or Engineer. For the Deployment locations, they are generally listed in the distance from where you were killed. You will not always be able to respawn near where you were fighting; sometimes your spawn location will be taken over (if a base) or otherwise destroyed (Sunderer). A Sunderer is a troop carrier vehicle that can deploy into a mobile spawn location, and will be your best friend in any base assault.
It is also worth noting that the little symbols on the right end of the bar correspond to what kind of consoles are located there. Every base will have a Pistol icon (Infantry console), but whether there are others depends on the base layout. For example, if I want to spawn somewhere where I can create an airplane, I’ll need to choose one of the bottom two.
What Do I Do?
The general idea is to take over every base on the map. Each area on the map will have one or more types of bases, ranging from small outposts to those huge Biodomes you can see from miles away. Taking over bases involves putting warm bodies next to the capture nodes for the base/region and waiting for a bar to fill up. In larger bases, there will be generators that power shields that keep your faction’s vehicles at bay, along with shields that protect a 2nd generator keeping the enemy’s spawn location active.
It sounds complicated, and to be honest, I believe it is overly complicated for no reason. If you familiarize yourself with the various icons though, it becomes much easier to follow.

Not pictured: 167 other stupid icons.
Basically, if you see the Up Arrow icon in someone else’s colors, go there, and hang out near the weird data thing pictured in the lower right. You can see your progress towards capturing this particular node in the center top of your screen. Once captured, you should be able to start spawning near this location. If you see an [A] icon instead, that means… well, do the exact same thing. The key difference is that capturing an [A] node is just as quick as before, but your faction won’t actually own that point on the map until that second bar in the center-left part of your screen fills up. With bigger bases, you will also need to cap [B] and [C] if they exist. I don’t know for sure whether the map only caps if there are people hanging out near a capture point, but hang out anyway; being near a facility being capped gives you a huge XP bonus (enough for +4 Certs for a Biodome, in fact).
Not pictured above are the various generator icons, the respawn generator icon for large facilities, and other things. While you do want to help blow generators up (go up to them and hold E to destabilize them), it is not something I would focus on as a brand new player. You are likely going to be of much more use helping your team cap nodes than bringing down the shields so your tank column can set up shop outside the enemy respawn location.
Teleporters are probably useful. Use them. Indeed, if you are assaulting a Biodome, if you capture the outlying bases (they will have the Up Arrow symbol near them) then you gain access to a teleporter that sends you to a shielded room in the heart of the Biodome. “Shielded” as in you can shoot enemies out of the room, but they cannot shoot you inside. Biodomes sieges in general are good sources of close-quarters killing/farming XP.
There are three types of consoles are indicated by their symbol: Pistols (Infantry), Tanks (Vehicles), and Airplanes (Airplanes) Go up and press E to use them. You can restock ammo infinitely at the Infantry consoles, along with changing your class. Vehicle and Airplane consoles are pretty straightforward, and you should never feel like you don’t know enough about the vehicle in question to build one and drive it around. Each player has their own individual Resource pools from which to build vehicles, it fills up by X amount every 5 minutes automatically, and it has a cap of 750 points. Ergo, if you have 750 Mechanized Resources and aren’t building a tank, then those Resources are going to waste.
Speaking of wasted points, here is another Pro Tip: you spend Infantry Resources to get more grenades (among other things).
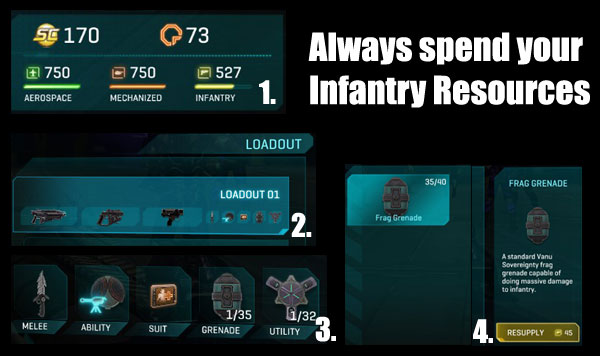
Yet another thing that should have been in a tutorial.
- If you have more than 100 Infantry Resources, go ahead and stock up on (explosive) consumables.
- Pick the class with the consumable (grenades are universal), then click a Loadout.
- Click on Grenade or Utility, depending on what you have.
- Make sure the appropriate item is selected, then click Resupply.
The short version is that things like grenades are considered one-use consumables; you can only carry one grenade at a time (unless you unlock more), but you might only start with 5 total across all your classes. Since the only other use of Infantry Resources is busting out a MAX unit, anytime you have more than ~100 points, spend them to stock up on your consumables (which includes medpacks, proximity mines, C-4, and anything else you’ve unlocked). If you let your Infantry Resources cap out at 750, you are seriously hurting yourself later should you get into a situation that calls for some supplemental utility.
Classes
As I mentioned before, I am recommending the Combat Medic or Engineer for new players. Why? Not only are both useful in a group setting, but you are also much more self-sufficient as either class than you would be by yourself. And until you get a handle on what is going on, you are probably going to find yourself lost and alone pretty often. Here is a quick rundown:
- Infiltrator – Press F to cloak, but you cannot fire or be healed. Class is a bit weak until you unlock better sniper rifles. Hack enemy consoles by pressing E.
- Light Assault – Double-tap or hold Spacebar for jetpack. If you are ever fighting somewhere that you can get to without a jetpack, you are doing it wrong.
- Combat Medic – Press F for AoE heal (including yourself). Use your heal gun on people; revive the dead. When you revive someone, finish healing them.
- Engineer – Drop ammo boxes, drop a turret that you can man. Repair everything, especially friendly MAX units.
- Heavy Assault – Press F for an extra shield. Only class with default ability to hurt vehicles via rocket launcher.
- MAX – Press F to run fast for a few seconds. Left-click left gun, right-click right gun. Swap anti-tank weapon for anti-air depending on fight.
Personally, I play Engineer 90% of the time in-game. Running out of ammo is a pretty major concern in Ps2, and few people run around as Engineers despite it being an easy source of XP. Each time someone gets resupplied, you get 10xp, or 10% of a kill. Plus, after you take a base, there is typically a lot of repairing that needs to be done to get the AA guns and consoles back online.
Miscellaneous Tips
- There is friendly fire in this game.
- You can move your drop pod slightly with WASD. Aim for rooftops.
- Press Q all the time. It will help you spot enemies you didn’t actually see. Plus, if someone kills them you get free Spotting XP.
- The secondary fire (press B) of the Engineer Turret is another ammo pack. Once you buy some other Utility item, drop your “regular” ammo packs and get the benefits of having both.
- You can swap out a MAX’s weapon loadout at any Infantry console without losing the MAX itself. If you switch classes though, the MAX goes on cooldown.
- Drop an ammo pack near Sunderers, get massive amounts of Resupply XP from people running back to change classes/get more ammo.
- Normal guns can damage light aircraft (Scythes, etc), so shoot at them to encourage them to go somewhere else. Larger aircraft are immune, though.
Certifications, aka Certs
All the XP you are earning is basically a means to get additional Cert points to unlock new weapons, gear, attachments, and… well, everything. The Cert interface is pretty confusing, especially when you start browsing the weapons, but there are some inexpensive items to get you started.

Another UI element that could be cleaned up.
In the screenshot above, we are looking at the Suit Slot of the Heavy Assault class. Note that there are six different options, but you can only equip one of the upgrades under the specific tab at a time. I already have the first rank in Nanoweave Armor, which gives me 10% base health and cost exactly one (1) Cert to purchase; the next rank is pretty inexpensive at 10 Certs as well. The different classes usually have different options, although sometimes an unlock is class-wide, such as Medpacks and even some weapons like shotguns. If you unlock something new, such as a gun attachment or the aforementioned Nanoweave Armor, you have to specifically equip it in a Loadout before it takes effect.
The above process is the same for vehicle Certs.
Are there must-have Certs, or always-avoid Certs? Probably. I recommend getting the Nanoweave Armor upgrade on all your classes since it is 1 Cert a pop, for example. There are some similarly cheap upgrades for the healing/repair guns. I might also recommend unlocking Medpacks since they get unlocked for all classes with a single purchase (don’t forget to equip them and buy more with Infantry Resources!). From there is starts to hugely depend on what class you have found yourself gravitating towards. Since I enjoy the Engineer the most, I went ahead and bought him some Proximity Mines. Just yesterday I purchased C-4 for my Light Assault as an investment in future shenanigans.
When it comes to weapons, I have been playing it pretty slow and avoiding spending any Certs. The majority of the guns cost a whopping 1000 Certs, which is probably 10-20 hours of straight gaming assuming you know what you are doing; no matter how cool the weapon, you are likely go to get a lot more mileage out of class upgrades than weapons, especially since the former cannot be purchased with Station Cash (only boosts). Once you do find a weapon you enjoy using though, I recommend investing in a better scope and horizontal stabilizer.
By the way, you will passively earn roughly ~12 Certs overnight. It is not a whole lot, and you stop earning them after 48 hours of not logging on, but there are some decent early ranks you can pick up with that amount.
How Much Will This Really Cost Me?
It’s Free to Play, bro.
…for the most part. We all know F2P games are not always as free as they appear, but Ps2 is a lot better than any I seen. The 1000 Cert floor for most weapons takes them off the table for rational people, and while all of them being “sidegrades” is probably a bit too charitable, I am extremely satisfied with the default guns (as Vanu… your faction mileage may vary).
The only point at which I feel at a decided disadvantage is when it comes to the Heavy Assault rocket launchers and the light aircraft rocket pods. The default dumb-fire rocket launcher for the Heavy deals the most damage out of the available options, but the AA rocket launcher can change a “getting farmed in respawn location by aircraft” engagement into an enemy rout. On the flip side, flying a light aircraft with the A2G rocket pods can turn you into a jealous Greek god, meting out judgment upon the lowly worms in your warpath.
There are ways around these limitations – switch to a MAX with an AA gun if aircraft are near, and… just use your machine gun or not fly – but these were definite F2P thumbscrews for me. I have heard similar things regarding High-Explosive rounds for tanks vs the default ammo, but I have not used ground vehicles all that much when I could be getting my Greek on.
Important note: Cert/Station Cash unlocks are currently character-specific. In other words, if you dropped some real cash unlocking rocket pods for the Scythe (Vanu faction), you cannot use those rocket pods on another Vanu character on another server, or different faction on the same server. This is slated to change in future, i.e. unlocks becoming account-wide, but there was no timeline given so who knows when that will go into affect. Such a change will apparently be retroactive, but in the meantime, it is a good idea to stick to a faction/character you think you can live with.
Conclusion
If all the negative press regarding the new player experience has made you leery of downloading Ps2… well, it’s true. The new player experience sucks. However! From what I have been reading, the developers are listening to and implementing feedback at a pretty quick clip. Plus, hopefully this Quickstart guide will ease your passing into what I have found to be a very entertaining FPS.
Honestly, after being able to create vehicles on a whim, I don’t know if I will be able to go back to the Battlefield 3 model of camping the helicopter pad for a chance at 3 minutes of fun. There are still timers in Ps2 to prevent light aircraft spam, but between using Certs to reduce the timer or simply creating a tank to wait down the clock, I am never at a lack for mayhem to get into.
The GW2 Quickstart Guide
So you bought Guild Wars 2 and downloaded it. Now what?
The following is a collection of tips and tweaks that will hopefully make your beginning experience that much smoother in Guild Wars 2. For the purposes of this guide, I am going to assume you already made it through character creation.
Improving the Framerate
Even if you have a super-computer, chances are good that you may only have 40 fps or less if you start out with everything at max settings. Two quick changes in the graphics settings gained me +15-20 fps, and will hopefully work likewise for you:

And you won’t feel a thing.
In text form:
- Reflections: All –> Terrain & Sky (+10 fps)
- Shadows: Ultra –> High (+5 fps)
I am not sure what possesses MMO companies to add graphical features that require computers from the future in order to run properly, but once you tune those two options down a step, you should gain around 15 fps with zero apparent loss of graphical fidelity. Every computer is different, of course, so your own gains may be more or less. Screwing around with some of the other settings resulted in the following for me:
- Shadows: High –> Medium (+5 fps) –> Low (+10 fps)
- Shaders: High –> Medium (+10 fps)
- Textures: High –> Medium (+10 fps)
Again, those numbers may not be accurate for your machine, or even my own machine for that matter – it could be I was simply in the wrong area for a legitimate test. Regardless, I did notice a reduction in game fidelity (i.e. graphics took a hit) when I started bumping that second set of numbers down, so if you like your shiny games to be shiny, stick with the slight Reflections/Shadows tweak.
If you find additional tweaks on your own, feel free to leave it in the comments below.
Improving the Controls
On the default option screen, the two biggest things are turning on Autoloot and increasing the Camera Rotation speed:

You WILL Dodge to your death many a time.
Turning off “Double-Tap to Evade” is a good idea when you start doing any of the jumping puzzles, and it may be a good idea to turn it off permanently anyway. I have not quite worked out what button to comfortably assign Dodge to though, as it has to be one in which you can reliably hit while navigating around with WASD. Right now, I have it assigned to V but may move it to C later (or see if my side mouse buttons will do the job).
Speaking of WASD, take the time now to disable keyboard-turning, you noob:

MMO companies should really disable this shit by default.
I also recommend moving “Interact” from F –> E, but that is just me. The idea behind it is that with Autoloot turned on, what you can do is run through that pile of bodies created by a nearby Dynamic Event and just spam the E key to pick up all the loot.
Improving Quality of Life
At this point, I am going assume you made it through your race’s tutorial, e.g. level 1-2.
One of the first things I recommend is to save up 72 copper and purchase the three basic types of gathering tools:

Start this early, and you’ll thank me later.
If you spot a vendor immediately upon zoning in from the tutorial, you will likely only have ~50 copper or so. Go ahead and purchase the Copper Logging Axe and one of the other two; the herbs are going to be more common, but the ore nodes are going to be more immediately useful for crafting. Otherwise, you can wait until after you finish your first Renown quest “hub” or so to get enough cash to buy them at the same time.
Once the gathering tools are in your inventory, double-click them to “equip” them and you will be ready to go. Each node you tap gives you the equivalent of ~3 or so mob kills and contributes to your Daily Quest achievement score (which itself nets extra XP and rewards).
Incidentally, you might have noticed the Salvage Kits in the vendor window above, or may have received such a kit from completing story quests. Salvage Kits basically “disenchant” old gear into crafting material. I do not recommend buying some right at the beginning of the game like with the gathering tools, especially since you will get several packs of them free from story quests.
If you find yourself lacking in funds, check your mailbox. Each Renown Heart you complete will get you a follow-up letter in your mailbox, which will contain some cash too:

This early copper will be HUGELY useful in the early game.
Between gathering and Dynamic Events, chances are that your bags are going to get full in no time. The good news is that there is an app a button for that:

Hands down the best feature in GW2.
Open your Inventory (I), click the cog, select Deposit All Collectibles. Bam! All your crafting materials (etc) automatically get whisked away to the Collectibles tab of your bank. Want to use those items for Crafting? Any Crafting table will give you access to your Bank and Collectibles tabs, which lets you drop the needed item into your normal bag to use it for crafting purposes. Your bank and Collectibles tabs are Account-wide. There is literally no reason to not use that button, but you can deposit individual items by right-clicking and selecting Deposit from the menu if you wish.
If you find yourself not getting a healthy selection of weapons from drops, check out a weapon vendor. While such vendors can be found sparingly out in the world, it is likely the easiest to seek one out in your race’s capital city. The entrance to every race’s capital city is usually a portal right behind where you spawned from the tutorial. The main entrance is only meaningful for your first trip there, as every time after that you can simply teleport to a Waypoint inside from anywhere.
The weapon vendor will be a marked as a (tiny) icon with a sword:

Harder to find in some capitals than others.
The significance of these vendors is that you can buy every weapon type from them. While the weapons themselves are of low-quality, and expensive for low-level characters anyway, the point is that it is entirely possible to never run across, say, a pair of pistols on your Thief or a Longbow for your Ranger. Not only can you miss the opportunity to level up those weapon skills until you manage to get a random drop, but some classes are worlds more fun with certain weapons – you have not played a Guardian until you played a Guardian with a Broadsword, or an Elementalist with dual-daggers. So if you find yourself creeping up on 2 whole silver pieces and have not unlocked the majority of your weapon skills, I suggest making a shopping trip in town.
By the way, if you happen across an NPC (or object) in town with a golden boot above their head, talk to him/her/it. You will receive a ~5 minute speed boost to make your shopping/exploring trip that much easier.
Improving Globe Trotting
The last Quickstart tip I have is to help you move about the world. Did you roll a Norn and want to quest with your Sylvari friend? Or maybe you just want to check out the Charr area? It is easier than it looks.
- Press H, to bring up the Hero menu.
- Click on the PvP tab, along the bottom left.
- Click “Enter the Mists.”
- If this is your first time here, go ahead and do these tutorial Hearts.
- This next area is the “lobby” for PvP. Feel free to check out your level 80 abilities.
- Otherwise, run into the gate your should be facing. It should say “Lion’s Arch” when near.
- In this next area, press M for your map. It should look like this:

…almost there…
- Run North across the bridge, the hook around to the West.
- One portal for each starting zone.
- Pro tip: you can tell which starting zone a gate belongs to by the race of its guards.
- Go through one of them, grab the nearby Waypoint, then find your friend.
The good news is that there is a Waypoint right at the cluster of portals, meaning you won’t have to the do the PvP portaling trick again. On the other hand, traveling to a Waypoint clear across the world is fairly pricey for a low-level toon (something like 50+ copper for a level 8) so you may want to save those pennies by taking the “long way.”
As you might surmise, each capital will have a portal that leads straight to that Lion’s Arch cluster of portals. If you know your way around your own capital good enough to figure out where it is, feel free to cut out the PvP zone detour. The benefit of the above outlined path is that it is easier to tell someone to click a button and head North than it likely is shepherding them around the utterly massive capitals.
_____
And that, my friends, is that. Crafting is a bit beyond the scope of a Quickstart Guide, and I am not entirely sure how useful a Renown Heart/Dynamic Event rundown would be in comparison to just running around doing it. In any case, hopefully this post was useful in some way, either to yourself or as something to point a friend towards.
Now if you will excuse me, I’m still trying to figure out which character will be my main.
