Blog Archives
My Time at Portia: Beginner’s Tips
Here are a few critical beginner tips to make your experience in My Time at Portia more pleasant.
1. Slow Down Game Speed

One of the first things I recommend doing is opening the Options screen and reducing the Game Speed. All this controls is how quickly the clock ticks in the game. So, instead of burning two hours of daylight heading over to your neighbor’s house to chat, it may only take 30 minutes to cover the same ground. This will also give you more opportunity to use all of your Stamina on digging/logging.
For myself, I pushed it all the way down to 60%. This gives me plenty of time to stock all my furnaces, talk to who I need to, and complete all my chores with plenty of time to explore a bit more before hitting the sack. If you want to burn some more daylight, you can speed it back up at any time.
2. All your Storage is Linked
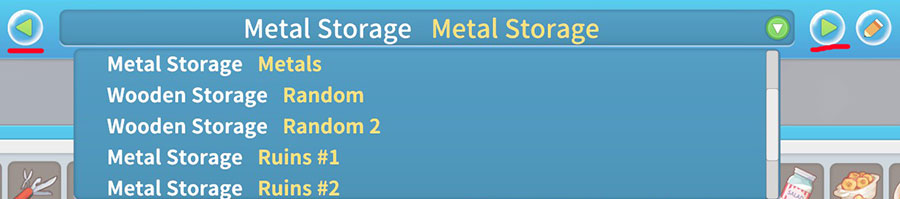
Even though the game mentions this in a loading screen tip, it wasn’t until a few dozen hours into the game that I realized that all your storages are linked. What this means is that if you have one easily-accessible storage chest, you can open it and then browse the contents of all the others, even if they are inside your house (which I recommend doing to save real estate).
Why is this useful? Because you can name each chest and then put that stuff in the chest and easily find them later. I have chests for Metal, Wood, Cloth, Foodstuffs, relics from Ruins #1, Ruins #2, etc etc etc. Considering how often you have to physically put stuff on your hotbar to assemble things, it’s helpful to organize all your stuff.
3. Fishing = $$$
If you haven’t already learned this from the Fishing Tournament in the first month, Fishing is one of the most lucrative endeavors in the game. As soon as you craft your first fishing pole, you can purchase bait from Sophia’s store and then head to the fishing hole near the waterfall. Goliaths are the common catch there and each one has a book value of 350g. The King Goliaths are very rare and hard to reel in, but their book value is 5000g. I recommend not selling those until you have two, because…
4. Breed Fish for Easy Cash
At a certain point, you’ll be able to craft a fish tank. If you plop two fish of the same type (and rarity) into the tank and feed them regularly, eventually you’ll get a 3rd fish. There’s a distinct lack of any kind of useful interface with the fish tank, but basically you can dump in as much food as you want and the fish feed themselves until it runs out. As long as they aren’t hungry, another invisible timer will be counting down until a third fish appears in the tank. Just make sure you don’t accidentally pull a fish out of the tank until they have bred, because it resets to timer even if you put it back.
For practical purposes: put in two King Goliaths (or other 5000g fish pairs), load it up with food, and then 7-8 days later you will have a 3rd 5000g fish. Rinse and repeat for some nice passive income.
5. Don’t Overthink Relationships
There are a few dozen members of the Portia community, and quite a few reasons why you might want to cozy up to all of them. For example, store discounts, extra stat buffs, periodic presents, or because you want to make one of them your beau. Just don’t go too crazy with it though.
Each star or heart container represents 100 relationship points. Talking with townsfolk confers… +1 point each day. Sparring with them confers… +1 point. Playing Rock-Paper-Scissors… yeah, +1 point. While there are Skills that can be unlocked to boost these numbers, they pale in comparison to the other avenues to raise relationships. Giving gifts, for example. Most townsfolk appreciate certain food dishes, and giving them it on the daily is worth +10 points each time.
Additionally, about midway through the game, you “unlock” the ability to go on Play Dates with most townsfolk, once per person per week. If you plan out things right, you can fairly easily score +25 to +40 points in an evening. This isn’t even counting the bonuses (+20 to +35) that come from quests, or them viewing relics you place in your yard, or when you complete their Commissions.
In short, don’t get hung up on talking to everyone everyday.
6. Embrace the Dig
Early on you will unlock some Abandoned Ruins. While these locations have buried relics to chase, the biggest draw is just to find a mineral vein and dig. And dig. And dig some more. While you do need Wood to power the Furnaces that turn all of the copper (etc) ore into usable bars, the vast majority of your time in MtaP will be spent digging. So embrace it.
Also, Pro Tip: you can trade up to 999 Rock for Wood at a 1:1 ratio at A&G Construction. While you will want to keep some Rock around to turn into Bricks on occasion, this conversion will save you a lot of time if you don’t have to split your time between digging and logging.
7. Note the Economy
Prices in Portia fluctuate: down to the low 70% all the way to 135%. Every vendor is affected by the same multiplier shown in the upper-right of the vendor window. Changes are typically gradual, so you’ll have some idea of the direction things are moving. Needless to say, if you are wanting to sell things, you will get more bang for your buck saving it for high-price days. Just keep in mind that each vendor has a maximum amount of money they have each day, so you can’t exactly unload 50,000g+ of goods all at once.
On low-price days, I recommend stocking up on items from Sophie’s Store like fish bait, dough balls, and random cooking ingredients like Sugar and Rice and Cumin. You can also save a few thousand Gols by waiting for these days to purchase new armor from the clothing store.
Quick & Dirty Guide: No Man’s Sky
Right from the start, let me say that No Man’s Sky is often intentionally vague in order to engender a sense of wonder and discovery. In that respect, the following Quick & Dirty guide might constitute spoilers because I will be explaining some of the game systems as they exist in version 1.38. If you feel like that might take away from your enjoyment of the game, by all means, stop reading.

For everyone else, let’s roll.
Basic Gameplay
1. Land on planet
2. Collect resources
3. ???
4. Profit.
Seriously though, in the beginning, do not worry too much about anything in particular. A large part of this game comes down to Inventory Management, and you are never given enough space to collect all the things. If something seems like a super-rare thing, trust me, it’s not. You will find a planet with tons of it later on.
What you will want to keep an eye on though, at all stages of the game, are the following:
- Plutonium: It costs 50 to lift your Starship off the ground.
- Zinc: Basic way to recharge your environmental protections, once crafted.
- Thamium9: Primarily for recharging Life Support, but used in Farms later on.
You will always want to keep a stack of those elements handy at all times, at every stage of the game. Once you get a decent Unit (e.g. cash) stream, all of them can be acquired quickly and in bulk by visiting a Trading Post on a planet in any economically successful system. We’re talking buying 1500+ at a time for like 40k Units. Much faster than farming, especially with Thamium9.
Quick Movement
Walking, and even Sprinting, seems really slow and never gets much better.
The better way to get around is to Melee+Jetpack. Basically, start walking in a particular direction and press the Melee button (Q on PC) and your Jetpack (Space on PC) at the same time. If done correctly, you will surge forward a few steps, and meanwhile that faster momentum will carry over onto your Jetpack. For best results, start Sprinting (Shift on PC) before the Melee hit and you’ll be able to traverse wide swaths of the world, as long as your Jetpack lasts.
How Do I Upgrade X?
Personal Inventory: Drop Pods can be found on every planet, and are specifically searchable by building a Signal Booster. Enter the Pod and purchase the additional slot. Each Drop Pod is only usable once.
Keep in mind that there are three different player inventories. The General Inventory can contain both items and tech upgrades. The Technology Inventory can contain only tech upgrades. The Mass Inventory can only contain items, but at Starship-level stack sizes, e.g. 500 elements, or 5 items per slot. While the General Inventory is cheaper to expand at first, if you place too many tech upgrades in there, you are simply limiting your ability to store goods later on. Luckily, you can scrap tech upgrades and rebuild them when you unlock additional Technology Inventory slots.
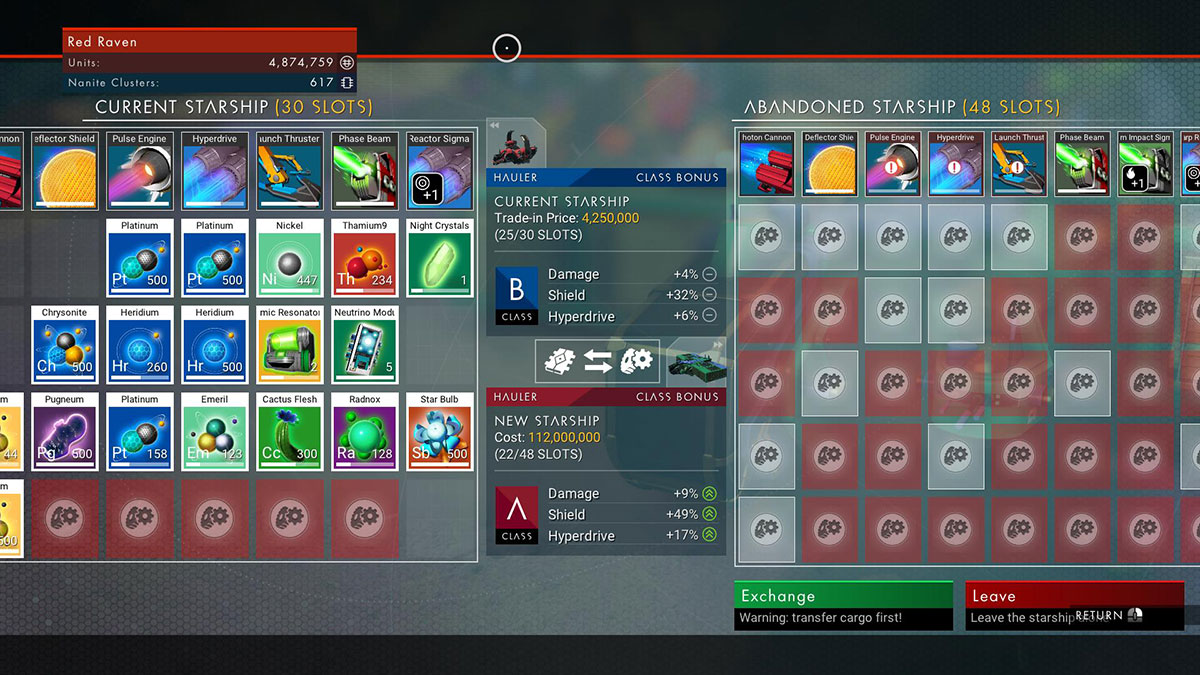
Starships: You do not upgrade Starships – you buy new ones or fix ones you find.
To buy a Starship, you need to go up to one that has landed somewhere, like at a Space Station or Trading Post, talk to the owner, and then choose Buy Starship. At that point, you can see how many inventory slots it has, what techs might already be installed, and so on. If it looks good, and you have the cash to cover the difference in price between your current ride and the new one, it’s yours. The sale is not final until you take off though, so you have some leeway in attempting to move over inventory that might not have fit, or that you forgot to move in the first place.
Note: you do not get a cash refund for buying a lower-priced ship, so don’t bother.
Quite the upgrade.
The alternative method is to find a crashed Starship on a planet and then claim it. This method can allow you to significantly leap-frog any sort of Starship progression, insofar as you can find and claim a 48-slot Starship way before you would ever have enough Units to purchase one outright. The catch is that crashed Starships have broken inventory slots that can only be repaired via increasingly higher numbers of Units; the first slot might cost 33k to fix, but ten slots later the cost will exceed 1.5 million. The result ends up about the same, e.g. it costs X amount to fix everything, but this nevertheless allows you to “upgrade” your ship as money allows rather than needing a bulk purchase.
Finding crashed ships in the first place can be tricky though, as the “traditional” method involves discovering Communication Towers, solving a logic puzzle, and hoping it leads to a crashed ship. Alternatively… just fly around a planet and spam the 1 key, which is basically “target nearest ship.” While you will sometimes tag NPC ships flying around, especially near Trading Posts, this method otherwise allows you to comb a rather huge portion of the planet’s surface while flying around. If something pops up on your radar, fly down and take a peek.
Multi-Tool: Similar to Starships, you only ever find new ones.

Just from talking to a guy.
While you can get new Multi-Tools from Monolith or creature interactions, the more common method is simply finding them out in the world in display cases. Curiously, these display cases still require you to “purchase” the new Multi-Tool, even when it doesn’t make a whole lot of sense.
How Do I Unlock Y?
AtlasPass v1: Follow the story and it will unlock for you.
AtlasPass v2/v3: Same as above, but you’ll need some achievements.
Farms: It’s the last in a series of quest-chains related to base-building.
Exocraft: It’s one of the first in a series of quest-chains related to base-building.
Blueprints: there are basically three methods. First, randomly as interaction rewards, from talking to people or Monoliths or crashed ships. Second, as rewards for certain Missions. Lastly, bought from Tech traders by using Nanoclusters – each Star Base has a slightly different list that focuses on Starships, Multi-Tools, or Exosuits.
Technically, there is a fourth method, which is via questing. Unlocking specific farming crops requires completing quests from the Farming Specialist in your base, for example. There are also some specific blueprints tied to the Atlas questline and achievements therein, just like with the AtlasPass v1.
What’s the Best Way to Get Units?
Sell things. That’s… basically it.
In the very early game, pretty much your first cash-crop, so to speak, is going to be mining and selling Emeril. You can sell pretty much anything, but Emeril goes for 200-300 Units apiece, is easy to find on many planets (mineral around sinkholes), and isn’t used for pretty much anything else. You can do the same thing with Gold later on, but Gold is used in a few recipes and is usually found on more hostile planets.
Also in the early game, go ahead and sell any weird items you might pick up. Neutrino Controllers, Gek Charms, whatever. While they have functions later in the game – from recipes to increasing Faction reputation – you will find plenty in your travels, and it’s not worth the precious inventory space when you’re slumming around with less than 20 slots.
Later on, you have more options and a few more considerations. Keep in mind though, that whenever you sell something on the market, you will get a worse price the next time you leave the screen. So when selling, do so in bulk.
Missions: these are the Radiant-style random quests you can pick up from the Mission NPC on every Star Base. Each time you successfully complete a Mission, you get faction reputation and the stated reward. If the reward is a Blueprint you already own, you’ll get ~88k Units instead. The other items you receive are a bit esoteric and usually vendor trash, but sometimes can be worth a surprising amount of Units.

Almost doubled my Units right there.
No matter what method you end up doing, I recommend filling your Log with Missions at each Star Base you encounter. Many of them can overlap, such that you can fulfill several at once from the same activity (e.g. killing Sentinels, etc), and you can turn in successful Missions at any Mission NPC. Plus, as you move up the reputation ranks, the standard Mission starts awarding 250k Units by itself and the items can be worth several million.
Farming: This is pretty much the ultimate source of Units in the game. The idea is build a base, plant some crops, harvest said crops, and then turn the material into more expensive things that you then sell. Example:
- 100 Frost Crystal + 200 Solarium = Heat Capacitor.
- 100 Cactus Flesh + 200 Star Bulb = Poly Fiber
- Heat Capacitor + Poly Fiber = Circuit Board
- Sell Circuit Board for 1 million+ Units apiece.
If you’re looking for a more in-depth guide, see this Reddit thread. Circuit Boards aren’t the priciest item you can create, or the easiest for that matter, but that’s the basic idea.
Trading: If you have a lot of starting capital, a LOT of free inventory space, an Economy Scanner, and plenty of Warp Cells, you can make some money buying vendor trash from one system at a discount and selling to another at a profit.
Next time you’re at a Trade terminal, look at what items are for sale. At the top of the list are likely some random items with a little green Unit symbol and the text that they are -X% cheaper than the market average. These items have tool tips which then tell you which systems need them more, e.g. will sell for over the market average price. So, buy as many as your Starship will hold, fly over to the target system, and sell them all. Then at this new system, buy the next set of goods, and sell at the next system. Wash, rinse, repeat.
Scanning: this is more of a side-hustle than anything else, but Units are Units. Basically, each time you touch down on a new planet, go ahead and scan as many plants and animals as possible.
With zero upgrades, you only get about 200ish Units for each discovery. With two Scanning upgrades though, suddenly each new plant will give you 20k and animals will sometimes break 100k apiece. I have as yet to find the third upgrade for either Scanner, but I’m looking forward to the boost in income from doing something I was going to do anyway.
Miscellaneous Tips
Gathering Kelp: While you can grow or purchase pretty much anything you might need for crafting purposes, the exception are Kelp Pods. For these, you need gather them manually, and they only exist on planets with water.
The best way I have found to gather them is using a Nomad, aka hoverbike:

As pictured, drive over the water on the Nomad and use it’s mining laser to collect the Kelp. This method is significantly faster than trying to use the Roamer to drive along the bottom, and much better than the default method of actually swimming around.
Quick & Dirty Guide to Fallout 4
Just now picking up Fallout 4? I envy you.
Here is all the spoiler-free info I wish I had before I started playing.
The Baseline SPECIAL
If you are new to the series or just want a character build that works, I consider this the baseline:

TL;DR
The leftover points can be put wherever, but you’ll probably want to get Endurance to at least 3.
Why is this the best? Simple: it unlocks the largest amount of the best Perks in Fallout 4.
Strength – 3
Unlocks Armorer, the first rank of which will let you squeeze out some extra mileage from whatever armor you manage to loot; Armorer also becomes important if you decide to go the Power Armor route. The rest of the Strength tree is useless for anyone but melee character builds and can thus be ignored. Note, however, that Strength impacts your Carrying Capacity.
Luckily, Companions are easy to come by and can carry ~200 lbs of wasteland junk.
Perception – 4
Unlocks both Rifleman and Locksmith. Rifleman is probably one of the more absurd Perks in Fallout 4 simply because it increases the damage of pretty much all the weapons in the game: sniper rifles, shotguns, laser muskets, etc. Meanwhile, Locksmith will, of course, allow you to pick locks. Two things of note though: bobby pins are pretty common (no reason to take Rank 4), and you can recruit a companion that can unlock Master-level locks. As in, if you take that companion, you won’t need Locksmith at all. You’ll miss out on the XP and other companion banter however.
As an aside, Perception governs VATS accuracy, so you might want to dump some extra points in if you end up using VATS a lot.
Endurance – 1
Basically, there aren’t really any good Perks in this tree other than Toughness, which only needs Endurance 1 anyway. You should be able to easily reach your health regen needs via farming, resting, and so on.
Optional: Endurance 3 will unlock Life Giver, the third rank of which grants passive regeneration at level 16. Since you’ll probably want Endurance to be higher than 1 anyway just so you won’t be one-shot by grenades and such, this isn’t much to ask.
Charisma – 6
This is technically optional, but Charisma 6 unlocks Local Leader. The first rank of Local Leader makes it so that all of your Settlement Workbenches becomes shared stashes (for components only). Basically, if you want to engage with the Settlement minigame with any kind of seriousness, you’re going to need this Perk. Charisma also improves prices when buying/selling stuff with vendors by about 5% per point.
Optional: Charisma 1, if you are fine either Fast Traveling all the time, or otherwise don’t plan on doing much with Settlements. Just note that Charisma impacts your dialog success rates. You can generally cheese these with chems and reloading saves though.
Intelligence – 6
This is enough to unlock Science, Scrapper, and Gun Nut, e.g. the crafting trifecta. While it is possible to just get Gun Nut at Intelligence 3, you will be hurting for screws, a crafting component that is otherwise sparse in the wasteland; the first rank of Scrapper will get you screws for days by salvaging crappy pipe guns that drop from 99% of the NPCs you kill. Meanwhile, the first rank of Science will unlock a plethora of both gun mods and Settlement options.
Agility – 3
It’s enough to unlock Sneak. Keep in mind though, that Sneak is less useful in Fallout 4 than in games past, because non-aware hostile mobs do not show up on the compass ribbon. You can certainly hear them talking to themselves, but the likelihood of you actually using Sneak successfully indoors (for the delicious Sneak Attack Criticals) is pretty small. Outdoors, Sneak is almost superfluous as you can generally just crouch and snipe from afar.
Luck – 2
It has been said that Luck is one of the more powerful stats in Fallout 4, and that may well be true. However, unless you are willing to commit a lot of stat points, two is enough to unlock the first rank of Scrounger, which will pretty much solve your ammo problems for good. Plus, sell your unneeded ammo for cash.
Optional: Luck 8 for Grim Reaper’s Sprint or Luck 9 for Four Leaf Clover. Grim Reaper’s Sprint has always been pretty powerful in the other Fallouts, and it’s technically possible for you to unlock it at level 2, if you wish. Going all the way to Luck 9 will allow you to leverage a pretty absurd amount of Perk synergy: Four Leaf Clover procs will give you an auto-critical, which you can bank for whenever with Critical Banker, which do an impressively high amount of damage with Better Criticals, and will likely kill your target and possibly proc a full AP bar via Grim Reaper’s Sprint, letting you pump out more bullets and restart the process with Four Leaf Clover.
Advanced Tips
Been around the Wasteland a bit, eh? Okay, here are my observations from playing the game:
Free Stat Points
The stat Bobbleheads are back again, and picking them up increases the relevant stat by 1 point. In other words, if you have a specific character build you are going for, you can budget your SPECIAL stats accordingly. For example, my baseline recommendation has Charisma set to 6 for Local Leader. If you don’t anticipate using Local Leader until after you find the Charisma Bobblehead, you can set Charisma to 5 and use that extra stat point elsewhere.
Also, there is a “You’re SPECIAL” book laying on the floor in your former house in Sanctuary. Pick it up and you’ll get a free stat point you can place wherever you want.
Advanced Stat/Perk Planning
The Baseline I recommended originally simply gives you complete access to most of the best Perks right away. If you instead follow the Bobblehead route (e.g. relying on the free stat to meet requirements) though, you can do some goofy things… like this:

Almost makes me want to reroll right now…
Or maybe not put it all in Luck, but split it into Perception and Agility. Or whatever.
In fact, you can go even further down the optimization route with the understanding that not only will there be “dead levels” in there where your best Perk choice will just be leveling up a stat, but also that you don’t necessarily even need a particular Perk until later in the game. For example, Science won’t be used for much until you start routinely encountering enemies with laser weapons. You won’t want to unlock Local Leader until you have a decent stockpile built up, so maybe use Charisma as a dump stat until the end of your 20s.
Collect that Junk… Intelligently
Nearly every piece of lootable debris can be broken down into useful crafting components, which will be important if you engage in the Settlements system at all. There are two tricks here that you should pay attention to though.
The first is “Tag to Search.” If you open your Pip-Boy and browse over to the Junk tab, one of the options should be Component View. This will show all the components your currently held Junk will break down into. If you notice any with Aluminum, Screws, Leather, Oil, Adhesive, Copper, or whatever you might be low on, go ahead and tag those. Within a few hours, you’ll start to have a Pavlovian response to Office Desk fans, Lighters, and similar items.
The second tip is to not just rely on scavenged items in the world. Vegetable Starch is a Cooking recipe that makes 5 Adhesive per batch. Cutting Fluid is a Chem Station recipe for Oil. But also do not discount your everyday friendly shop keepers in Diamond City and beyond:

Mouth literally watering.
I used to have a Leather problem. Then I realized that I can get Moe to part with 6 Baseball Gloves for 5 caps apiece. That’s 18 pieces of Leather for 30 caps. The other vendors are not as lucrative in say, Oil or Aluminum, but it certainly beats revisiting already-cleared factories scrounging the floor for cans or spending an insane amount of caps for “shipments of X” at several thousand caps apiece. Do a little browsing each time you offload your raider loot, and it will all add up.
Mod Shuffling
After doing some weapon upgrading, you might notice your inventory filling with random-seeming weapon mods. What is actually going on here is that whenever you replace one mod with another, the old mod is not destroyed, but removed and stored. You can take advantage of this fact to both access better mods than you may be able to craft, or even use it to bypass the need for Gun Nut entirely (although you’ll want it for other reasons).
If you come across a weapon with a mod you want – say, a Silencer – head over to the crafting table and act like you are creating a new mod for that slot. In fact, that is exactly what you are doing: replacing the current mod with hopefully the “None” or “Standard” version. Voila! Now you have a Silencer despite not having Gun Nut maxed out. Just keep in mind that mods are base-weapon specific. A Silencer for a Pipe Gun is different than a Silencer for a rifle.
Keep a Charisma Suit Handy
Caps are more important in Fallout 4 than they have ever been, and Charisma is your ticket to getting more of them. Before offloading your latest haul of raider loot, equip your Charisma Suit, e.g. all the items with bonuses to Charisma. It should not take you too long to find clothes with at least +2 Charisma, and you can stack two additional points from both Sunglasses and Pompadour wig. Each point of Charisma improves prices by about 5%, which absolutely adds up over the course of the game.
Speaking of Charisma, vendors, and caps…
Better Living Through Grape Mentats
One of the most insane chems in Fallout 4, Grape Mentats are a craftable variation on the standard Mentats that provides you with +5 Charisma and a 10% buying/selling bonus from vendors. Whether you stroll into Diamond City laden with raider loot or are eyeing a vendor’s Legendary equipment selection, you will want to take some Grape Mentats.
How much of a difference does it make? This much:
- At Charisma 9: item costs 2331 caps.
- As above + Grape Mentats: item costs 1366 caps.
- As above + Cap Collector perk: item costs 1301 caps.
As you can see, Grape Mentats “stack” with Cap Collector, but not very well. Which is fine, because Grape Mentats are easy to make and have no prerequisites. The ingredients are: Hubflower x2, Mentats x1, Whiskey x1. Given that the latter two are everywhere in the game (including on vendors), the only difficult part is actually getting Hubflowers.
Luckily for you, I have found a few good locations:
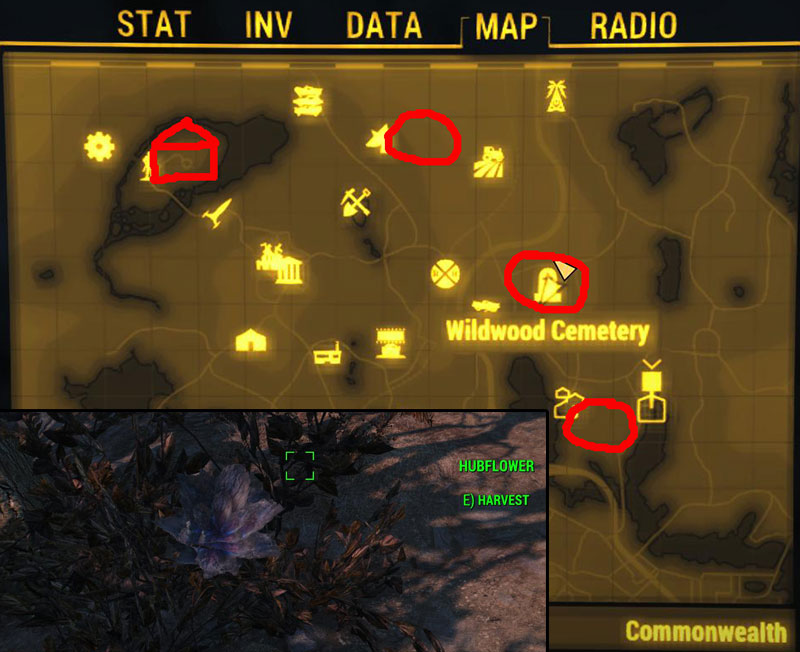
You can never have enough.
The circled areas generally have 4+ Hubflower nodes in a small area. Said nodes do respawn eventually, on an unknown timetable.
Avoid the Designer Perk Traps
Certain Perks have always been hit-or-miss in the Fallout series (Nerd Rage! is still awful), but there are some that are worse than others this time around specifically due to decisions the designers have made.
For example, rethink your desire for a Sneak build. Sneak Attack Criticals are still in the game, but achieving them is incredibly more difficult this time around, and almost entirely superfluous. Non-aware enemies no longer appear on compass ribbon, so you almost have to make some noise to even know enemies are present. Sneak also requires heavy investment before you can move faster than an agonizing crawl, and you are likely to be instantly spotted indoors anyway. Making matters even worse, Fallout 4 has Legendary item prefixes that will double the damage of the weapon when used on enemies with full health, and another that adds an additional projectile. Why run around slow all the time when you can have a gun that basically gives you Sneak Attack Criticals by default?
Another subtle trap is Nuclear Physicist in the Intelligence tree. Take it if you want the Radiation weapon damage boost, but do not take it for the Fusion Core boost. Getting 25%/50%/100% longer duration on Fusion Cores sounds like something you’d want for a Power Armor build… right up until you realize that Fusion Cores can easily be bought from damn near every vendor in the Commonwealth. With Grape Mentats, I can buy Fusion Cores for 240 caps. So at Rank 3 of Nuclear Physicist (which requires level 26), I’ve spent three Perks all so I can… buy Fusion Cores for 120 caps. Rank 2 Cap Collector will get you infinitely more caps for two Perk points in comparison.
Other traps include Sniper and Penetrator in the Perception tree. While they perform exactly how they are described, the point is that they sound cool, but aren’t actually that useful. For example, if you are in a position to use a sniper rifle, you will typically be much better off waiting for your target to peek their head over cover and shoot them outside of VATS anyway.
Power Armor Decision
After one of the first quests in the game, you are given your very own suit of Power Armor. Deciding on whether or not you are going to try using it full-time is one of the more important decisions you can make. And, yes, you can use Power Armor all the time throughout the entire game. The only limiting factor is Fusion Cores, which aren’t actually that limiting at all in practice. But the question, again, is whether you want to use Power Armor all the time.

I’m tired of your shit, Preston.
The benefits are pretty clear: an insane amount of armor right off the bat, allowing you to tank damage and most non-water sources of radiation. Additionally, Power Armor automatically sets your Strength to 11 with a corresponding increase to Carrying Capacity. The individual pieces of Power Armor do take damage and need repair, but it generally only takes a few pieces of steel to get them back up and running again. From a mechanics standpoint, Power Armor can’t really be beat.
…unless you don’t like skipping most of the other gameplay.
While in Power Armor, you do not receive any of the benefits of other armor you might be wearing. For example, I came across a piece of Legendary leg armor that increases my movement speed by 10%. I bought a Legendary arm piece that reduces damage taken by Human by 15%. Incidentally, this is why I say you’ll want to make the Power Armor decision early: to prevent you from spending 2000+ caps on gear instead of Fusion Cores. Running around in Power Armor all the time basically means all those items – and any you might pick up along the way – are functionally useless.
The more damning for me personally though, is simply how Power Armor feels while playing. You walk slower, all the time. Power Armor doesn’t impact your Sneaking ability from what I can tell, but you will certainly hear your own mechanical footsteps all the time. A large part of your screen will be taken up by the Power Armor UI, even if you aren’t wearing the helmet piece. And if you do wear the helmet piece, 100% of your character’s spoken dialog will be filtered through the face mask. At first, it’s amusing, but you lose a lot of the voice-acting nuances and emotion this way IMO.
It’s a tough decision, so take your time. It’s not the end of the world if you change your mind – you can command your companions to don the Power Armor in your stead (assuming they don’t already have their own suit) – but there is no real reason to “level up” both paths.
The PlanetSide 2 Quickstart Guide
So you went and downloaded PlanetSide 2. Now what?
The following set of tips and tweaks that will hopefully make your beginning experience that much smoother in PlanetSide 2 (hereafter Ps2).
Why Bother in the First Place?
To be completely honest, the new player experience in Ps2 is awful. Right after character creation, you will be drop-podded down into the thickest fighting on the map as a Light Assault class, and probably killed in seconds before you even had the chance to look at the keybindings. You will empty a clip into the first enemy you see, and they will turn around and kill you with two bullets. Your HUD will be filled with icons that may as well be Egyptian hieroglyphics, there will be cooldowns and resources and cash shop items and oh my god get me out of here. The entire purpose of this quickstart guide is to soften the blow, but you are still going to be punched in the face. So why bother, especially with this F2P game?
Because this happens:
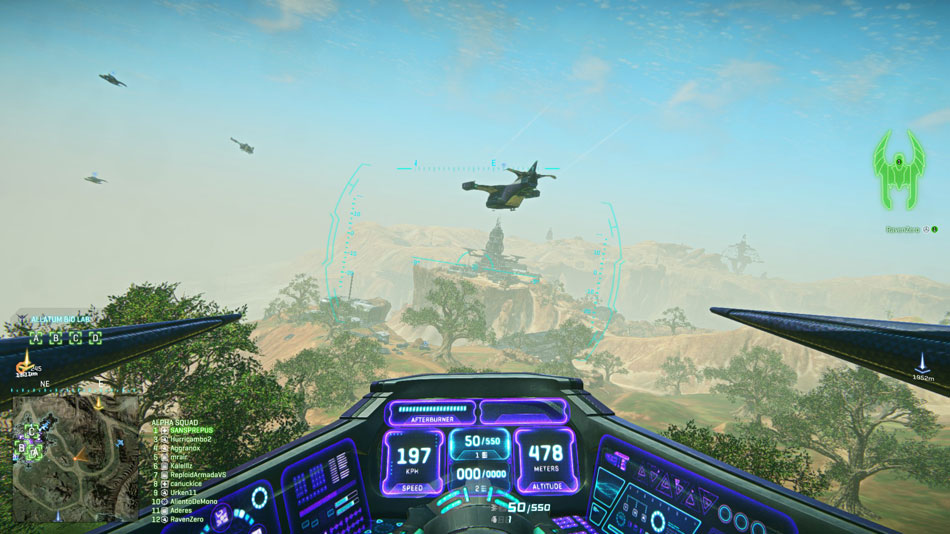
Escorting the 15-man Galaxy so it can break a stalemate.
And this happens:

Moments before your squad’s own deployment.
Oh, and this was yesterday:
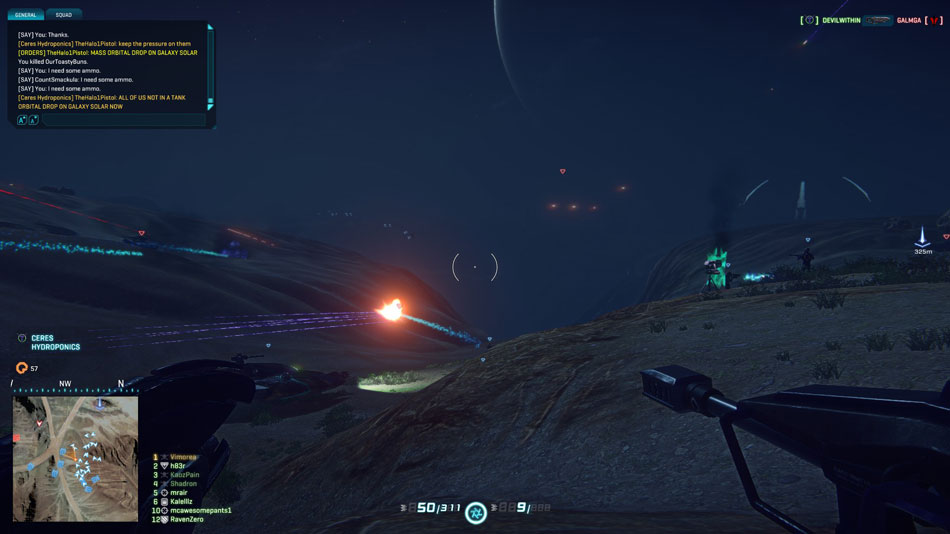
Still frames doesn’t do the firefight justice.
I am not a part of a Guild/Outfit, I did not schedule my play session, I know none of the people I was playing with, and I likely won’t even see them again. Many people will say that the “correct” way to play Ps2 will be a part of an organized group of friends. That might be more fun, but it can be plenty fun logging in solo. Will you experience the sort of uniform fun that comes from playing a few maps of Battlefield 3? Not all the time, no. But I can say you will never get a moment in BF3 when you are flying in formation with 20+ other airplanes, raining havoc upon your foes. Or having the ability to create a tank on a whim, instead of waiting for a respawn.
Suffice it to say, when Ps2 is good, it’s really good. When it’s not, it’s not. This guide is about getting more of the former, and less of the latter.
Finding the Action
So you’ve just been killed within 30 seconds of starting the game for the first time, or maybe you have just been wandering around, lost and confused. Where is all the action taking place?
First, hit either Esc or M to bring up your main menu:

First thing I do whenever I log on.
- Click the Social button.
- Click the Join Squad button next to a squad you think will work for you.
- Click the Map button.
- In the lower-left part of the map, click Squad Leader and then Deploy.
If you follow the steps, you will be drop-podded near where the squad leader is located, which will typically be in the middle of a war-zone. From there, find some friendlies and follow them around, occasionally shooting bad guys. There is no guarantee that your squad knows what it is doing, but the idea is to get yourself acclimated to this particular FPS flow, with base layouts, how firefights play out, and so on.
When you die – and you will, many, many times – you will see a screen like this:

Get used to it.
First thing I’d recommend, if you haven’t already, is change your class: click on either the Combat Medic or Engineer. For the Deployment locations, they are generally listed in the distance from where you were killed. You will not always be able to respawn near where you were fighting; sometimes your spawn location will be taken over (if a base) or otherwise destroyed (Sunderer). A Sunderer is a troop carrier vehicle that can deploy into a mobile spawn location, and will be your best friend in any base assault.
It is also worth noting that the little symbols on the right end of the bar correspond to what kind of consoles are located there. Every base will have a Pistol icon (Infantry console), but whether there are others depends on the base layout. For example, if I want to spawn somewhere where I can create an airplane, I’ll need to choose one of the bottom two.
What Do I Do?
The general idea is to take over every base on the map. Each area on the map will have one or more types of bases, ranging from small outposts to those huge Biodomes you can see from miles away. Taking over bases involves putting warm bodies next to the capture nodes for the base/region and waiting for a bar to fill up. In larger bases, there will be generators that power shields that keep your faction’s vehicles at bay, along with shields that protect a 2nd generator keeping the enemy’s spawn location active.
It sounds complicated, and to be honest, I believe it is overly complicated for no reason. If you familiarize yourself with the various icons though, it becomes much easier to follow.

Not pictured: 167 other stupid icons.
Basically, if you see the Up Arrow icon in someone else’s colors, go there, and hang out near the weird data thing pictured in the lower right. You can see your progress towards capturing this particular node in the center top of your screen. Once captured, you should be able to start spawning near this location. If you see an [A] icon instead, that means… well, do the exact same thing. The key difference is that capturing an [A] node is just as quick as before, but your faction won’t actually own that point on the map until that second bar in the center-left part of your screen fills up. With bigger bases, you will also need to cap [B] and [C] if they exist. I don’t know for sure whether the map only caps if there are people hanging out near a capture point, but hang out anyway; being near a facility being capped gives you a huge XP bonus (enough for +4 Certs for a Biodome, in fact).
Not pictured above are the various generator icons, the respawn generator icon for large facilities, and other things. While you do want to help blow generators up (go up to them and hold E to destabilize them), it is not something I would focus on as a brand new player. You are likely going to be of much more use helping your team cap nodes than bringing down the shields so your tank column can set up shop outside the enemy respawn location.
Teleporters are probably useful. Use them. Indeed, if you are assaulting a Biodome, if you capture the outlying bases (they will have the Up Arrow symbol near them) then you gain access to a teleporter that sends you to a shielded room in the heart of the Biodome. “Shielded” as in you can shoot enemies out of the room, but they cannot shoot you inside. Biodomes sieges in general are good sources of close-quarters killing/farming XP.
There are three types of consoles are indicated by their symbol: Pistols (Infantry), Tanks (Vehicles), and Airplanes (Airplanes) Go up and press E to use them. You can restock ammo infinitely at the Infantry consoles, along with changing your class. Vehicle and Airplane consoles are pretty straightforward, and you should never feel like you don’t know enough about the vehicle in question to build one and drive it around. Each player has their own individual Resource pools from which to build vehicles, it fills up by X amount every 5 minutes automatically, and it has a cap of 750 points. Ergo, if you have 750 Mechanized Resources and aren’t building a tank, then those Resources are going to waste.
Speaking of wasted points, here is another Pro Tip: you spend Infantry Resources to get more grenades (among other things).

Yet another thing that should have been in a tutorial.
- If you have more than 100 Infantry Resources, go ahead and stock up on (explosive) consumables.
- Pick the class with the consumable (grenades are universal), then click a Loadout.
- Click on Grenade or Utility, depending on what you have.
- Make sure the appropriate item is selected, then click Resupply.
The short version is that things like grenades are considered one-use consumables; you can only carry one grenade at a time (unless you unlock more), but you might only start with 5 total across all your classes. Since the only other use of Infantry Resources is busting out a MAX unit, anytime you have more than ~100 points, spend them to stock up on your consumables (which includes medpacks, proximity mines, C-4, and anything else you’ve unlocked). If you let your Infantry Resources cap out at 750, you are seriously hurting yourself later should you get into a situation that calls for some supplemental utility.
Classes
As I mentioned before, I am recommending the Combat Medic or Engineer for new players. Why? Not only are both useful in a group setting, but you are also much more self-sufficient as either class than you would be by yourself. And until you get a handle on what is going on, you are probably going to find yourself lost and alone pretty often. Here is a quick rundown:
- Infiltrator – Press F to cloak, but you cannot fire or be healed. Class is a bit weak until you unlock better sniper rifles. Hack enemy consoles by pressing E.
- Light Assault – Double-tap or hold Spacebar for jetpack. If you are ever fighting somewhere that you can get to without a jetpack, you are doing it wrong.
- Combat Medic – Press F for AoE heal (including yourself). Use your heal gun on people; revive the dead. When you revive someone, finish healing them.
- Engineer – Drop ammo boxes, drop a turret that you can man. Repair everything, especially friendly MAX units.
- Heavy Assault – Press F for an extra shield. Only class with default ability to hurt vehicles via rocket launcher.
- MAX – Press F to run fast for a few seconds. Left-click left gun, right-click right gun. Swap anti-tank weapon for anti-air depending on fight.
Personally, I play Engineer 90% of the time in-game. Running out of ammo is a pretty major concern in Ps2, and few people run around as Engineers despite it being an easy source of XP. Each time someone gets resupplied, you get 10xp, or 10% of a kill. Plus, after you take a base, there is typically a lot of repairing that needs to be done to get the AA guns and consoles back online.
Miscellaneous Tips
- There is friendly fire in this game.
- You can move your drop pod slightly with WASD. Aim for rooftops.
- Press Q all the time. It will help you spot enemies you didn’t actually see. Plus, if someone kills them you get free Spotting XP.
- The secondary fire (press B) of the Engineer Turret is another ammo pack. Once you buy some other Utility item, drop your “regular” ammo packs and get the benefits of having both.
- You can swap out a MAX’s weapon loadout at any Infantry console without losing the MAX itself. If you switch classes though, the MAX goes on cooldown.
- Drop an ammo pack near Sunderers, get massive amounts of Resupply XP from people running back to change classes/get more ammo.
- Normal guns can damage light aircraft (Scythes, etc), so shoot at them to encourage them to go somewhere else. Larger aircraft are immune, though.
Certifications, aka Certs
All the XP you are earning is basically a means to get additional Cert points to unlock new weapons, gear, attachments, and… well, everything. The Cert interface is pretty confusing, especially when you start browsing the weapons, but there are some inexpensive items to get you started.
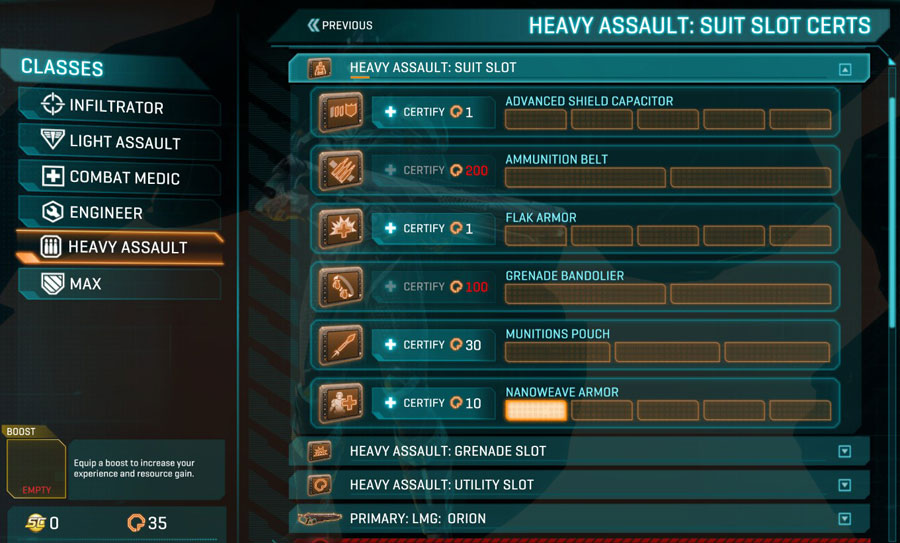
Another UI element that could be cleaned up.
In the screenshot above, we are looking at the Suit Slot of the Heavy Assault class. Note that there are six different options, but you can only equip one of the upgrades under the specific tab at a time. I already have the first rank in Nanoweave Armor, which gives me 10% base health and cost exactly one (1) Cert to purchase; the next rank is pretty inexpensive at 10 Certs as well. The different classes usually have different options, although sometimes an unlock is class-wide, such as Medpacks and even some weapons like shotguns. If you unlock something new, such as a gun attachment or the aforementioned Nanoweave Armor, you have to specifically equip it in a Loadout before it takes effect.
The above process is the same for vehicle Certs.
Are there must-have Certs, or always-avoid Certs? Probably. I recommend getting the Nanoweave Armor upgrade on all your classes since it is 1 Cert a pop, for example. There are some similarly cheap upgrades for the healing/repair guns. I might also recommend unlocking Medpacks since they get unlocked for all classes with a single purchase (don’t forget to equip them and buy more with Infantry Resources!). From there is starts to hugely depend on what class you have found yourself gravitating towards. Since I enjoy the Engineer the most, I went ahead and bought him some Proximity Mines. Just yesterday I purchased C-4 for my Light Assault as an investment in future shenanigans.
When it comes to weapons, I have been playing it pretty slow and avoiding spending any Certs. The majority of the guns cost a whopping 1000 Certs, which is probably 10-20 hours of straight gaming assuming you know what you are doing; no matter how cool the weapon, you are likely go to get a lot more mileage out of class upgrades than weapons, especially since the former cannot be purchased with Station Cash (only boosts). Once you do find a weapon you enjoy using though, I recommend investing in a better scope and horizontal stabilizer.
By the way, you will passively earn roughly ~12 Certs overnight. It is not a whole lot, and you stop earning them after 48 hours of not logging on, but there are some decent early ranks you can pick up with that amount.
How Much Will This Really Cost Me?
It’s Free to Play, bro.
…for the most part. We all know F2P games are not always as free as they appear, but Ps2 is a lot better than any I seen. The 1000 Cert floor for most weapons takes them off the table for rational people, and while all of them being “sidegrades” is probably a bit too charitable, I am extremely satisfied with the default guns (as Vanu… your faction mileage may vary).
The only point at which I feel at a decided disadvantage is when it comes to the Heavy Assault rocket launchers and the light aircraft rocket pods. The default dumb-fire rocket launcher for the Heavy deals the most damage out of the available options, but the AA rocket launcher can change a “getting farmed in respawn location by aircraft” engagement into an enemy rout. On the flip side, flying a light aircraft with the A2G rocket pods can turn you into a jealous Greek god, meting out judgment upon the lowly worms in your warpath.
There are ways around these limitations – switch to a MAX with an AA gun if aircraft are near, and… just use your machine gun or not fly – but these were definite F2P thumbscrews for me. I have heard similar things regarding High-Explosive rounds for tanks vs the default ammo, but I have not used ground vehicles all that much when I could be getting my Greek on.
Important note: Cert/Station Cash unlocks are currently character-specific. In other words, if you dropped some real cash unlocking rocket pods for the Scythe (Vanu faction), you cannot use those rocket pods on another Vanu character on another server, or different faction on the same server. This is slated to change in future, i.e. unlocks becoming account-wide, but there was no timeline given so who knows when that will go into affect. Such a change will apparently be retroactive, but in the meantime, it is a good idea to stick to a faction/character you think you can live with.
Conclusion
If all the negative press regarding the new player experience has made you leery of downloading Ps2… well, it’s true. The new player experience sucks. However! From what I have been reading, the developers are listening to and implementing feedback at a pretty quick clip. Plus, hopefully this Quickstart guide will ease your passing into what I have found to be a very entertaining FPS.
Honestly, after being able to create vehicles on a whim, I don’t know if I will be able to go back to the Battlefield 3 model of camping the helicopter pad for a chance at 3 minutes of fun. There are still timers in Ps2 to prevent light aircraft spam, but between using Certs to reduce the timer or simply creating a tank to wait down the clock, I am never at a lack for mayhem to get into.
The GW2 Quickstart Guide
So you bought Guild Wars 2 and downloaded it. Now what?
The following is a collection of tips and tweaks that will hopefully make your beginning experience that much smoother in Guild Wars 2. For the purposes of this guide, I am going to assume you already made it through character creation.
Improving the Framerate
Even if you have a super-computer, chances are good that you may only have 40 fps or less if you start out with everything at max settings. Two quick changes in the graphics settings gained me +15-20 fps, and will hopefully work likewise for you:

And you won’t feel a thing.
In text form:
- Reflections: All –> Terrain & Sky (+10 fps)
- Shadows: Ultra –> High (+5 fps)
I am not sure what possesses MMO companies to add graphical features that require computers from the future in order to run properly, but once you tune those two options down a step, you should gain around 15 fps with zero apparent loss of graphical fidelity. Every computer is different, of course, so your own gains may be more or less. Screwing around with some of the other settings resulted in the following for me:
- Shadows: High –> Medium (+5 fps) –> Low (+10 fps)
- Shaders: High –> Medium (+10 fps)
- Textures: High –> Medium (+10 fps)
Again, those numbers may not be accurate for your machine, or even my own machine for that matter – it could be I was simply in the wrong area for a legitimate test. Regardless, I did notice a reduction in game fidelity (i.e. graphics took a hit) when I started bumping that second set of numbers down, so if you like your shiny games to be shiny, stick with the slight Reflections/Shadows tweak.
If you find additional tweaks on your own, feel free to leave it in the comments below.
Improving the Controls
On the default option screen, the two biggest things are turning on Autoloot and increasing the Camera Rotation speed:

You WILL Dodge to your death many a time.
Turning off “Double-Tap to Evade” is a good idea when you start doing any of the jumping puzzles, and it may be a good idea to turn it off permanently anyway. I have not quite worked out what button to comfortably assign Dodge to though, as it has to be one in which you can reliably hit while navigating around with WASD. Right now, I have it assigned to V but may move it to C later (or see if my side mouse buttons will do the job).
Speaking of WASD, take the time now to disable keyboard-turning, you noob:

MMO companies should really disable this shit by default.
I also recommend moving “Interact” from F –> E, but that is just me. The idea behind it is that with Autoloot turned on, what you can do is run through that pile of bodies created by a nearby Dynamic Event and just spam the E key to pick up all the loot.
Improving Quality of Life
At this point, I am going assume you made it through your race’s tutorial, e.g. level 1-2.
One of the first things I recommend is to save up 72 copper and purchase the three basic types of gathering tools:

Start this early, and you’ll thank me later.
If you spot a vendor immediately upon zoning in from the tutorial, you will likely only have ~50 copper or so. Go ahead and purchase the Copper Logging Axe and one of the other two; the herbs are going to be more common, but the ore nodes are going to be more immediately useful for crafting. Otherwise, you can wait until after you finish your first Renown quest “hub” or so to get enough cash to buy them at the same time.
Once the gathering tools are in your inventory, double-click them to “equip” them and you will be ready to go. Each node you tap gives you the equivalent of ~3 or so mob kills and contributes to your Daily Quest achievement score (which itself nets extra XP and rewards).
Incidentally, you might have noticed the Salvage Kits in the vendor window above, or may have received such a kit from completing story quests. Salvage Kits basically “disenchant” old gear into crafting material. I do not recommend buying some right at the beginning of the game like with the gathering tools, especially since you will get several packs of them free from story quests.
If you find yourself lacking in funds, check your mailbox. Each Renown Heart you complete will get you a follow-up letter in your mailbox, which will contain some cash too:

This early copper will be HUGELY useful in the early game.
Between gathering and Dynamic Events, chances are that your bags are going to get full in no time. The good news is that there is an app a button for that:

Hands down the best feature in GW2.
Open your Inventory (I), click the cog, select Deposit All Collectibles. Bam! All your crafting materials (etc) automatically get whisked away to the Collectibles tab of your bank. Want to use those items for Crafting? Any Crafting table will give you access to your Bank and Collectibles tabs, which lets you drop the needed item into your normal bag to use it for crafting purposes. Your bank and Collectibles tabs are Account-wide. There is literally no reason to not use that button, but you can deposit individual items by right-clicking and selecting Deposit from the menu if you wish.
If you find yourself not getting a healthy selection of weapons from drops, check out a weapon vendor. While such vendors can be found sparingly out in the world, it is likely the easiest to seek one out in your race’s capital city. The entrance to every race’s capital city is usually a portal right behind where you spawned from the tutorial. The main entrance is only meaningful for your first trip there, as every time after that you can simply teleport to a Waypoint inside from anywhere.
The weapon vendor will be a marked as a (tiny) icon with a sword:

Harder to find in some capitals than others.
The significance of these vendors is that you can buy every weapon type from them. While the weapons themselves are of low-quality, and expensive for low-level characters anyway, the point is that it is entirely possible to never run across, say, a pair of pistols on your Thief or a Longbow for your Ranger. Not only can you miss the opportunity to level up those weapon skills until you manage to get a random drop, but some classes are worlds more fun with certain weapons – you have not played a Guardian until you played a Guardian with a Broadsword, or an Elementalist with dual-daggers. So if you find yourself creeping up on 2 whole silver pieces and have not unlocked the majority of your weapon skills, I suggest making a shopping trip in town.
By the way, if you happen across an NPC (or object) in town with a golden boot above their head, talk to him/her/it. You will receive a ~5 minute speed boost to make your shopping/exploring trip that much easier.
Improving Globe Trotting
The last Quickstart tip I have is to help you move about the world. Did you roll a Norn and want to quest with your Sylvari friend? Or maybe you just want to check out the Charr area? It is easier than it looks.
- Press H, to bring up the Hero menu.
- Click on the PvP tab, along the bottom left.
- Click “Enter the Mists.”
- If this is your first time here, go ahead and do these tutorial Hearts.
- This next area is the “lobby” for PvP. Feel free to check out your level 80 abilities.
- Otherwise, run into the gate your should be facing. It should say “Lion’s Arch” when near.
- In this next area, press M for your map. It should look like this:

…almost there…
- Run North across the bridge, the hook around to the West.
- One portal for each starting zone.
- Pro tip: you can tell which starting zone a gate belongs to by the race of its guards.
- Go through one of them, grab the nearby Waypoint, then find your friend.
The good news is that there is a Waypoint right at the cluster of portals, meaning you won’t have to the do the PvP portaling trick again. On the other hand, traveling to a Waypoint clear across the world is fairly pricey for a low-level toon (something like 50+ copper for a level 8) so you may want to save those pennies by taking the “long way.”
As you might surmise, each capital will have a portal that leads straight to that Lion’s Arch cluster of portals. If you know your way around your own capital good enough to figure out where it is, feel free to cut out the PvP zone detour. The benefit of the above outlined path is that it is easier to tell someone to click a button and head North than it likely is shepherding them around the utterly massive capitals.
_____
And that, my friends, is that. Crafting is a bit beyond the scope of a Quickstart Guide, and I am not entirely sure how useful a Renown Heart/Dynamic Event rundown would be in comparison to just running around doing it. In any case, hopefully this post was useful in some way, either to yourself or as something to point a friend towards.
Now if you will excuse me, I’m still trying to figure out which character will be my main.
