The Quick & Dirty Guide to: State of Decay 2
I’m going to assume you have played through the State of Decay 2 tutorial and have a general idea of basic game mechanics. This Quick & Dirty guide is meant to take that baseline knowledge and advance you to the mid-game without needing to waste energy on trial and error.
General Tips
One of the best tips in the game.
- Blood Plague is only contracted when the Infection meter fills up all the way. If you cycle your characters regularly, Blood Plague shouldn’t really ever be a concern.
- Keep an eye on any AI-controlled partners though, as it’s tougher to notice when they take a lot of Infection damage.
- You can Dodge (“C” on PC) in any direction, and can pass through zombie models.
- Dodge backwards through zombie behind you, immediately grapple and execute.
- Dodging forward too early can result in still taking damage.
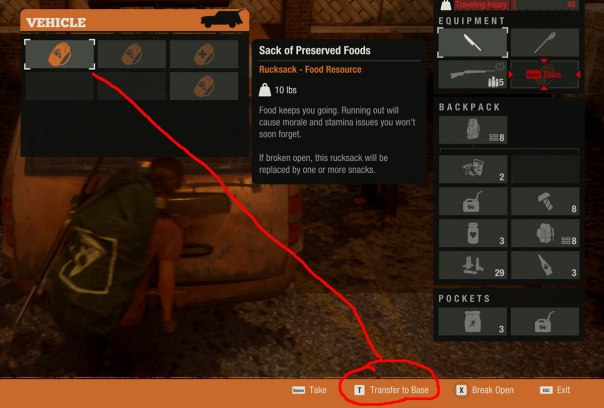
- If you park a vehicle in a base parking spot, you can transfer duffel bags in the trunk by pressing “T.”
- Save duffel bag turn-ins for characters that need the Standing gains.
- Scoped weapons can zoom in with “Z.”
- In single-player Offline mode, Exiting to Main Menu will despawn Freaks in the vicinity.
- Shooting a Bloater in the head will reduce the toxic gas emitted, but the body still acts as a landmine.
- Juggernauts can almost be meleed to death within the duration of one Smoke Grenade.
Base Selection/Planning
There are several different types of bases available, and the exact configurations of them are different between the different maps. Don’t stress too much about picking the perfect base the first time, as you receive a 100% refund of all resources when moving bases. The Facilities themselves will need to be rebuilt, but they are built faster for the first day, post-move.
That said, there are some things to keep in mind:
- A Workshop, Infirmary, and Garden/Hydroponics are pretty much required in every base.
- Each survivor eats 1 Food/day, and generally you’ll need 2 Medicine/day to heal.
- Bases often come with “built-in” Facilities that cannot otherwise be replaced. Make sure you can take advantage of them, else they are wasted slots.
- Dismantling a Facility results in a 100% refund of resources.
- There is no reason to keep certain Large-slot Facilities around once you craft their specific items.
- For example, get rid of Auto Shop after you craft Vehicle Upgrade kits.
- No reason to keep Forge around once you crafted several melee weapons.
- The Staging Area Facility can get extremely lucrative as you upgrade other Facilities – the one in my base “generates” +5 Materials per day by itself.

Pictured: Staging Area pulling its weight.
It is possible to optimize the configuration of your base and Outposts to essentially achieve perfect homeostasis eventually. Don’t spend too much of your time worried about that, however, as it will require looting specific mods and recruiting survivors with good skills. What you should focus on is getting to a point where you can last several days without critically running out of specific resources – having a -2/day deficit of a resource is nothing if you already have 20 of that resource.
Outposts
Don’t worry too much about picking the “perfect one.” There are no special outposts – the list of possible benefits are standardized:
- +1 Food/Fuel/Building Materials/Medicine/Ammo
- +2 Beds
- Base-wide Water (costs 1 Fuel/Day)
- Base-wide Electricity (costs 1 Fuel/Day)
- Morale Bonus
- Morale Bonus + Espresso
- Artillery Strike
In other words, there are no Outposts that give +2 Ammo, or +4 Beds, ect.
Ideally, you will want to have Outposts evenly distributed around the map, rather than bunched up in one part of town. That way, there will be an Outpost nearby at all times, so you can offload non-Duffel Bag loot and/or swap out a tired/injured character.
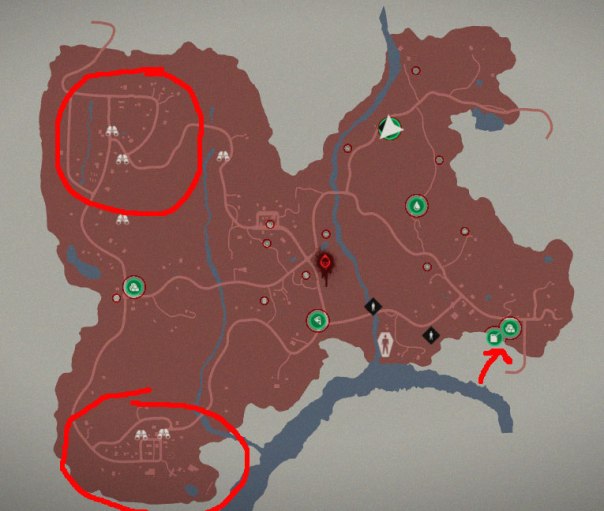
I should really move one of those Outposts into the circled areas.
If you can afford to, having one empty Outpost slot can take your looting game to the next level. As your inventory fills up, claim whatever building you are in as an Outpost and then offload your gear. Then, through the Base screen go ahead and abandon the Outpost. You get 100% of your Influence back when you abandon an Outpost, so you lose nothing by doing this, other than the opportunity cost of not getting +1 whatever.
Survivor Management
The key thing to understand is that not all survivors are worth keeping around. You should absolutely recruit every single person you can, but only because it’s easier to check their Skills/Traits that way. There is no penalty, Morale or otherwise, for Exiling a member, so be sure to do so when necessary (and after stripping them of all gear). You can have a maximum of 10 survivors at your base – nine would be better, if only because you lose the ability to recruit anyone once you have 10.
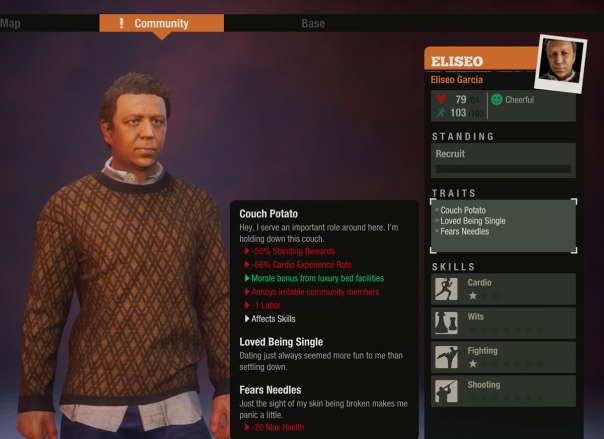
Pictured: someone who won’t long survive the zombie apocalypse.
There are generally three things you want to look for in a survivor.
First, do they have any negative Traits? If they have something like “Lacks Boundaries” (-5 Morale to everyone), then think rather long and hard as to whether they have any other redeeming value.
Second, do they have any Skills without 7 (blank) stars? If so, it means that that particular Skill cannot be upgraded to a specialized version. For example, I had (emphasis on had) a survivor with the Used Car Salesman Trait, which meant that their Mechanics skill was permanently limited to three stars. That still counts enough to build an level 3 Workshop, but not enough to specialize in Automechanics and unlock the Auto Shop. Since the specialized skills can actually grant really good bonuses, there really isn’t a reason to keep any of these limited survivors around.

Drop these useless survivors like they’re hot.
The only exceptions, on a case-by-case basis, would be those with 1-star skills. Sometimes those provide unique bonuses that can make it worth it.
The final consideration for survivors is their 5th skill slot. If that area is blank, then great! A blank slot will allow you to teach the survivor any particular skill you have a book for, giving you the opportunity to plug any skill gaps in your base. If not blank, make sure it’s actually a skill you need.
As a bonus note, new survivors start out with the Recruit rank. After earning enough Influence, they become Citizens, which then tells you what bonuses they provide should they achieve the Hero rank. Some of these bonuses are so-so, like +3 Morale. Others are straight-up bonkers, like Tough Negotiator granting +30% Influence gain. Which, by the way, affects how much Influence you get by selling things – Bulk Plague Cure goes from 500 Influence to 650. So, if a particular survivor is borderline, it’s worth sending them out long enough to hit Citizen level, and check their Hero bonus.
Recruiting survivors
If you’re looking for more people, there are basically two ways to get them. First is helping survivors out in the world, e.g. answering all those inane radio messages every 5 minutes.
The second method is recruiting directly from Enclaves. Talk with each member of an Enclave, and look at their stats by choosing “Learn more about Survivor.” Their specific Traits will be hidden, but their Skill list will not. If you find one you like, keep in mind that recruiting them will effectively disband the Enclave. There will always be more Enclaves popping up, but you’ll need to help them out again and the bonuses they provide aren’t always the same.
Skills
As your survivors level up, they will have the opportunity to specialize their Skills. At a minimum, you always get two choices. One key note about Skills is the fact that they have a “hidden” bonus effect once you max them out. Sometimes that is enough to make or break your decision.
There aren’t many Wikis out there at the moment, but here’s the best I could find.
Some specific notes:
Cardio–>Powerhouse is incredibly strong. While it grants the ability to Drop Kick right away, once you hit 7 stars you unlock the ability to Grapple from the front. This move not only interrupts zombie attack animations, it essentially allows you to chain kill entire mobs of zombies, given how you get a few invincibility frames performing the move.
Fighting –> Endurance grants you the Slam move right away, which will vastly increase your survivability. Basically, the Slam move interrupts zombie attack animations, and leaves them on the ground behind you for an easy execution.
Shooting –> Gunslinger is unique in that “Aim Snap” basically allows you to instantly and perfectly track the head of zombies (at the cost of Stamina). Note: it is currently broken as of patch 2.0.
Wits –> Stealth is better than it sounds, and certainly better than Scouting. Stealth allows you to sprint while crouched, and silently open stuck doors.
Gaining Influence
For the most part, gaining Influence is a slow, incremental process. You get some for completing quests, but most of your gains will be from killing zombies:
- Kill X zombies = +5
- Kill Screamer = +5
- Kill Bloater = +10
- Kill Feral = +20
- Kill Juggernaut = +50
I’m not 100% sure of those values, as I have a +30% bonus to Influence gain from a survivor, so I’m working backwards.
Beyond that, you can get Influence from selling things. The absolute best gain comes from crafting and selling Bulk Plague Cure, which defaults to +500 Influence (or +650 with bonuses) from spending 20 Plague Samples and 8 Meds. This means each Plague Sample laying around is worth about 25 Influence by itself, considering Meds can be produced by a Garden. So, yeah, pick them up.
Somewhat surprisingly, traders actually care about those random notes you can occasionally loot. If you bothered holding onto them, they will sell for 10-15 Influence apiece. Backpacks are also nice items to sell, especially as you cycle through survivors and slowly upgrade them to 8-slot ones.
Taking Out Plague Hearts
e.g. beating the game.
While scary at first, Plague Hearts are almost comically easy to destroy. You will essentially handle them the same way you (eventually) handle all zombie groups.
- Get a visual on the target, preferably from outside the building.
- Toss a roll of Firecrackers near the target.
- Toss 3-6 Fuel Canisters/Molatovs at target.
- ???
- Profit.
This isn’t the only way to take them out. You can get fancy by crafting some C4, sneaking in to plant it, then blowing it up. Regular grenades technically work, but not as well as fire. If you happen across a 50-caliber rifle, several shots (recently nerfed to 6) from that will kill it too. Entire clips of gunfire will work in a pinch as well, but there’s no such thing as a Plague Heart “pinch” – just leave and come back with molatovs, because the Plague Heart isn’t going anywhere.

Missed the Plague Heart though, because it was in the back.
One of my favorites though? Drone Strike. Get a survivor with Computers –> Programming. Spend 25 Parts and wait ~20 minutes for drones to come online. Spend 75 Influence to get the targeting smoke. Toss the smoke near the outside wall closest to the Plague Heart, then run away. Instant death, +150 Influence. The blast ignores walls and is fairly large, although not quiet large enough to hit a Plague Heart at the back of a house if the smoke is on the front porch. The smoke doesn’t register indoors, by the way, so don’t toss it too close to the eaves either.
Drone strikes are a great way to clear hostile Enclaves too, without needing to put yourself at risk.
Posted on August 24, 2018, in Guide and tagged Base Building, Quick & Dirty Guide, State of Decay 2, Zombie Apocalypse. Bookmark the permalink. 1 Comment.

State of Decay (1, not 2 you were reviewing) was the ONLY game in my life I “returned to the shop” by requesting refund after 74 mins gameplay on Steam. While the strategic game is great and I was sold the minute I saw someone playing, I could not bear the zombie melee fight which was clumsy, random and uncontrollable.
Unless they made some really serious improvement in that field, I’m not trying this out.
LikeLike