Blog Archives
Beginning Nightingale Tips
Here are some T1 beginning tips on playing Nightingale (post-Realms Rebuilt) that I wish I knew before.

Go Ahead and Build Your House Wherever
Nightingale is a game about portals and traveling to new places all the time. So… where is the best place to build your base? Near the Crossroads? Near a Portal? The actual answer is: wherever you want.
Fast travelling is easier than you think. Press M to bring up your map, and you’ll have two options: Travel to Respite, and Travel to Crossways. Clicking on Respite will take you to wherever you placed your Estate Carine, no matter the realm. That’s fairly straight-forward: porting home, dumping your inventory, and crafting some stuff. But how do you get back to where you were going? That’s where the Crossways comes in. There are portals in the Crossways. Specifically, these portals can only take you to the “Storied Realms” aka plot realms, but chances are that is where you are coming from anyways.
In any case, after you complete the 1st story realm you unlock the ability to craft your own portals wherever you want. So, again, don’t lose sleep over where you should build your base. Just do it.
Hold E to Collect All the Things
Did you just kill and skin a fae creature (you monster!) and see a bunch of Hide, Meat, Essence, and Bones pop out? Hold E to collect everything in one go. Chop down a tree on a slope and see the Wood Bundles start to roll away? Hold E. Mining Tin next to the water? Hold E occasionally. This method will not pick up sticks, rocks, and other interactable “nodes,” but it does work on basically anything that spawns in with the wispy glow around it.
Survivor Inventory is NOT Weight-Based
Early on, you can recruit an NPC to follow you around and fight and collect things for you. Unfortunately, they only have 15 slots of inventory, which means it’s easy to get clogged with all kinds of leaves, pieces of twine, and so on. The good news is that you can relieve them of those burdens, and instead load them down with 50kg stacks of Lumber and Ore, no problem. Extremely useful for when you strip-mining the fae realms for resources.
Don’t Let Survivors Bring a Knife to a Maul Fight
Speaking of survivors, ever wonder why your first survivor is dealing just 3 damage to those zombies trying to eat your face off? Because they’re equipped with 3-damage stone knife. Give them the Maul you aren’t using anyway, and suddenly they’ll be slaying mystical beasts while you sip tea and crumpets. Well, that’s a Tier 3 food, but you get the idea. Open the survivor’s inventory, put the new weapon inside, and then right-click it and choose equip. Don’t forget to give them your hand-me-down clothing after you upgrade as well.
Incidentally, you can also give the survivor a ranged weapon if that’s what you’re into. I recommend sticking to melee weapons though, to encourage them to take beatings on your behalf. If you do give them bows or guns, the good news is that they don’t need nor use up any ammunition.
Essence is of the Essence
When you are starting out, every spent Essence is a progression trade-off. Which crafting station do you unlock first? Is it worth unlocking (and crafting!) the Recovery spell? Once you get further into the game, the decisions become much easier, of course, but it’s also true that T1 Essence remains relevant forever as it is used to Repair even higher-tier gear.
So… pssst… interested in learning how to get some quick T1 Essence on the cheap? Check these out:
- Simple Saw Table – Paper x6 from Wood Bundle x2 [6 Essence]
- Simple Tanning Station – Straps x3 from Hide [3 Essence]
- Simple Workbench – Simple Wood Axe from Stone Block and Wood Bundle [10 Essence]
Once any of the products are created, right-click on them and choose Extract. Bam, enjoy the Essence. The Simple Wood Axe seems a clear winner, especially in the early-early game, but just note that these numbers are without any Augmentations from nearby decorations. And sometimes you just want to chop down a bunch of trees and/or clear all the Hides from your inventory, ya know?
Living the Charmed Life
There are a lot of little ways to enhance your gear in Nightingale, but one you don’t want to sleep on are Charms. These are unlocked under the Magick tab and represent conditional boons (and sometimes banes) that can be applied to tools and clothing. Key word there is apply, by the way – it does nothing in your inventory until you right-click and apply it to something. Ask me how I know.
One of the most useful ones in the early game is Charm of the Mule, which doubles your Carry Weight while reducing your Stealth by half. Seems like quite the tradeoff, but right now Stealth is pretty useless considering Bound always know where you are and using guns at all negates Stealth for several seconds afterwards. Once you get better backpacks you can drop it, if you want. Charm of the Wanderer is also great as it significantly decreases Stamina drain while gliding with the umbrella. Just note that Charms are only active when you have the item equipped. This means you are better off putting as many as possible on your clothing rather than on the items themselves.
Building from a Box
I was pleased to see that Nightingale allows you to use resources stored in chests to craft things at workstations. What struct me as odd at the time though, was how this did not extend to crafting walls, floors, or building the workstations themselves. Turns out, you can build using stored resources, but there’s a reason why you may not want to.
When you open any storage container, there is a gear-looking icon on the right called Container Permissions. It is here where you can toggle whether to allow for the resources inside that specific container to be used for building or not. The default is Not Allowed.
But… why? Well, resources are extremely important in Nightingale because they can imbue crafted items with their attributes. Buildings and Workstations, however, get zero benefit. So, ideally, you want your walls built with regular Wood Bundles from trees you chopped down on the tutorial island rather than the T3 Wood Bundle (Yew) that you could be using to grant tools +6% melee/ranged damage. The game otherwise doesn’t care which resource gets consumed, and it will consume your best resources on a whim if you’re not careful.
The good news is that you can decide on a system that works for you and just keep doing it. For example, I have several “Building: Allowed” containers where I put all the resources I don’t care about, and then everything else stays protected. Or you could do it the other way around.
Three Hots and a Cot
Food buffs are incredibly important for survival in Nightingale, as is the Comfort buff from sleeping. You can have up to three different food buffs at a time and there is never really a reason not to have them rolling. As a note, “different food buffs” is very generously defined in the game – you can get three Roasted Meat buffs as long as each was created with a different base Meat, e.g. Prey, Predator, Bug.
In the early game, I recommend finding and loading up on as many Blueberries as possible, as the Max Stamina bonus from them is significant when your gear isn’t providing a higher baseline. Also, do yourself a favor and unlock Mixed Plants immediately. The initial Roasted Berries recipe requires two berries, but Mixed Plants allows for two separate vegetables, both of which can be the same berry, doubling the attribute gain.
Semi-advanced tip: prioritize unlocking the Feast Minor Realm card if your base is in the Abeyance realm, aka tutorial island. The Feast card massively increases the duration of food buffs when eaten in that realm, and the increased duration persists when you leave. All of a sudden, your food buffs are lasting 40 minutes even while you progress the story in other realms. This is helpful no matter where your base is, but Storied Realms require you to finish them before you can apply Minor Realm cards.
Quick & Dirty Guide to Starbound (Frackin’ Universe)
Frackin’s Universe (FU) is a Steam Workshop mod that revitalizes (and complicates) the entire Starbound experience. It is not recommended for a first playthrough – go beat the base, vanilla game first. Then, just when you think you’ve had enough, come back, load the mod, and play what feels like Starbound 2.0.

Beyond FU itself, I highly recommend the following (compatible!) mods:
- Character Extender (required)
- Improved Containers
- Frackin’ Music
In particular, Improved Containers will change your Starbound life. They added a button to automatically stack anything you’re carrying into an existing stack in a container. Great for off-loading one of the dozens of new ore types introduced in FU after coming back aboard your ship.
Beginning Recommendations
Play or skip the tutorial. When it asks whether you want the default ship or the Build Your Own Ship (BYOS) option, choose BYOS. This allows you to skip a huge block of vanilla Starbound progression and immediately construct a ship of your dreams.
Incidentally, you can construct your dream ship out of any materials lying around. Including dirt. Despite floating in deep space, you are free to destroy the walls and background tiles of your ship at any time; there are no decompression mechanics in Starbound. Just note that “loose” items/blocks fall to the bottom of the screen, and walking onto a spot without background tiles puts you in an airless, zero-g environment. This will likely be fatal to you at the start of the game, so construct your ship from the other side of a wall first.
Get off the starter planet ASAP. Complete the required quests first, but try to get to a different Lush or whatever planet when you can. Tungsten Ore is an especially vital part of early-game progression, and the starter planet probably doesn’t have any.
Get a Mining Laser ASAP. It is better than Mining Picks, Mining Drills, and the best, most upgraded Matter Manipulator any day. You will still want to upgrade the latter over time though, as the Mining Laser burns through both normal and background blocks, which can be problematic in certain edge cases. Like when the background is full of lava, for example.
Roughly 99% of your deaths will be related to fall damage. That is not so much a recommendation as it is a fact. Mitigating fall damage is super important, but you won’t have very many options at the start, especially considering how dark FU is generally. Until you can get armor/Augments to assist with the issue, your best bet is to focus on unlocking Physics Field tech in the Tech Console. That way you can press F if you notice yourself falling to prevent all damage.
Cheese the lighting system by printing lighted signs. One of the FU changes is that you no longer emit a minimum aura of light. Combined with the fact that EPP upgrades are not cumulative, you will often be in a situation where you need to craft thousands of torches to see anything. Alternatively, once the Pixel Sign maker is up at the Outpost – unlocked after the first artifact – you can create a white, lighted sign that practically shines with the force of a thousand suns.
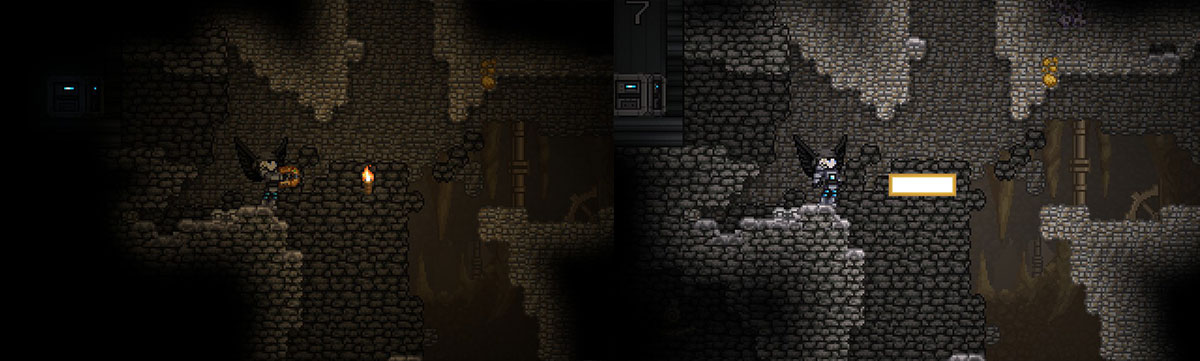
It also costs nothing but the effort of spam-clicking the print button. Torches are still useful in that they don’t require background tiles to work, but signs are otherwise better when you can use them.
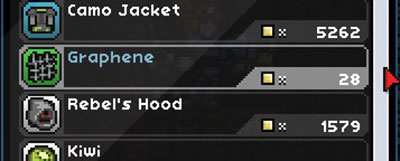
Check every vendor you see. Most of the time, a vendor’s inventory is randomly set when you meet them. This can sometimes result in fortuitous situations like a vendor selling unlimited amounts of, say, Graphene for 28px a pop.
Base Recommendations
Build your first base on an Ocean planet. If you are anything like me, you’re concerned about where your “real” base should be located. So you go planet to planet, looking for the perfect spot, and meanwhile junk and crafting benches continue to accumulate wherever you placed them (probably on your ship). Eventually, by the time you find the ideal location, you’re overwhelmed by all the items you have to move, so you stick with your first “choice.”

I recommend an Ocean planet base for two reasons. First, it’s a planet. Ship bases are perfectly viable options, but you essentially forgo easy power generation from Solar/Wind stations, and easy materials from Atmospheric Condensers. Second, Ocean planets have infinite water tiles. There are craftable Wells and other water sources wherever you are, but nothing beats the convenience of holding down left-click and soaking up as much water as you need. Or automating it all later.
Keep a Sifter up and running 24/7. A full stack of 1000 Sand will keep a Sifter occupied for quite some time, but the end result will be a dozen or more different materials, some of which can be loaded back in an Alternator to power the Sifter to continue generating free goodies. The Centrifuge is similarly useful, but certainly less perpetual… unless you have Solar panels on an Ocean planet.
Farming Recommendations
Did you build a base on an Ocean planet? Lobsters are EZ-Mode. Craft some Lobster Traps and watch as they magically fill up with free food. Lobsters stack to 99, do not require cooking to eat (but you can if you want), and actually sell for a decent amount (1980px per 99 stack). While there is an indication of freshness, lobsters do not appear to spoil; this may be a bug that is fixed later.
Rice is the easiest vegetable crop to manage. Uncooked rice stacks in your inventory, never goes bad, and you only need a Campfire to cook it. Wheat is similar, but Rice does not need to be replanted (assuming you aren’t using Growing Trays). You forgo any fancy buffs, but it is incredibly straight-forward. If you haven’t found rice on a planet yet, “purchase” it from a Greenhouse.
Grow Trays/Hydroponics are niche tools. On paper, they sound amazing: drop in three seeds, a stack of water, maybe some Fertilizer, and off you go. The problem is that there isn’t a good visual indication of when the product can be harvested. Or when it runs out of water. Or when all of the output slots are full of spoiled food.
Where Grow Trays excel is when they are used either with a stackable product, such Silk, or with a food item that normally despawns when harvesting, such as Wheat. In most other situations, I prefer planting crops in dirt.
Aeroponic or Hydroponic Tubing is strictly better than dirt, once you unlock them. They are kinda expensive considering dirt and the broken sprinkler are so early in the tech tree, but there are benefits to be able to pack more plants into a smaller area (sprinklers need height to water everything). Just keep in mind that you do have to “till” the tubing before planting.
If you want the most-filling food, then you’ll want Ultimate Juice. Incidentally, it also provides +20% Jump/Energy/Health/Run Speed and a Rage effect. This requires six different crops to craft though: Boneboo, Feathercrown, Oculemon, Neonmelon, and Toxictop. Finding these crops before reaching the endgame will be a challenge.
Critical FU Functionality
Frackin’ Universe adds a lot of very complicated systems. Here are the most important/useful ones.
Power – Both Power Generators and Batteries (when charged) output X number of Watts. Plugging a 4W battery into an Arc Smelter (req. 40W) isn’t going to work. That said, wattage is cumulative on a wire. Connect ten 4W batteries to that Arc Smelter – or preferably, to a Wire Relay – and you will be in business. Just note that if you are using 40W, that is 40W less on the wire. If you have multiple stations running simultaneously, you will need a power surplus to keep all the lights on.
Terminals – A Terminal is a clickable interface that grants you access to an “Item Network.” Linking all your storage units together into an Item Network means you can use Terminals to search for and retrieve your items from a single location, e.g. the Terminal itself, instead of having to manually look for it across all your storage units.
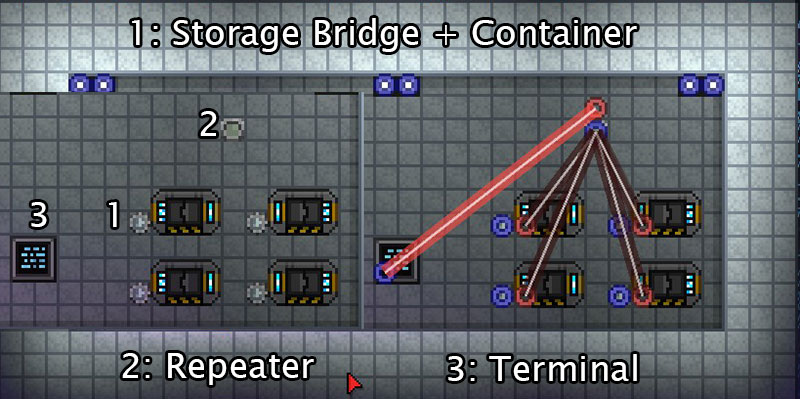
What you’ll need:
- Storage unit(s) full of stuff
- Craft and place Storage Bridge near storage unit(s)
- (optional) Craft and place Repeater to hook into multiple Storage Bridges
- Craft and place Terminal near crafting stations
- Connect the blues to the reds, e.g. Storage Bridge to Repeater/Terminal
Item Movement – If you want to take something from one container and physically put it into another container, you want an Item Transference Device (ITD). If you click on the ITD, you will get a bunch of pseudo-programming options that I have zero interest in learning or explaining. Instead, all you really need to know is that it basically works out of the box. Connect the red circle of your container to the blue circle of the ITD, then connect the red circle of the ITD to the blue circle of the other container. Bam. All items that appear in the first slot of the first container will get moved.
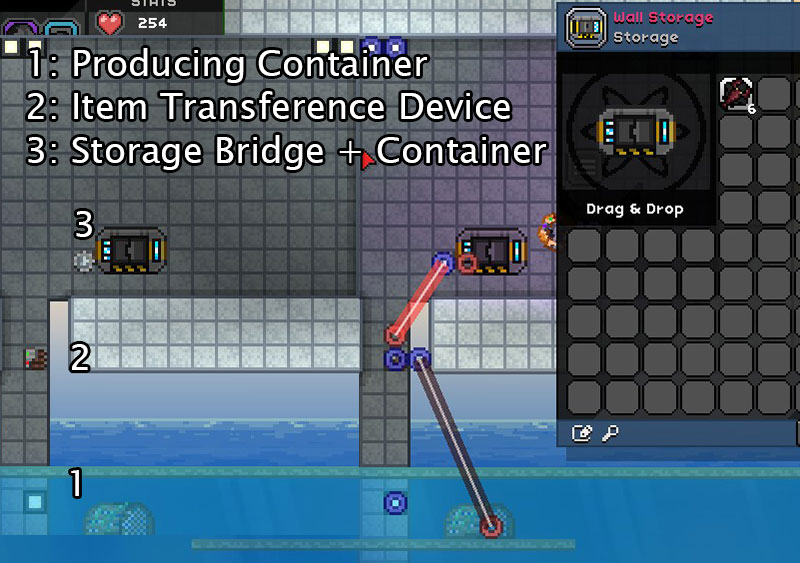
For me, the most practical use of an ITD was moving items from a Lobster Trap or Growing Tray to a box automatically. If the box is actually refrigerated storage, then all the better. Red, blue, red, blue, done. If you want something more fancy, you are on your own.
Survival Recommendations
One of your quick-slot items should be Dirt. If you find yourself in trouble, close off the tunnel you’re in with dirt; it will block melee and the majority of ranged attacks while you heal yourself or escape. While it’s a kinda cheesy move in vanilla Starbound, the enemies in Frackin’ Universe are exceedingly more deadly. Some enemies can pass through walls though, and explosive damage can penetrate tiles, so take care.
Always deploy with your Mech on new worlds. Depending on how much (if any) time you spend with the Mech-building side of things, your Mech will not make you invulnerable to planet effects or damage for long. That said, it will absolutely extend your life by a few precious seconds in case you get beamed down in the middle of a USCM camp full of snipers that can one-shot you. Just note that if your Mech explodes, you die with it. So either beam back up to your ship or bail.
Craft a few dozen flags and plant them everywhere. Flags are cheap to craft and act as bookmarks that allow you to get back to where you want to be quickly. Think you might die or encounter a tough fight? Plant a flag. If you come across a planet with a lot of good resources, plant a flag and name it “Penumbrite (Acid, Hot)” or whatever. This will save you oodles of time if you find yourself in a situation of needing more of X resource but being in a Y system instead.
Get an X (Radiation, etc) Ball Wand/Staff. Regardless of your fighting style, having a Wand/Staff with Radiation Ball (or whatever) will change your life. Specifically, it will allow you to attack enemies around corners/from range with guided death. Even better, you can dig a 1-block hole in a wall or floor and then squeeze your orb of death through it to murder your foes with impunity.
I snaked a Radiation Ball right through the one-tile gap to fry that guy.
Cheap? Sure. Effective? Hell yeah.
Armor Combinations – There are over 100 sets of armor added with Frackin’ Universe, so determining what you want to wear can be a challenge. For the most part though, it’s best to craft a bunch of mannequins and just have specialized sets ready for each planet you beam down on. That said, here were my go-to options:
Nautilus Armor / Kraken Armor / Leviathan Armor
This armor series eventually grants you Acid, Poison/Bio, Gas, Pressure, and Oxygen immunities once you reach the end. If you combine this with the Thermal Shell EPP, you will be immune to the most common damage types. A Field Generator EPP will make you further immune to Radiation, at the expense of making lava a concern again. This will cover just about everything aside from Shadow and Insanity, which can handled with EPP Augments.
Valkyrie Armor
With this set, you get Oxygen, Gas, Pressure, and Radiation protection, plus technical immunity to fall damage (you float downwards). This seems like considerably less protections than the same-tier Leviathan Armor set, and it is, but the Valkyrie gear boasts a 500% weapon damage modifier instead of 276%. Definitely a glass-cannon set, with half the armor of Leviathan and a third of War Angel.
Sunwalker Armor
This is a “War Angel-lite” tier-6 set that provides Radiation, Heat, Cold, Breath, and Pressure immunities. Additionally, there is an extra 40% Radiation resist and a +15% bonus to Plasma weapon damage.
War Angel
Basically an endgame armor, this nevertheless makes you immune to Pressure, Cold, Heat, Radiation, knockback, and all fall damage. On top of that, it provides 35% Physical Resist, so you’ll be taking less damage from mobs. Oh, and 93 Armor and tons of extra HP. Definitely a tanky set. Chain Swords deal 250% extra damage in your hands with this set as well.
EPP and Augments – Much like with Armor, there are dozens of different types of EPPs and Augments to slot into them. The ultimate goal is find a combination that works for your play-style and providing the necessary protection to survive whatever planet you’re on. That said, some of the choices are better than others.
[EPP] Thermal Shell
Providing protection against heat, cold, lava, and burning on top of 20% Fire and Ice Resistance, the Thermal Shell is one of the most useful EPPs in the game. Many armors can give you heat immunity, but none of them will save you from taking damage in lava, which is weird. Even the Field Generator, which appears to be a strict upgrade to the Thermal Shell given how it includes Radiation protection, makes you vulnerable to a lava bath once again.
[EPP] Repulsor Field Pack
While outclassed in the midgame, the Repulsor Field Pack is a fantastic early-game EPP since it provides 20% Physical and Fire Resistance. The “penalty” to Cosmic Resistances isn’t particularly relevant until much later in the game.
[EPP] Plasma Light Pack
The final word in backpack light generation, the Plasma Light Pack doesn’t appear until the endgame and may end up being a fool’s errand to chase after. While it provides Breath and Pressure Immunities, most armors offer the same by then.
[Augment] Immunity I & Immunity Field
Pretty much the final word with Augments, Immunity I provides protection against Heat, Cold, Gas, Radiation, and Proto-Poison at a base level. Immunity Field is a recent, stronger addition that grants a 2nd level protection to those same qualities while adding on Radiation Burning, Poisoning, and Liquid Nitrogen immunities. Still does nothing versus Shadow/Insanity/etc damage, so be wary of what planets you are beaming to. Although having a specialized armor set against those qualities with a Thermal Shell with an Immunity Field Augment to handle the rest will do you well.
The Quick & Dirty Guide to: State of Decay 2
I’m going to assume you have played through the State of Decay 2 tutorial and have a general idea of basic game mechanics. This Quick & Dirty guide is meant to take that baseline knowledge and advance you to the mid-game without needing to waste energy on trial and error.
General Tips
One of the best tips in the game.
- Blood Plague is only contracted when the Infection meter fills up all the way. If you cycle your characters regularly, Blood Plague shouldn’t really ever be a concern.
- Keep an eye on any AI-controlled partners though, as it’s tougher to notice when they take a lot of Infection damage.
- You can Dodge (“C” on PC) in any direction, and can pass through zombie models.
- Dodge backwards through zombie behind you, immediately grapple and execute.
- Dodging forward too early can result in still taking damage.
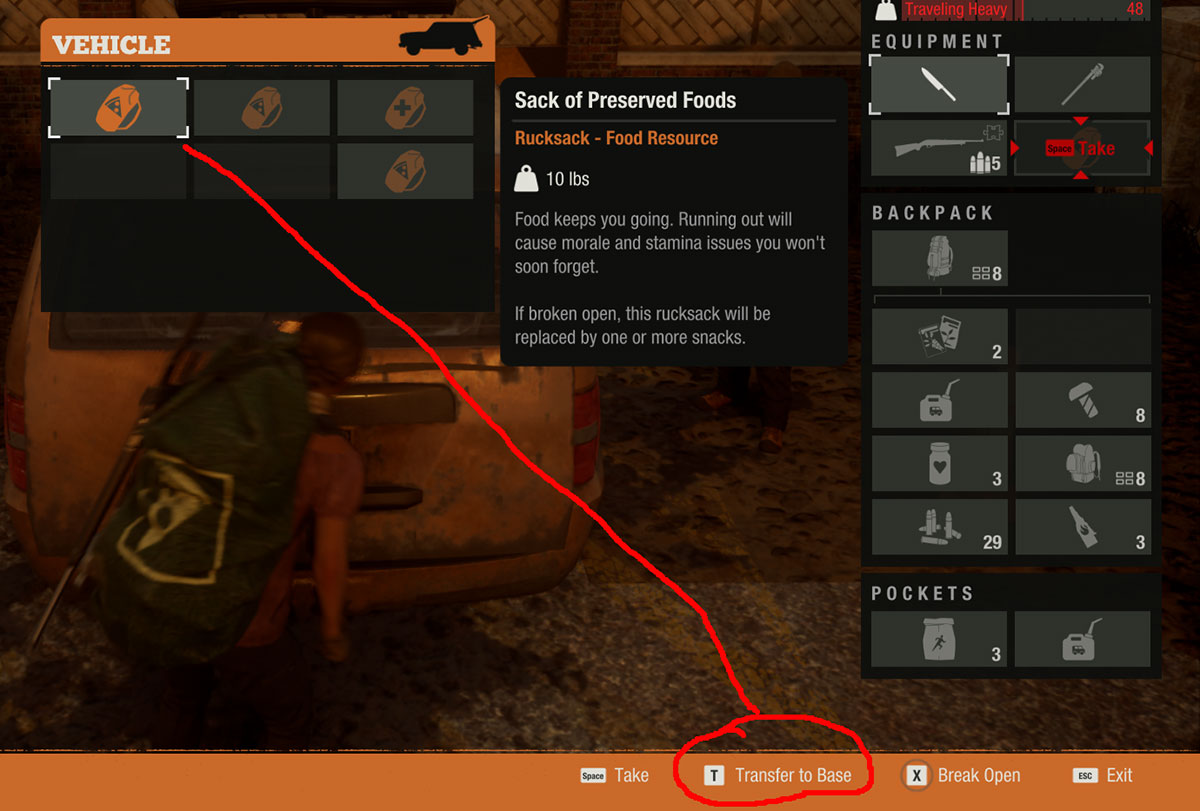
- If you park a vehicle in a base parking spot, you can transfer duffel bags in the trunk by pressing “T.”
- Save duffel bag turn-ins for characters that need the Standing gains.
- Scoped weapons can zoom in with “Z.”
- In single-player Offline mode, Exiting to Main Menu will despawn Freaks in the vicinity.
- Shooting a Bloater in the head will reduce the toxic gas emitted, but the body still acts as a landmine.
- Juggernauts can almost be meleed to death within the duration of one Smoke Grenade.
Base Selection/Planning
There are several different types of bases available, and the exact configurations of them are different between the different maps. Don’t stress too much about picking the perfect base the first time, as you receive a 100% refund of all resources when moving bases. The Facilities themselves will need to be rebuilt, but they are built faster for the first day, post-move.
That said, there are some things to keep in mind:
- A Workshop, Infirmary, and Garden/Hydroponics are pretty much required in every base.
- Each survivor eats 1 Food/day, and generally you’ll need 2 Medicine/day to heal.
- Bases often come with “built-in” Facilities that cannot otherwise be replaced. Make sure you can take advantage of them, else they are wasted slots.
- Dismantling a Facility results in a 100% refund of resources.
- There is no reason to keep certain Large-slot Facilities around once you craft their specific items.
- For example, get rid of Auto Shop after you craft Vehicle Upgrade kits.
- No reason to keep Forge around once you crafted several melee weapons.
- The Staging Area Facility can get extremely lucrative as you upgrade other Facilities – the one in my base “generates” +5 Materials per day by itself.
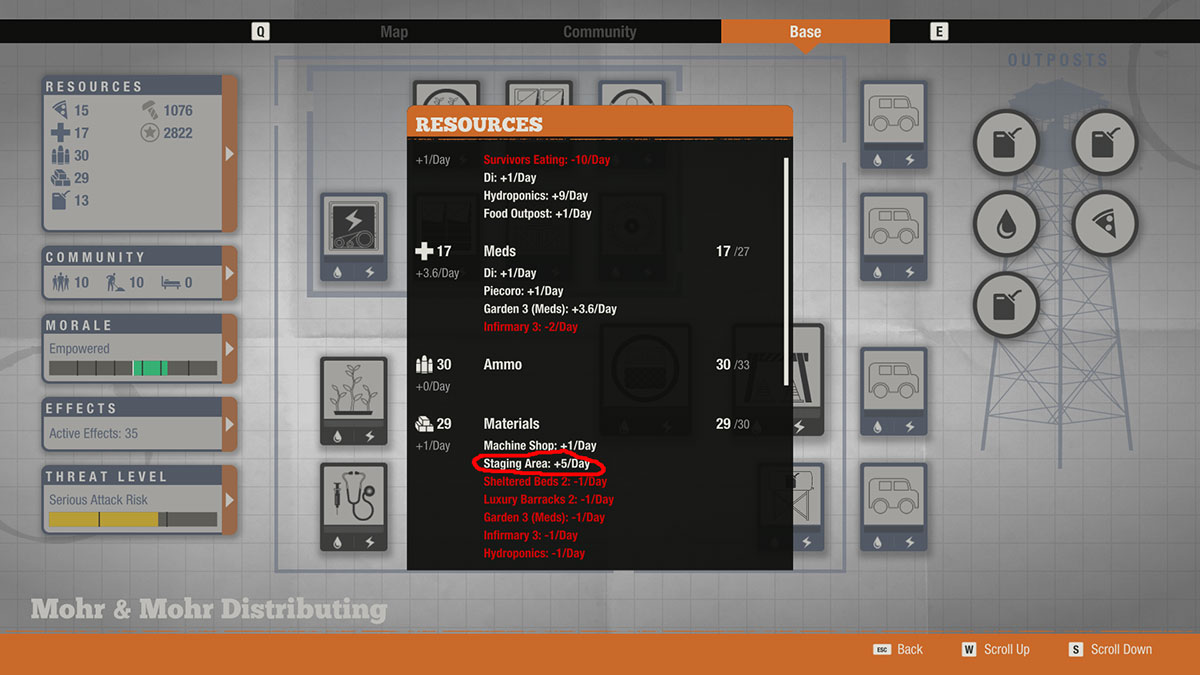
Pictured: Staging Area pulling its weight.
It is possible to optimize the configuration of your base and Outposts to essentially achieve perfect homeostasis eventually. Don’t spend too much of your time worried about that, however, as it will require looting specific mods and recruiting survivors with good skills. What you should focus on is getting to a point where you can last several days without critically running out of specific resources – having a -2/day deficit of a resource is nothing if you already have 20 of that resource.
Outposts
Don’t worry too much about picking the “perfect one.” There are no special outposts – the list of possible benefits are standardized:
- +1 Food/Fuel/Building Materials/Medicine/Ammo
- +2 Beds
- Base-wide Water (costs 1 Fuel/Day)
- Base-wide Electricity (costs 1 Fuel/Day)
- Morale Bonus
- Morale Bonus + Espresso
- Artillery Strike
In other words, there are no Outposts that give +2 Ammo, or +4 Beds, ect.
Ideally, you will want to have Outposts evenly distributed around the map, rather than bunched up in one part of town. That way, there will be an Outpost nearby at all times, so you can offload non-Duffel Bag loot and/or swap out a tired/injured character.

I should really move one of those Outposts into the circled areas.
If you can afford to, having one empty Outpost slot can take your looting game to the next level. As your inventory fills up, claim whatever building you are in as an Outpost and then offload your gear. Then, through the Base screen go ahead and abandon the Outpost. You get 100% of your Influence back when you abandon an Outpost, so you lose nothing by doing this, other than the opportunity cost of not getting +1 whatever.
Survivor Management
The key thing to understand is that not all survivors are worth keeping around. You should absolutely recruit every single person you can, but only because it’s easier to check their Skills/Traits that way. There is no penalty, Morale or otherwise, for Exiling a member, so be sure to do so when necessary (and after stripping them of all gear). You can have a maximum of 10 survivors at your base – nine would be better, if only because you lose the ability to recruit anyone once you have 10.
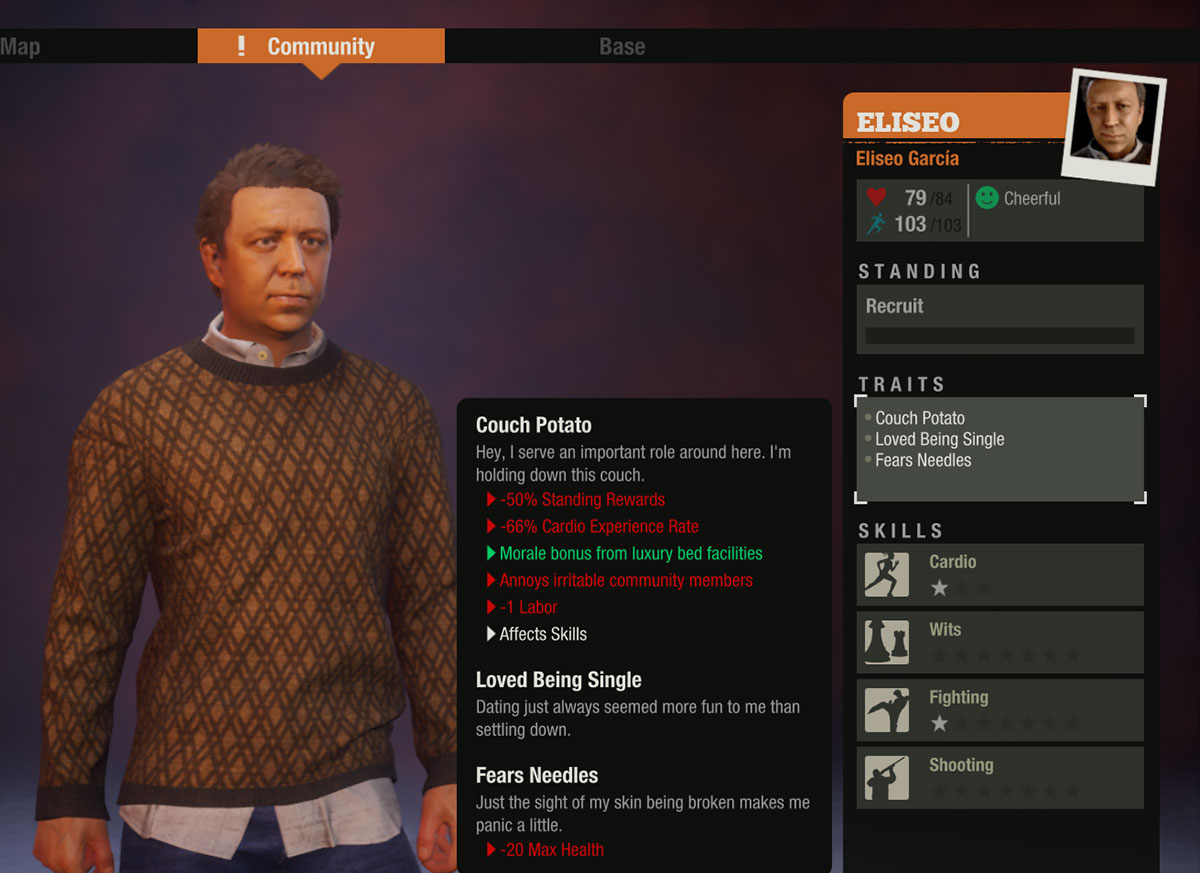
Pictured: someone who won’t long survive the zombie apocalypse.
There are generally three things you want to look for in a survivor.
First, do they have any negative Traits? If they have something like “Lacks Boundaries” (-5 Morale to everyone), then think rather long and hard as to whether they have any other redeeming value.
Second, do they have any Skills without 7 (blank) stars? If so, it means that that particular Skill cannot be upgraded to a specialized version. For example, I had (emphasis on had) a survivor with the Used Car Salesman Trait, which meant that their Mechanics skill was permanently limited to three stars. That still counts enough to build an level 3 Workshop, but not enough to specialize in Automechanics and unlock the Auto Shop. Since the specialized skills can actually grant really good bonuses, there really isn’t a reason to keep any of these limited survivors around.
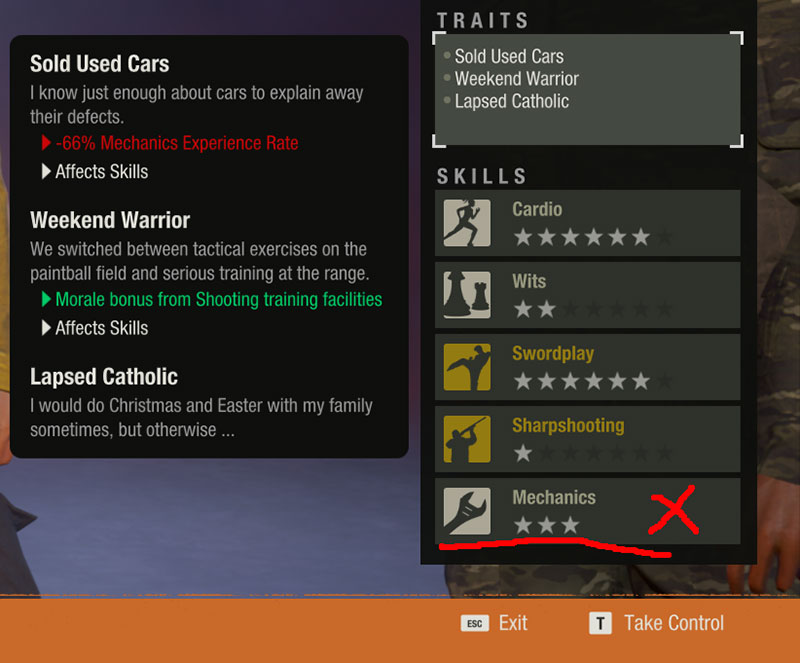
Drop these useless survivors like they’re hot.
The only exceptions, on a case-by-case basis, would be those with 1-star skills. Sometimes those provide unique bonuses that can make it worth it.
The final consideration for survivors is their 5th skill slot. If that area is blank, then great! A blank slot will allow you to teach the survivor any particular skill you have a book for, giving you the opportunity to plug any skill gaps in your base. If not blank, make sure it’s actually a skill you need.
As a bonus note, new survivors start out with the Recruit rank. After earning enough Influence, they become Citizens, which then tells you what bonuses they provide should they achieve the Hero rank. Some of these bonuses are so-so, like +3 Morale. Others are straight-up bonkers, like Tough Negotiator granting +30% Influence gain. Which, by the way, affects how much Influence you get by selling things – Bulk Plague Cure goes from 500 Influence to 650. So, if a particular survivor is borderline, it’s worth sending them out long enough to hit Citizen level, and check their Hero bonus.
Recruiting survivors
If you’re looking for more people, there are basically two ways to get them. First is helping survivors out in the world, e.g. answering all those inane radio messages every 5 minutes.
The second method is recruiting directly from Enclaves. Talk with each member of an Enclave, and look at their stats by choosing “Learn more about Survivor.” Their specific Traits will be hidden, but their Skill list will not. If you find one you like, keep in mind that recruiting them will effectively disband the Enclave. There will always be more Enclaves popping up, but you’ll need to help them out again and the bonuses they provide aren’t always the same.
Skills
As your survivors level up, they will have the opportunity to specialize their Skills. At a minimum, you always get two choices. One key note about Skills is the fact that they have a “hidden” bonus effect once you max them out. Sometimes that is enough to make or break your decision.
There aren’t many Wikis out there at the moment, but here’s the best I could find.
Some specific notes:
Cardio–>Powerhouse is incredibly strong. While it grants the ability to Drop Kick right away, once you hit 7 stars you unlock the ability to Grapple from the front. This move not only interrupts zombie attack animations, it essentially allows you to chain kill entire mobs of zombies, given how you get a few invincibility frames performing the move.
Fighting –> Endurance grants you the Slam move right away, which will vastly increase your survivability. Basically, the Slam move interrupts zombie attack animations, and leaves them on the ground behind you for an easy execution.
Shooting –> Gunslinger is unique in that “Aim Snap” basically allows you to instantly and perfectly track the head of zombies (at the cost of Stamina). Note: it is currently broken as of patch 2.0.
Wits –> Stealth is better than it sounds, and certainly better than Scouting. Stealth allows you to sprint while crouched, and silently open stuck doors.
Gaining Influence
For the most part, gaining Influence is a slow, incremental process. You get some for completing quests, but most of your gains will be from killing zombies:
- Kill X zombies = +5
- Kill Screamer = +5
- Kill Bloater = +10
- Kill Feral = +20
- Kill Juggernaut = +50
I’m not 100% sure of those values, as I have a +30% bonus to Influence gain from a survivor, so I’m working backwards.
Beyond that, you can get Influence from selling things. The absolute best gain comes from crafting and selling Bulk Plague Cure, which defaults to +500 Influence (or +650 with bonuses) from spending 20 Plague Samples and 8 Meds. This means each Plague Sample laying around is worth about 25 Influence by itself, considering Meds can be produced by a Garden. So, yeah, pick them up.
Somewhat surprisingly, traders actually care about those random notes you can occasionally loot. If you bothered holding onto them, they will sell for 10-15 Influence apiece. Backpacks are also nice items to sell, especially as you cycle through survivors and slowly upgrade them to 8-slot ones.
Taking Out Plague Hearts
e.g. beating the game.
While scary at first, Plague Hearts are almost comically easy to destroy. You will essentially handle them the same way you (eventually) handle all zombie groups.
- Get a visual on the target, preferably from outside the building.
- Toss a roll of Firecrackers near the target.
- Toss 3-6 Fuel Canisters/Molatovs at target.
- ???
- Profit.
This isn’t the only way to take them out. You can get fancy by crafting some C4, sneaking in to plant it, then blowing it up. Regular grenades technically work, but not as well as fire. If you happen across a 50-caliber rifle, several shots (recently nerfed to 6) from that will kill it too. Entire clips of gunfire will work in a pinch as well, but there’s no such thing as a Plague Heart “pinch” – just leave and come back with molatovs, because the Plague Heart isn’t going anywhere.
Missed the Plague Heart though, because it was in the back.
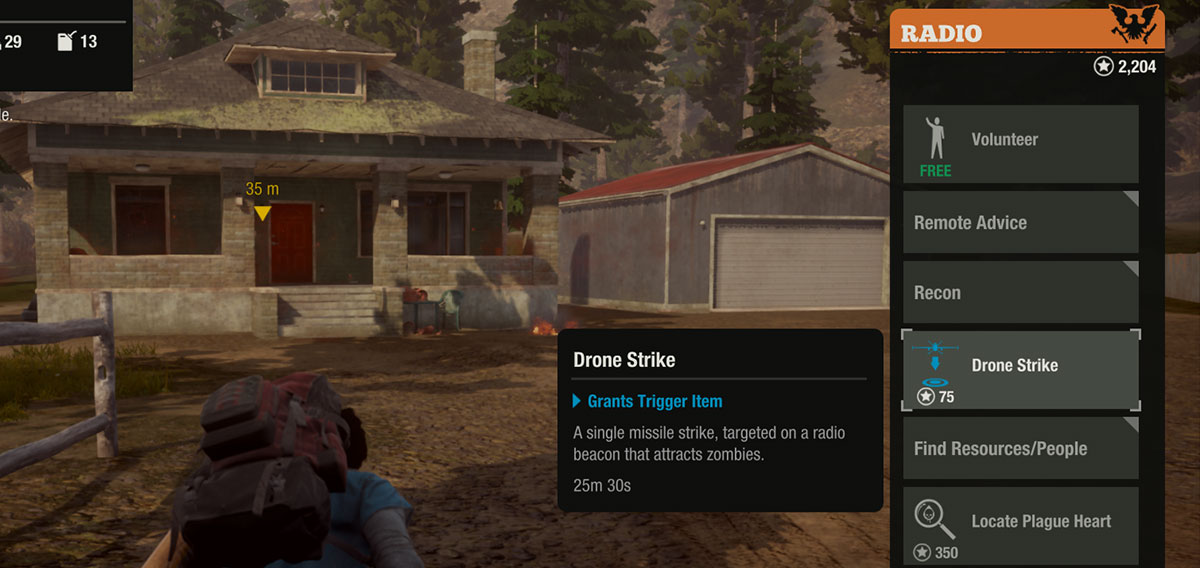
One of my favorites though? Drone Strike. Get a survivor with Computers –> Programming. Spend 25 Parts and wait ~20 minutes for drones to come online. Spend 75 Influence to get the targeting smoke. Toss the smoke near the outside wall closest to the Plague Heart, then run away. Instant death, +150 Influence. The blast ignores walls and is fairly large, although not quiet large enough to hit a Plague Heart at the back of a house if the smoke is on the front porch. The smoke doesn’t register indoors, by the way, so don’t toss it too close to the eaves either.
Drone strikes are a great way to clear hostile Enclaves too, without needing to put yourself at risk.
Quick & Dirty Guide: No Man’s Sky
Right from the start, let me say that No Man’s Sky is often intentionally vague in order to engender a sense of wonder and discovery. In that respect, the following Quick & Dirty guide might constitute spoilers because I will be explaining some of the game systems as they exist in version 1.38. If you feel like that might take away from your enjoyment of the game, by all means, stop reading.

For everyone else, let’s roll.
Basic Gameplay
1. Land on planet
2. Collect resources
3. ???
4. Profit.
Seriously though, in the beginning, do not worry too much about anything in particular. A large part of this game comes down to Inventory Management, and you are never given enough space to collect all the things. If something seems like a super-rare thing, trust me, it’s not. You will find a planet with tons of it later on.
What you will want to keep an eye on though, at all stages of the game, are the following:
- Plutonium: It costs 50 to lift your Starship off the ground.
- Zinc: Basic way to recharge your environmental protections, once crafted.
- Thamium9: Primarily for recharging Life Support, but used in Farms later on.
You will always want to keep a stack of those elements handy at all times, at every stage of the game. Once you get a decent Unit (e.g. cash) stream, all of them can be acquired quickly and in bulk by visiting a Trading Post on a planet in any economically successful system. We’re talking buying 1500+ at a time for like 40k Units. Much faster than farming, especially with Thamium9.
Quick Movement
Walking, and even Sprinting, seems really slow and never gets much better.
The better way to get around is to Melee+Jetpack. Basically, start walking in a particular direction and press the Melee button (Q on PC) and your Jetpack (Space on PC) at the same time. If done correctly, you will surge forward a few steps, and meanwhile that faster momentum will carry over onto your Jetpack. For best results, start Sprinting (Shift on PC) before the Melee hit and you’ll be able to traverse wide swaths of the world, as long as your Jetpack lasts.
How Do I Upgrade X?
Personal Inventory: Drop Pods can be found on every planet, and are specifically searchable by building a Signal Booster. Enter the Pod and purchase the additional slot. Each Drop Pod is only usable once.
Keep in mind that there are three different player inventories. The General Inventory can contain both items and tech upgrades. The Technology Inventory can contain only tech upgrades. The Mass Inventory can only contain items, but at Starship-level stack sizes, e.g. 500 elements, or 5 items per slot. While the General Inventory is cheaper to expand at first, if you place too many tech upgrades in there, you are simply limiting your ability to store goods later on. Luckily, you can scrap tech upgrades and rebuild them when you unlock additional Technology Inventory slots.
Starships: You do not upgrade Starships – you buy new ones or fix ones you find.
To buy a Starship, you need to go up to one that has landed somewhere, like at a Space Station or Trading Post, talk to the owner, and then choose Buy Starship. At that point, you can see how many inventory slots it has, what techs might already be installed, and so on. If it looks good, and you have the cash to cover the difference in price between your current ride and the new one, it’s yours. The sale is not final until you take off though, so you have some leeway in attempting to move over inventory that might not have fit, or that you forgot to move in the first place.
Note: you do not get a cash refund for buying a lower-priced ship, so don’t bother.
Quite the upgrade.
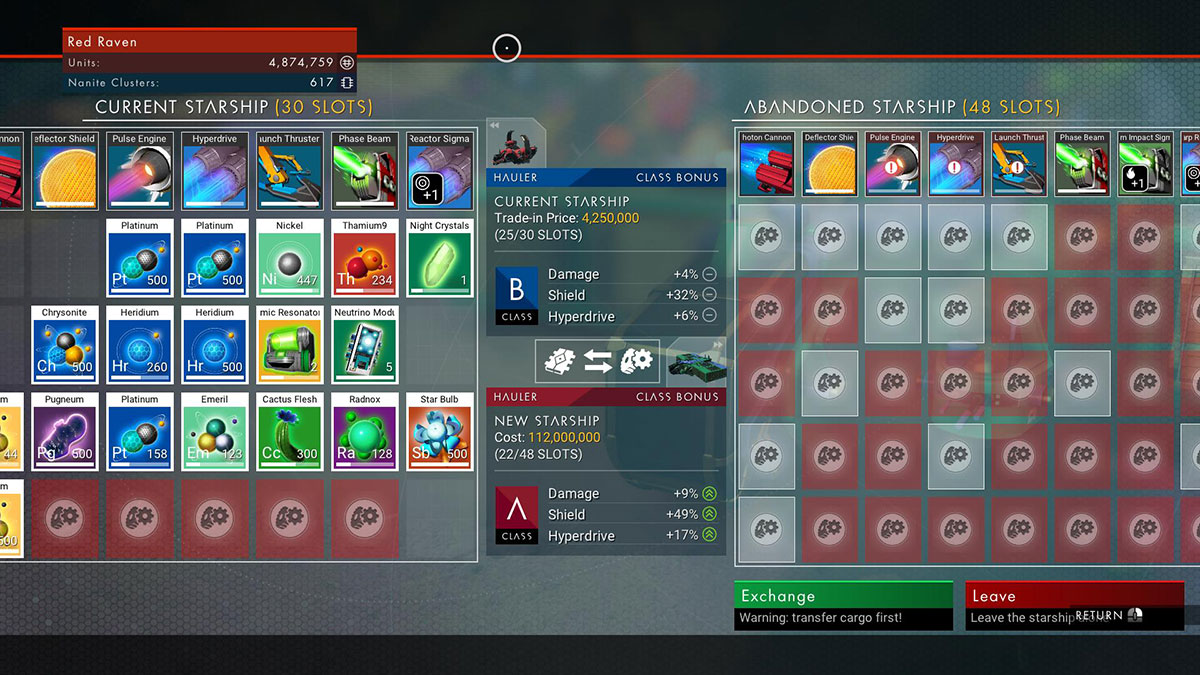
The alternative method is to find a crashed Starship on a planet and then claim it. This method can allow you to significantly leap-frog any sort of Starship progression, insofar as you can find and claim a 48-slot Starship way before you would ever have enough Units to purchase one outright. The catch is that crashed Starships have broken inventory slots that can only be repaired via increasingly higher numbers of Units; the first slot might cost 33k to fix, but ten slots later the cost will exceed 1.5 million. The result ends up about the same, e.g. it costs X amount to fix everything, but this nevertheless allows you to “upgrade” your ship as money allows rather than needing a bulk purchase.
Finding crashed ships in the first place can be tricky though, as the “traditional” method involves discovering Communication Towers, solving a logic puzzle, and hoping it leads to a crashed ship. Alternatively… just fly around a planet and spam the 1 key, which is basically “target nearest ship.” While you will sometimes tag NPC ships flying around, especially near Trading Posts, this method otherwise allows you to comb a rather huge portion of the planet’s surface while flying around. If something pops up on your radar, fly down and take a peek.
Multi-Tool: Similar to Starships, you only ever find new ones.

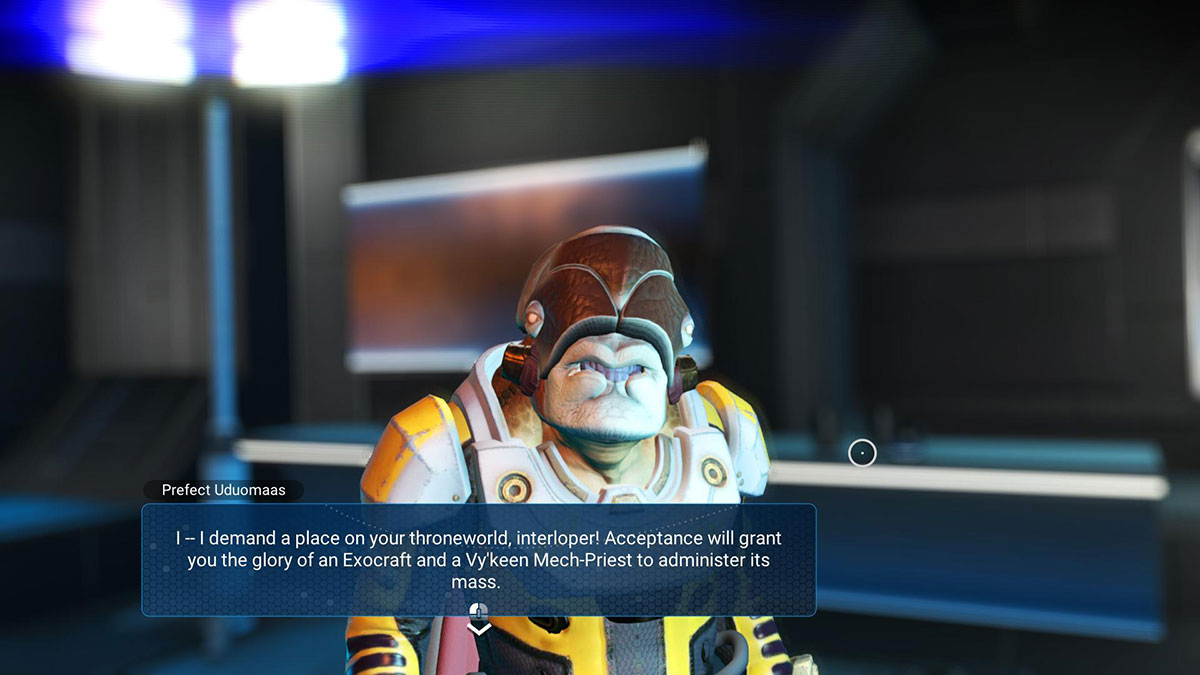
Just from talking to a guy.
While you can get new Multi-Tools from Monolith or creature interactions, the more common method is simply finding them out in the world in display cases. Curiously, these display cases still require you to “purchase” the new Multi-Tool, even when it doesn’t make a whole lot of sense.
How Do I Unlock Y?
AtlasPass v1: Follow the story and it will unlock for you.
AtlasPass v2/v3: Same as above, but you’ll need some achievements.
Farms: It’s the last in a series of quest-chains related to base-building.
Exocraft: It’s one of the first in a series of quest-chains related to base-building.
Blueprints: there are basically three methods. First, randomly as interaction rewards, from talking to people or Monoliths or crashed ships. Second, as rewards for certain Missions. Lastly, bought from Tech traders by using Nanoclusters – each Star Base has a slightly different list that focuses on Starships, Multi-Tools, or Exosuits.
Technically, there is a fourth method, which is via questing. Unlocking specific farming crops requires completing quests from the Farming Specialist in your base, for example. There are also some specific blueprints tied to the Atlas questline and achievements therein, just like with the AtlasPass v1.
What’s the Best Way to Get Units?
Sell things. That’s… basically it.
In the very early game, pretty much your first cash-crop, so to speak, is going to be mining and selling Emeril. You can sell pretty much anything, but Emeril goes for 200-300 Units apiece, is easy to find on many planets (mineral around sinkholes), and isn’t used for pretty much anything else. You can do the same thing with Gold later on, but Gold is used in a few recipes and is usually found on more hostile planets.
Also in the early game, go ahead and sell any weird items you might pick up. Neutrino Controllers, Gek Charms, whatever. While they have functions later in the game – from recipes to increasing Faction reputation – you will find plenty in your travels, and it’s not worth the precious inventory space when you’re slumming around with less than 20 slots.
Later on, you have more options and a few more considerations. Keep in mind though, that whenever you sell something on the market, you will get a worse price the next time you leave the screen. So when selling, do so in bulk.
Missions: these are the Radiant-style random quests you can pick up from the Mission NPC on every Star Base. Each time you successfully complete a Mission, you get faction reputation and the stated reward. If the reward is a Blueprint you already own, you’ll get ~88k Units instead. The other items you receive are a bit esoteric and usually vendor trash, but sometimes can be worth a surprising amount of Units.

Almost doubled my Units right there.
No matter what method you end up doing, I recommend filling your Log with Missions at each Star Base you encounter. Many of them can overlap, such that you can fulfill several at once from the same activity (e.g. killing Sentinels, etc), and you can turn in successful Missions at any Mission NPC. Plus, as you move up the reputation ranks, the standard Mission starts awarding 250k Units by itself and the items can be worth several million.
Farming: This is pretty much the ultimate source of Units in the game. The idea is build a base, plant some crops, harvest said crops, and then turn the material into more expensive things that you then sell. Example:
- 100 Frost Crystal + 200 Solarium = Heat Capacitor.
- 100 Cactus Flesh + 200 Star Bulb = Poly Fiber
- Heat Capacitor + Poly Fiber = Circuit Board
- Sell Circuit Board for 1 million+ Units apiece.
If you’re looking for a more in-depth guide, see this Reddit thread. Circuit Boards aren’t the priciest item you can create, or the easiest for that matter, but that’s the basic idea.
Trading: If you have a lot of starting capital, a LOT of free inventory space, an Economy Scanner, and plenty of Warp Cells, you can make some money buying vendor trash from one system at a discount and selling to another at a profit.
Next time you’re at a Trade terminal, look at what items are for sale. At the top of the list are likely some random items with a little green Unit symbol and the text that they are -X% cheaper than the market average. These items have tool tips which then tell you which systems need them more, e.g. will sell for over the market average price. So, buy as many as your Starship will hold, fly over to the target system, and sell them all. Then at this new system, buy the next set of goods, and sell at the next system. Wash, rinse, repeat.
Scanning: this is more of a side-hustle than anything else, but Units are Units. Basically, each time you touch down on a new planet, go ahead and scan as many plants and animals as possible.
With zero upgrades, you only get about 200ish Units for each discovery. With two Scanning upgrades though, suddenly each new plant will give you 20k and animals will sometimes break 100k apiece. I have as yet to find the third upgrade for either Scanner, but I’m looking forward to the boost in income from doing something I was going to do anyway.
Miscellaneous Tips
Gathering Kelp: While you can grow or purchase pretty much anything you might need for crafting purposes, the exception are Kelp Pods. For these, you need gather them manually, and they only exist on planets with water.
The best way I have found to gather them is using a Nomad, aka hoverbike:

As pictured, drive over the water on the Nomad and use it’s mining laser to collect the Kelp. This method is significantly faster than trying to use the Roamer to drive along the bottom, and much better than the default method of actually swimming around.
Advanced Ark Guide
A lot of the fun of survival games is learning from your early pain and suffering, figuring out how everything works, then coming back and steamrolling those same challenges. If you are just looking for some early-game direction, I recommend reading the Spoiler-Free Beginner’s Guide. It gives you a leg up, but not the whole body.
The rest of this guide? The whole damn body. Read at your own risk of adventure.
General Base Considerations
First things first: build two beds. You can stick two practically on top of each other, while still fitting in a 1×1 Thatch hut. Beds have a ~5 minute respawn cooldown, but it’s per bed, so having two will effectively remove the cooldown. This is a good idea whether you’re at an outpost or your main base.
Second… go ahead and double or triple up on everything, wherever you are. A stack of 200 Metal Ore takes over 30 minutes to smelt in one Refining Forge. Split that stack across two Forges, and now it only takes 15 minutes. Chances are good if you managed to collect a whole stack of Metal Ore, the extra 125 Stone and 65 Hide for Forge materials are not going to be a limiting factor here.

Resources are cheap, time is not.
Similarly, if you’ve unlocked the Preserving Bin and have a dino capable of harvesting a bunch of meat, go ahead and throw down 3-4 Campfires at a time and light them all up. Stacks of Cooked Meat are always going to be useful, either as general walking-around food or Cooking Pot materials, and the collected Charcoal will useful for Gunpowder.
Third, take a moment to reflect on your base layout and location. How far are you from water? Are there strategic resources nearby? Is this area defensible? There is nothing particularly stopping you from recreating a primary base elsewhere… other than the logistics of either moving all your old stuff and/or tamed dinos. Better to get it right the first time though.
As far as layout goes, there are some obvious-in-retrospect ways of arranging things. For example, you are going to want most of your crafting stations and containers within reaching distance of each other without moving – this will allow you to move hundreds of pounds of resources between containers, e.g. double your max carrying capacity. Likewise, you will want there to be room for you to do the same thing when removing items from tamed dinos to your containers.
This was my base setup originally:
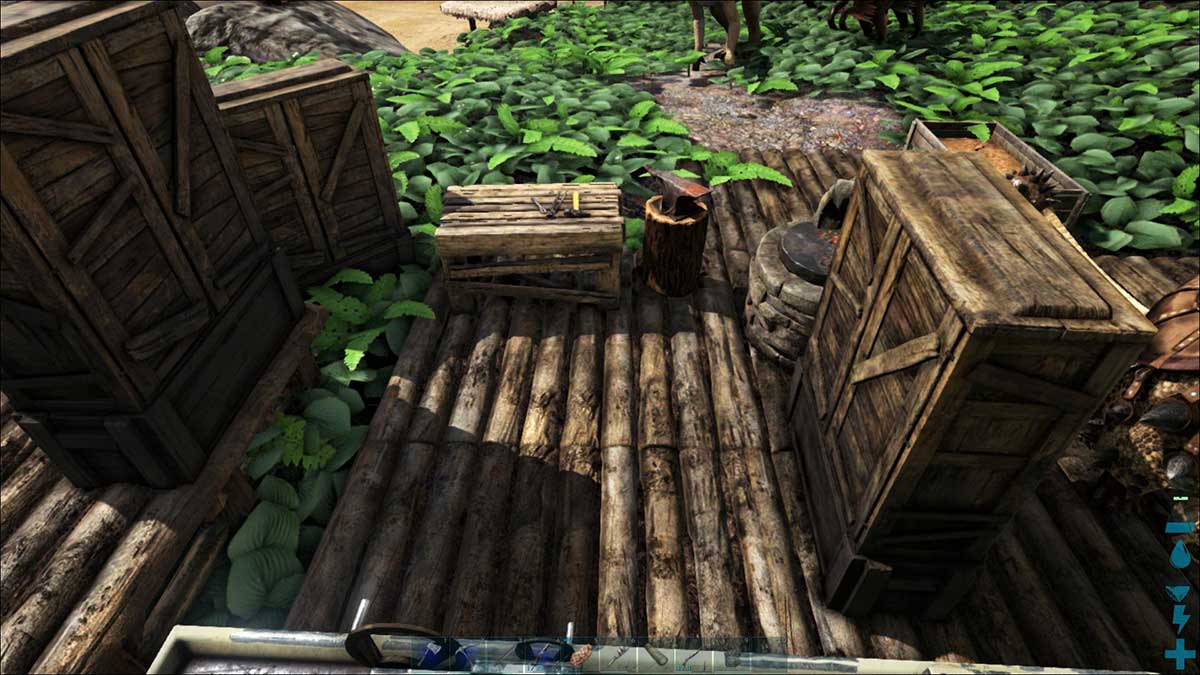
Not like this.
While everything was within reach, I actually had to hop over my Smithy to get out of the circle, and I was constantly running out of room for stuff. After watching some Youtube videos of other setups though, I realized that yeah, you can arrange your Large Storage Containers like this instead:

Doubles as a good OCD test.
Four times the storage and more room to move around. I removed the Refining Forge entirely, because my main base is nowhere near natural Metal deposits, and it’s much more efficient smelting on-site, and either bringing back the Metal Ingots or finished products.
Base Locations
Speaking of that, where should you be building a base? The answer is: wherever you want.
But, really, here are some other considerations:

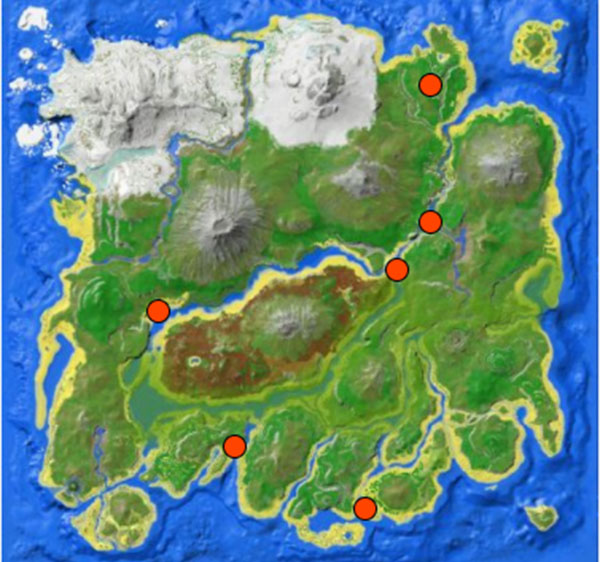
Consideration 1: Metal Nodes
The above map displays Metal Nodes around The Island map, along with the Obelisks. No matter what you plan on doing in Ark, you will need Metal eventually, for weapons, ammo, structures, tools, or even just saddles. It’s not impossible to build your main base over near, say, the Red Obelisk, but you will be performing some serious long-distance trucking to get those ingots.
Another consideration? Check where beacons come down. That’s right, there are specific, set locations where beacons spawn on the regular. Most of them will be filled with garbage, especially if you build up in the southern areas of the Island. But, hey, free is free. If it’s all the same to you, I’d suggest going over to that next ridge where they spawn before setting down roots.
Finally, consider where some more esoteric resources might be available. Giant Beaver Dams, for example, are great sources of Cementing Paste and Wood. While the specific spawn locations are not fixed, there are some rough guides. Giant Bee Hives can spawn pretty much anywhere, and can technically be moved, but if you manage to find one near a potential base location, that area should be considered prime real estate. Oh, and if you’ll be needing Sap, maybe choose something closer to the Redwood Forest area.
Countering Dinos
When you are just starting out, just about everything is scary and can kill you. Once you figure out “the trick” for specific tiers of dinos though, they start becoming speed bumps instead of brick walls. Less scary, but can still kill you if you’re sloppy.
Here are the tiers:
Slingshot: This tier encompasses any dino encounter that can be defeated by simply backpedaling at normal speed. This includes any passive creature like the Dodo, but also more dangerous ones (once provoked) like the Trike and Turtle (Carbonemys), provided they could catch you. Which they shouldn’t be able to.
Spear: The simple spear provides enough knockback to keep the target at bay until death. Quintessential example being the Dilo (Dilophosaurus), aka the spitting one. Insects and most fish belong to this group too. Troodan, notably, do not, since they can leap back at you.
Bola: Too fast or large to be affected by the spear’s knockback, but small enough to be rooted by a Bola. Most common contender in this tier is the Raptor. While the Bola can trivialize encounters with these dinos, keep in mind that it takes a few seconds to wind up the throw, and most of these dinos are especially dangerous if they get the jump on you on the ground.
Platform: Encompassing the rest of Ark’s carnivores unaffected by the Bola, you will likely need to be on a platform (e.g. cliff face, rock, structure) in order to safely take it out. Alternatively, sometimes a platform can be substituted with a Wooden Spike Wall instead. This works well with creatures like the otherwise deadly Therizinosaur, who will happily attack the 3500 HP wall while you re-feather its head with arrows.
All of the above assumes you are trying to take down a dino unassisted, using common weapons around the level of the beast you are encountering. Facing down a Carno on foot with nothing but a Crossbow is scary. Doing so while wielding a Pump-Action Shotgun and 400+ HP with armor? Much less so. Hell, add two Trikes to your bodyguard detail and you can take out a large chunk of the food chain using just a Spear yourself.
Taming Dinos and Utility
It always bear repeating: Ark is a dinosaur taming game. What balance exists in the game is dependent upon it; a lone survivor isn’t one for long. Here is some early-game progression:
- Unlock the Slingshot at level 5. Go tame a few Dilos.
- Unlock the Wooden Club at level 8 and Bola at level 9. Tame some Raptors.
- Farm Hides for a while, using your Bow (level 10) and/or dino buddies.
- Unlock the Trike Saddle at level 16, craft it, and go tame a Triceratops.
- Unlock Mortar and Pestle (level 6) if you haven’t already, and use the Trike to collect hundreds of nacroberries in less than a minute so you can turn them into Narcotics.
- Tame another Trike, and leave both parked in your base for protection.
- Unlock Tranquilizer Arrows at level 21. Enjoy your ability to tame damn near anything.
Along with their normal characteristics, many dinos have “secret” talents that elevate their value far beyond normal. For the most part, you will need to have a saddle created for the dino in order to take advantage of their skills, but sometimes you do not. Here is a non-exhaustive list, based on the level at which you can craft a saddle for them:
- (Lvl 6) Phiomia: Force-feeding Stimberries will create Medium Feces on demand.
- (Lvl 16) Trike: Excellent tank/base defense, gathers 100s of berries at a time.
- (Lvl 18) Raptor: Best early-game mount, and protector while exploring.
- (Lvl 20) Equus: e.g. wild horse, has reduced Stone weight and is fast. Saddle acts as Mortar & Pestle.
- (Lvl 30) Iguanodon: Infinite Sprint on four legs, high jumping on two. Can turn plant into seeds.
- (Lvl 31) Mammoth: Wood gathering machine, and makes Wood weigh 75% less.
- (Lvl 34) Doedicurus: Stone gathering machine, and makes Stone weigh 75% less.
- (Lvl 36) Ankylo: Metal gathering machine, and makes Metal weigh 75% less.
- (Lvl 37) Sabertooth: Efficient at gathering Hides, Chitin, and Keratin. Decent speed.
- (Lvl 38) Pteranodon: First flying mount. Pretty speedy too. Can grab tiny dinos.
- (Lvl 40) Beelzebufo: e.g. giant toad, huge jumps, turns insects into Cementing Paste, fast in water.
- (Lvl 43) Pelagornis: Flyer that can land on water. Harvests fish easily. Fishing Pole from saddle.
- (Lvl 61) Castoroides: e.g. giant beaver, Wood gathering machine, gathering Wood automatically while Wandering. Wood, Stone, Thatch, and Fiber weigh 50% less. Fast swimmer. Saddle is mobile Smithy.
- (Lvl 62) Argentavis: Fantastic flyer with lots of Stamina and Carry Weight. Can pick up most medium-sized dinos, including Raptors, Titanboas, etc. Best everyday flying mount.
- (Lvl 69) Therizinosaur: Insanely versatile, bordering on OP. High health, high DPS. Left-click harvests Meat and Wood incredibly fast. Right-click harvests 100s of Fiber from bushes. C attack harvests Hide and Chitin from corpses, Berries from bushes. Each level-up also allows greater specialization in harvesting types (Delicate vs Power) via Interact Menu.
As you might expect, higher levels give you access to better options. Do note however, that your ability to actually find and/or tame these dinos are not assured at the level you could. For example, while you unlock the saddle at level 34, the Doedicurus curls up into a defensive ball after losing health, which makes knocking them out difficult without having Tranq Darts (unlocked at level 62). One of the few ways around that is to use a Beelzebufo’s attack, which adds Torpor while dealing little damage. But even then, the Beelzebufo saddle is only unlocked six levels after the other one.
Then there is the matter of finding these dinos. The Mammoth and Equus are relatively low level tames, but they are not commonly found in the South, which is where you might be spawning as a newer player. So, if you want to be taming creatures when you unlock their saddle, you might have to, ahem, hoof it yourself and find them.
Cooking Like a Pro
There are two types of recipes: Standard and Custom. It’s a good idea to utilize both.
Standard Recipes
All recipes below require there to be water in the cookpot, in form of a filled waterskin.
- Enduro Stew (+melee, +healing): Mejo (10), Carrot (5), Potato (5), Stimulant (2), Cooked Meat (9)
- Focal Chili (+crafting, +movement): Mejo (10), Yellow/Blue/Red (20), Lemon (5), Cooked Meat (9)
- Lazarus Chowder (+underwater): Mejo (10), Corn (5), Potato (5), Narcotic (2), Cooked Meat (9)
- Calien Soup (+hot area): Mejo (10), Yellow/Red (20), Lemon (5), Stimulant (2)
- Fria Curry (+cold area): Mejo (10), Blue (20), Corn (5), Carrot (5), Narcotic (2)
- Medical Brew (+40 HP): Red (20), Narcotic (2)
- Sweet Vegetable Cake (special): Fiber (25), Corn (2), Carrot (2), Potato (2), Stimulant (4), Sap (4), Giant Bee Honey (2)
As you might expect, the feasibility of having a ready stock of most of these items is dependent on having a robust Greenhouse situation and/or playing on a server with Crop Growth cranked up. Medical Brew is the exception, needing only some Narcotics and 20 Tintoberries, both of which can be harvested enmass by a Trike or other herbivore. The catch is the 2 hour spoilage timer, although it lasts longer when refrigerated.
Custom Recipes
While custom recipes might sound both cool and complicated, it is really neither. The steps are:
- Craft a blank Note.
- Place Note and ingredients in Cooking Pot.
- Click Make Recipe
- Ensure Recipe note is in Cooking Pot with ingredients, then start fire.
The final output is an item with a percentage of the effects of the individual ingredients. What percentage that ends up being is based on your Crafting Speed stat at Step 3 only. A full optimization would require a level-capped player to consume a Mindwipe Tonic, place all of their upgrades in Crafting Speed, consume a Focal Chili, and then pen some recipes before using another Mindwipe Tonic to get their stats back. Thereafter, whoever uses that recipe will get the full benefits no matter their Crafting Speed. Because that makes sense.
For the rest of us, the “hidden” benefits of custom recipes (with the help of Focal Chili) still makes things worthwhile. For example, a custom recipe for 20 Raw Meat creates an item that grants 43 Food and 32 HP. That may seem pitiful considering a single piece of Cooked Meat restores 20 Food and 8 HP. The upside is that the custom recipe doesn’t need to be cooked, weighs 0.3 pounds, and lasts for 48 hours in your inventory, rather than 20 minutes.
So, really, custom recipes are mainly about saving space and avoiding spoilage. Did your Mammoth get bogged down with hundreds of pounds of berries when it was harvesting lumber? A 10 lb stack of Tintoberries can get refined down to a 1.1 lb paste that grants you 53 Food and 15 HP.
Bonus tip: Stimberries and Stimulants are great for giving a Stamina boost at the expense of thirst. Cut out the downside by creating a custom food (as opposed to drink) recipe of, say, 50 Stimberries. That’ll give you 27 Food, 8 HP, and ~89 Stamina back without the thirst. Just note that these gains are capped at basically 1/second, but it should still aid in your sprint out of danger.
Harvesting Specialty Resources
Beyond the basic building resources like Stone and Wood, there exists a lot of specialty resources to craft more advanced items. Gathering these special resources is sometimes a pain, depending on the method. Here are some of the best.
Cementing Paste
The default method of creating Cementing Paste is x4 Chitin/Kreatin + x8 Stone. This is incredibly inefficient though, as it would require 200 Chitin/400 Stone for an Assault Rifle, or even 2400 Chitin/4800 Stone for a Wooden Tree Platform.
The best and easiest source are wild Beaver Dams. These are built by Castoroides, and are located on land or in the water. While accessing the inventory of a Beaver Dam will cause all nearby Castoroides to go hostile, each one usually contains 150+ Cementing Paste. Since items do not respawn inside containers, it’s best to loot (and drop) the rest, so that the Beaver Dam collapses and another one can spawn later.
Basically, any water feature not the ocean or swamp.
The second best source is from the Beelzebufo mount. Using Right-Click against insects will result in 5-15 Cementing Paste apiece, along with some Chitin. The biggest challenge is finding a stable enough insect population. The good news is that the mount is adept at navigating the same areas where Beaver Dams spawn, so one can double-dip in farming.
Third, there is a “passive” form of collection: from tamed Achatina, e.g. giant snail. These creatures will slowly accumulate both Achatina Paste (same properties as Cementing Paste) and Organic Polymer up to 100 apiece in their inventories. The catch is that Achatinas only eat Sweet Vegetable Cake, which requires both Sap and Giant Bee Honey, which are themselves specialty resources.
(Organic) Polymer
The default method of Polymer production is x2 Cementing Paste + x2 Obsidian. This isn’t too terrible by itself, although it requires the construction of a Fabricator, which uses Gasoline as its fuel. Organic Polymer can be substituted for Polymer in all situations, and the Ghillie Suit actually requires Organic Polymer specifically in its construction.
Note: You will want a Wooden Club or Metal Sword for harvesting Organic Polymer. A tamed Pelagornis will also work effectively. Hatchets or Picks will give you none.
The best and easiest farming target are Kairuku, aka penguins. Each iceberg in the NW corner of the Island has a dozen or so, and they react basically like the Dodo when attacked or threatened. Tragically, the babies have the most Organic Polymer, so club them first.

They are basically… ahem, sitting ducks.
If you are far from the North, the alternative source will be from Hesperornis, aka duck-like birds. You can typically find them swimming around shorelines and rivers hunting for fish. While they have zero offensive capabilities, note that that they frequently exist in otherwise dangerous areas. Keep an eye out for Sarcos, Spinos, and other river terrors.
Considering that Organic Polymer spoils extremely quickly (~30 minutes) and is unaffected by most preservation techniques, be sure and have the other materials/blueprints ready to go for when you collect this resource. The last thing you want to happen is collecting a bunch and then scrambling to find the other materials.
Obsidian
Black rocks on mountains. Go mine them.
Oil
There are several different sources of Oil in Ark, with different levels of ease of acquirement.
The first would be the Oil Rocks up in the NW corner of the Island, and scattered about in other snowy regions. While the environment is hostile, mining them is almost as easy as clubbing seals for Organic Polymer. The tricky part is actually traveling all the way up there, so be sure to stock up via boat or wagon train once you’ve made the effort.
Second would be the Oil nodes located in many places in the ocean. These are usually closer to home, but often require long dives in hostile waters. Cook some Lazarus Chowder and bring a dino that can breathe underwater. Underwater caves are another source, but chances are that you won’t be needing this guide if you are advanced enough to be plumbing those depths.
Third, is from killing/harvesting Trilobites and Leeches. You actually get a respectable amount of Oil from each kill, but the trouble is actually finding a suitable amount of targets. In that regard, be sure and stop what you are doing and kill them if you happen to spot any, no matter what else you might have been doing.
Finally, there is a quasi-passive source: Dung Beatles. These animals have to be tamed and brought out of the caves they inhabit, then be fed a constant source of Feces (tame a Phiomia) before it is turned into Fertilizer and a bit of Oil. While it ain’t nothing, Medium Animal Feces is turned into x2 Fertilizer and x4 Oil after 15 minutes. This might be enough Oil to keep the lights on (via Gasoline), but not for those endgame Industrial stations that need 400+ to craft.
Sap/Giant Bee Honey
These are combined because the only real reason you might need either is for Sweet Vegetable Cake, so they go hand-in-hand.
For Sap, there is no reasonable way to avoid crafting at least one Tree Sap Tap. Then you have to specifically place them high up in a Redwood Tree. Being able to collect the Sap will require either a Wooden Tree Platform (600 Cementing Paste!) or constructing your own janky scaffolding out of Wooden Pole and ladders. Once that’s done, visit it periodically to collect your 20 Sap.
Giant Bee Honey can be harvested from Giant Bee Hives, tamed or wild. The taming process to set up your own Hives in convenient locations is quite difficult, and requires a lot of prep work – Bug Repellent, Ghillie Suit, hand-feeding Rare Flowers to the Queen Bee, etc. If you don’t need a constant source of Sweet Vegetable Cake, it might be better to just note the locations of wild hives and swipe their honey when needed; a Ghillie Suit and fast escape mount are recommended.
Final Thoughts
Ark is a fascinating sandbox experience, even when just played in Single-Player. No matter how powerful you end up feeling, the game world is ready to remind you to take it seriously or suffer the sometimes absurd consequences. While even a low-level Argentavis mount can effectively (albeit slowly) murder the meanest Alpha predators with impunity, all it takes is one Microraptor sailing out of trees to knock you off your mount into a pool of Megapiranha before you realize how dangerous the world still is.
Hopefully the above guide is enough to give you the edge necessary to survive out there. Or at least live that much longer.
Spoiler-Free Beginner Ark Guide
There is no tutorial or hand-holding in Ark. The game is unfair, the world hostile, and the dinosaurs are without remorse. While that is part of the appeal of the game for some people, it can also serve as a barrier to others who might otherwise enjoy the experience. That’s the purpose of this guide: provide enough hand-holding to get you out of the nest safely, and into free-fall.
Whether you flap your wings afterwards, is up to you.
Spawning
When you first start Ark, you will have to choose a general starting area to spawn into the world, but the specific location will be random within that area. As the game text mentions, some areas are easier than others. While you cannot do much about the randomness at the beginning, one of the first things you will want to accomplish is removing the randomness by building a bed, and NOT a Sleeping Bag. Beds have infinite respawns, sleeping bags have one respawn.
Note: You can build more than one bed. In fact, I highly recommend you build at least two, even in your first starter base. There is a respawn cooldown of 5 minutes, but that’s per bed. This will allow you a 2nd chance at collecting your stuff if the first naked run doesn’t work out.
Basic Gathering
At the beginning, think Minecraft: punch trees for Wood and Thatch, collect rocks from the ground, then craft a Stone Pick. Use that to collect some more material to craft a Stone Hatchet. Between the two, the Hatchet will collect more building material (Wood, Stone, Hide) from an object, whereas the Pick will collect “special” material better (Flint, Metal, Meat). For the majority of the game, the Hatchet is where it’s at.
By the way, save every piece of Flint, Charcoal, and Spoiled Meat you find/create. You’ll be using those quite a bit for mid-game stuff.
Death
Dying in Ark is practically an everyday experience in the beginning, especially before you get to taming a lot of dinos. When you die, everything that you were carrying will drop to the ground into a backpack, which will despawn in 15 minutes. Additionally, your backpack will (usually) have a beam of green light shooting out of it, to assist in recovering your gear.
There are some key things to note here, given the above. The biggest is the fact that whatever killed you will still be hanging around your corpse. Dinos will wander around randomly, but they frequently do not roam large distances, and certainly not within a tidy 15-minute timeframe. So, you will need to make a decision about whether or not it’s worth trying to grab your stuff. That decision will also be informed about whether or not you can grab your stuff naked, which is your immediate condition having just respawned.
Here is a good breakdown off “the rules” then:
- Only carry what you are willing to lose.
- Die in a convenient location.
- Don’t be greedy.
The first rule is just a basic philosophy that you will need to embrace in Ark. Do you really need to be running around in your best armor and weapons all the time? Are you sure that carrying two rafts in your inventory is a good idea when exploring a cave? Unlike a lot of games, the basic armor and weapons of Ark are still viable for a large portion of encounters you’ll face. Once you have tons of resources and duplicates, sure, go out there in your Sunday best. But only do that if you’re not afraid of losing what you got.
A convenient location to die would be one in which is farther from whatever killed you to begin with, but easy to access for your replacement. Sometimes this means throwing yourself from a cliff, sometimes this means not throwing yourself from a cliff. Similarly, forcing that Carno to chase you into the water means there will be a buffer to snag your stuff back. Then again, there could be a swarm of sharks in the area too. Try your best, but also acknowledge that sometimes you will need to cut your losses and move on.
Finally, being greedy means hitting up one last node despite having already collected more than you need. Every moment away from home is a risk, and nothing in your inventory is really yours until it makes it back into container. Besides, you’ll likely have more than one death due to something dumb like Compys who ate your ankles because you gathered 20 more pounds of Metal Ore and became too encumbered to run away.
Inventory Interaction
By default, E is the button to interact with just about everything: containers, campfires, dino inventories, etc. This will get annoying over time though, because pressing E around a campfire will light/smother the flames rather than giving you access to the Cooked Meat you wanted. Get in the habit of pressing F to access inventories instead. Pressing F will directly access the inventory of your target, up to and including a dino you might be riding.
Taming
This might seem silly to mention, but this is a dinosaur taming game. When I first started playing, I didn’t tame anything until level 21 when I unlocked Tranquilizer Arrows. This was a mistake. You can and should be taming dinos as soon as you have your basics covered, e.g. hut with some storage and a bed.
Here are the steps to taming:
- Render a dino unconscious.
- Feed it food it likes.
- ???
- Profit
Some dinos are tamed “passively,” which means skipping step 1). For the vast majority though, you need to knock them out. You accomplish that by dealing Torpor damage. The early game options available for inducing Torpor are: Slingshot, Wooden Club, and Tranq Arrows. While it will be quite a challenge to knock out fast-moving predators like Raptors with something like a Slingshot, there are a lot of dinos that are fairly slow and can be kited around. In the early game, for example, Dilos make excellent guard dogs. And if you manage to make it on top of a rock or cliff that the dino can’t reach, you can typically knock out just about anything.
Once unconscious, go up to the dino and access it’s inventory by pressing E or F. Transfer food from your inventory to theirs, either by left-clicking for individual items, or by pressing T to transfer the entire stack. While there is special “kibble” that can be used to speed up the process, you can stick with raw meat for carnivores and berries for the herbivores. Special note for the latter though, do NOT give them Stimberriers – eating those can make the dino wake up faster.
Depending on the server settings, taming dinos can take a long time. To keep them unconscious, you’re going to need to keep their Torpor meter up. Beating them with a Wooden Club can do this, but any damage taken will reduce Taming Effectiveness, which in turn makes the dino gain fewer bonus levels. Typically, you’ll want to use either Narcoberries or Narcotics. Place either one into the dino’s inventory, hover over the icon and press E. This will “force-feed” the dino the item. The Torpor gain will not be immediate, but rather gradual. Depending on the dino, you may need to force-feed them quite a few.
Note: many older videos/guides used the term “Remote Use Item,” which doesn’t exist in the game anymore. Pressing E on an item in the dino’s inventory does the same thing.
Controlling Dinos
Once you have tamed a dino, there are several means by which you can control them. If you have a saddle available, you can directly mount them and ride around. Some dinos are more useful than others as actual means of transportation though. Raptors are extremely fast, for instance, whereas Trikes are extremely slow. That said, saddles give you access to a given dino’s special talents, which sometimes more than makes up for its other deficiencies. For example, that same slow Trike can harvest 100s of berries at a time from nearby bushes, but only if you are riding it with a saddle.
Dinos are still extremely useful even without a saddle. If they are on Follow Mode and Attack MY Target, they will, well, follow you around and help kill your foes. This can and will save your life many a time if you happen to stumble into a bad situation you were not prepared for. If you are trying to tame additional dino pals though, be sure to switch your current bodyguards to Passive.
Surviving the Early Game
As mentioned previously, Ark is unfair. But it is unfair in fairly consistent ways. There will be times when there really is nothing you can do to avoid death. Other times? You can survive. Here are some quick tips for the common causes of death in the early game.
Dilos – Counter: Spears. The biggest gimmick with Dilos is their spit attack. It’s sometimes difficult to juke, so I like to jump right before they spit, which usually causes it to sail over my head. Beyond that, a simple Wooden Spear has greater reach than their melee attack, and will knock them back far enough to strike again with relative impunity.
Raptor – Counter: Bolas. Raptors are too fast to outrun, and spears aren’t near strong enough to keep them at bay. But a single Bola will automatically root them for ~30 seconds. Once rooted, shoot them in the face, or maybe beat them unconscious with a Wooden Bat if you have one handy.
Carnos – Counter: Turtles. Truly one of the more annoyingly unfair dinos in the early game, Carnos have a HUGE aggro radius and will relentlessly chase you down with what seems like infinite Stamina. One trick though, is that if you can kite them into the path of a turtle (i.e. Carbonemys), the Carno will injure itself and start attacking the turtle instead. Take that opportunity to book it or try and take it down.
—–
Hopefully the above is enough get you started in your Ark experience.
Quick & Dirty Guide to Fallout 4
Just now picking up Fallout 4? I envy you.
Here is all the spoiler-free info I wish I had before I started playing.
The Baseline SPECIAL
If you are new to the series or just want a character build that works, I consider this the baseline:

TL;DR
The leftover points can be put wherever, but you’ll probably want to get Endurance to at least 3.
Why is this the best? Simple: it unlocks the largest amount of the best Perks in Fallout 4.
Strength – 3
Unlocks Armorer, the first rank of which will let you squeeze out some extra mileage from whatever armor you manage to loot; Armorer also becomes important if you decide to go the Power Armor route. The rest of the Strength tree is useless for anyone but melee character builds and can thus be ignored. Note, however, that Strength impacts your Carrying Capacity.
Luckily, Companions are easy to come by and can carry ~200 lbs of wasteland junk.
Perception – 4
Unlocks both Rifleman and Locksmith. Rifleman is probably one of the more absurd Perks in Fallout 4 simply because it increases the damage of pretty much all the weapons in the game: sniper rifles, shotguns, laser muskets, etc. Meanwhile, Locksmith will, of course, allow you to pick locks. Two things of note though: bobby pins are pretty common (no reason to take Rank 4), and you can recruit a companion that can unlock Master-level locks. As in, if you take that companion, you won’t need Locksmith at all. You’ll miss out on the XP and other companion banter however.
As an aside, Perception governs VATS accuracy, so you might want to dump some extra points in if you end up using VATS a lot.
Endurance – 1
Basically, there aren’t really any good Perks in this tree other than Toughness, which only needs Endurance 1 anyway. You should be able to easily reach your health regen needs via farming, resting, and so on.
Optional: Endurance 3 will unlock Life Giver, the third rank of which grants passive regeneration at level 16. Since you’ll probably want Endurance to be higher than 1 anyway just so you won’t be one-shot by grenades and such, this isn’t much to ask.
Charisma – 6
This is technically optional, but Charisma 6 unlocks Local Leader. The first rank of Local Leader makes it so that all of your Settlement Workbenches becomes shared stashes (for components only). Basically, if you want to engage with the Settlement minigame with any kind of seriousness, you’re going to need this Perk. Charisma also improves prices when buying/selling stuff with vendors by about 5% per point.
Optional: Charisma 1, if you are fine either Fast Traveling all the time, or otherwise don’t plan on doing much with Settlements. Just note that Charisma impacts your dialog success rates. You can generally cheese these with chems and reloading saves though.
Intelligence – 6
This is enough to unlock Science, Scrapper, and Gun Nut, e.g. the crafting trifecta. While it is possible to just get Gun Nut at Intelligence 3, you will be hurting for screws, a crafting component that is otherwise sparse in the wasteland; the first rank of Scrapper will get you screws for days by salvaging crappy pipe guns that drop from 99% of the NPCs you kill. Meanwhile, the first rank of Science will unlock a plethora of both gun mods and Settlement options.
Agility – 3
It’s enough to unlock Sneak. Keep in mind though, that Sneak is less useful in Fallout 4 than in games past, because non-aware hostile mobs do not show up on the compass ribbon. You can certainly hear them talking to themselves, but the likelihood of you actually using Sneak successfully indoors (for the delicious Sneak Attack Criticals) is pretty small. Outdoors, Sneak is almost superfluous as you can generally just crouch and snipe from afar.
Luck – 2
It has been said that Luck is one of the more powerful stats in Fallout 4, and that may well be true. However, unless you are willing to commit a lot of stat points, two is enough to unlock the first rank of Scrounger, which will pretty much solve your ammo problems for good. Plus, sell your unneeded ammo for cash.
Optional: Luck 8 for Grim Reaper’s Sprint or Luck 9 for Four Leaf Clover. Grim Reaper’s Sprint has always been pretty powerful in the other Fallouts, and it’s technically possible for you to unlock it at level 2, if you wish. Going all the way to Luck 9 will allow you to leverage a pretty absurd amount of Perk synergy: Four Leaf Clover procs will give you an auto-critical, which you can bank for whenever with Critical Banker, which do an impressively high amount of damage with Better Criticals, and will likely kill your target and possibly proc a full AP bar via Grim Reaper’s Sprint, letting you pump out more bullets and restart the process with Four Leaf Clover.
Advanced Tips
Been around the Wasteland a bit, eh? Okay, here are my observations from playing the game:
Free Stat Points
The stat Bobbleheads are back again, and picking them up increases the relevant stat by 1 point. In other words, if you have a specific character build you are going for, you can budget your SPECIAL stats accordingly. For example, my baseline recommendation has Charisma set to 6 for Local Leader. If you don’t anticipate using Local Leader until after you find the Charisma Bobblehead, you can set Charisma to 5 and use that extra stat point elsewhere.
Also, there is a “You’re SPECIAL” book laying on the floor in your former house in Sanctuary. Pick it up and you’ll get a free stat point you can place wherever you want.
Advanced Stat/Perk Planning
The Baseline I recommended originally simply gives you complete access to most of the best Perks right away. If you instead follow the Bobblehead route (e.g. relying on the free stat to meet requirements) though, you can do some goofy things… like this:

Almost makes me want to reroll right now…
Or maybe not put it all in Luck, but split it into Perception and Agility. Or whatever.
In fact, you can go even further down the optimization route with the understanding that not only will there be “dead levels” in there where your best Perk choice will just be leveling up a stat, but also that you don’t necessarily even need a particular Perk until later in the game. For example, Science won’t be used for much until you start routinely encountering enemies with laser weapons. You won’t want to unlock Local Leader until you have a decent stockpile built up, so maybe use Charisma as a dump stat until the end of your 20s.
Collect that Junk… Intelligently
Nearly every piece of lootable debris can be broken down into useful crafting components, which will be important if you engage in the Settlements system at all. There are two tricks here that you should pay attention to though.
The first is “Tag to Search.” If you open your Pip-Boy and browse over to the Junk tab, one of the options should be Component View. This will show all the components your currently held Junk will break down into. If you notice any with Aluminum, Screws, Leather, Oil, Adhesive, Copper, or whatever you might be low on, go ahead and tag those. Within a few hours, you’ll start to have a Pavlovian response to Office Desk fans, Lighters, and similar items.
The second tip is to not just rely on scavenged items in the world. Vegetable Starch is a Cooking recipe that makes 5 Adhesive per batch. Cutting Fluid is a Chem Station recipe for Oil. But also do not discount your everyday friendly shop keepers in Diamond City and beyond:

Mouth literally watering.
I used to have a Leather problem. Then I realized that I can get Moe to part with 6 Baseball Gloves for 5 caps apiece. That’s 18 pieces of Leather for 30 caps. The other vendors are not as lucrative in say, Oil or Aluminum, but it certainly beats revisiting already-cleared factories scrounging the floor for cans or spending an insane amount of caps for “shipments of X” at several thousand caps apiece. Do a little browsing each time you offload your raider loot, and it will all add up.
Mod Shuffling
After doing some weapon upgrading, you might notice your inventory filling with random-seeming weapon mods. What is actually going on here is that whenever you replace one mod with another, the old mod is not destroyed, but removed and stored. You can take advantage of this fact to both access better mods than you may be able to craft, or even use it to bypass the need for Gun Nut entirely (although you’ll want it for other reasons).
If you come across a weapon with a mod you want – say, a Silencer – head over to the crafting table and act like you are creating a new mod for that slot. In fact, that is exactly what you are doing: replacing the current mod with hopefully the “None” or “Standard” version. Voila! Now you have a Silencer despite not having Gun Nut maxed out. Just keep in mind that mods are base-weapon specific. A Silencer for a Pipe Gun is different than a Silencer for a rifle.
Keep a Charisma Suit Handy
Caps are more important in Fallout 4 than they have ever been, and Charisma is your ticket to getting more of them. Before offloading your latest haul of raider loot, equip your Charisma Suit, e.g. all the items with bonuses to Charisma. It should not take you too long to find clothes with at least +2 Charisma, and you can stack two additional points from both Sunglasses and Pompadour wig. Each point of Charisma improves prices by about 5%, which absolutely adds up over the course of the game.
Speaking of Charisma, vendors, and caps…
Better Living Through Grape Mentats
One of the most insane chems in Fallout 4, Grape Mentats are a craftable variation on the standard Mentats that provides you with +5 Charisma and a 10% buying/selling bonus from vendors. Whether you stroll into Diamond City laden with raider loot or are eyeing a vendor’s Legendary equipment selection, you will want to take some Grape Mentats.
How much of a difference does it make? This much:
- At Charisma 9: item costs 2331 caps.
- As above + Grape Mentats: item costs 1366 caps.
- As above + Cap Collector perk: item costs 1301 caps.
As you can see, Grape Mentats “stack” with Cap Collector, but not very well. Which is fine, because Grape Mentats are easy to make and have no prerequisites. The ingredients are: Hubflower x2, Mentats x1, Whiskey x1. Given that the latter two are everywhere in the game (including on vendors), the only difficult part is actually getting Hubflowers.
Luckily for you, I have found a few good locations:
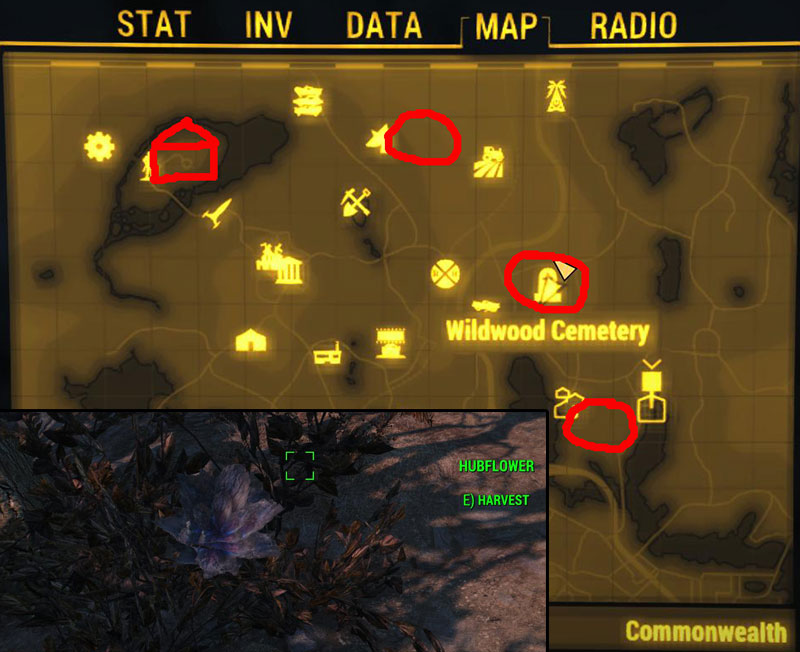
You can never have enough.
The circled areas generally have 4+ Hubflower nodes in a small area. Said nodes do respawn eventually, on an unknown timetable.
Avoid the Designer Perk Traps
Certain Perks have always been hit-or-miss in the Fallout series (Nerd Rage! is still awful), but there are some that are worse than others this time around specifically due to decisions the designers have made.
For example, rethink your desire for a Sneak build. Sneak Attack Criticals are still in the game, but achieving them is incredibly more difficult this time around, and almost entirely superfluous. Non-aware enemies no longer appear on compass ribbon, so you almost have to make some noise to even know enemies are present. Sneak also requires heavy investment before you can move faster than an agonizing crawl, and you are likely to be instantly spotted indoors anyway. Making matters even worse, Fallout 4 has Legendary item prefixes that will double the damage of the weapon when used on enemies with full health, and another that adds an additional projectile. Why run around slow all the time when you can have a gun that basically gives you Sneak Attack Criticals by default?
Another subtle trap is Nuclear Physicist in the Intelligence tree. Take it if you want the Radiation weapon damage boost, but do not take it for the Fusion Core boost. Getting 25%/50%/100% longer duration on Fusion Cores sounds like something you’d want for a Power Armor build… right up until you realize that Fusion Cores can easily be bought from damn near every vendor in the Commonwealth. With Grape Mentats, I can buy Fusion Cores for 240 caps. So at Rank 3 of Nuclear Physicist (which requires level 26), I’ve spent three Perks all so I can… buy Fusion Cores for 120 caps. Rank 2 Cap Collector will get you infinitely more caps for two Perk points in comparison.
Other traps include Sniper and Penetrator in the Perception tree. While they perform exactly how they are described, the point is that they sound cool, but aren’t actually that useful. For example, if you are in a position to use a sniper rifle, you will typically be much better off waiting for your target to peek their head over cover and shoot them outside of VATS anyway.
Power Armor Decision
After one of the first quests in the game, you are given your very own suit of Power Armor. Deciding on whether or not you are going to try using it full-time is one of the more important decisions you can make. And, yes, you can use Power Armor all the time throughout the entire game. The only limiting factor is Fusion Cores, which aren’t actually that limiting at all in practice. But the question, again, is whether you want to use Power Armor all the time.

I’m tired of your shit, Preston.
The benefits are pretty clear: an insane amount of armor right off the bat, allowing you to tank damage and most non-water sources of radiation. Additionally, Power Armor automatically sets your Strength to 11 with a corresponding increase to Carrying Capacity. The individual pieces of Power Armor do take damage and need repair, but it generally only takes a few pieces of steel to get them back up and running again. From a mechanics standpoint, Power Armor can’t really be beat.
…unless you don’t like skipping most of the other gameplay.
While in Power Armor, you do not receive any of the benefits of other armor you might be wearing. For example, I came across a piece of Legendary leg armor that increases my movement speed by 10%. I bought a Legendary arm piece that reduces damage taken by Human by 15%. Incidentally, this is why I say you’ll want to make the Power Armor decision early: to prevent you from spending 2000+ caps on gear instead of Fusion Cores. Running around in Power Armor all the time basically means all those items – and any you might pick up along the way – are functionally useless.
The more damning for me personally though, is simply how Power Armor feels while playing. You walk slower, all the time. Power Armor doesn’t impact your Sneaking ability from what I can tell, but you will certainly hear your own mechanical footsteps all the time. A large part of your screen will be taken up by the Power Armor UI, even if you aren’t wearing the helmet piece. And if you do wear the helmet piece, 100% of your character’s spoken dialog will be filtered through the face mask. At first, it’s amusing, but you lose a lot of the voice-acting nuances and emotion this way IMO.
It’s a tough decision, so take your time. It’s not the end of the world if you change your mind – you can command your companions to don the Power Armor in your stead (assuming they don’t already have their own suit) – but there is no real reason to “level up” both paths.
Q&D Guide to Dead Island
Don’t ask me why I choose to write the guides for the games I do, because I wouldn’t be able to tell you anyway. A year-old game down to $20 on Steam? Here, have a ~4800 word guide about it.
In any case, the Quick & Dirty Guide to Dead Island is now keeping my previous Q&D Guide to Mass Effect 3 Multiplayer company over on the Design tab. If you are curious about the text-only formatting, it is basically for easy GameFAQS.com porting.
Now whether or not it will get accepted…
Quick & Dirty Guide to ME3 Multiplayer
There are a couple of things going on.
First, I removed the Currently page and turned it into a sidebar item instead. Time will tell if I actually update it with any more regularity than I did with the original page, but I’ll jump off that bridge when I come to it. In the meantime, it is accurate.
Second, I have a new menu page entitled Design. The only item in there currently is my Quick & Dirty Guide to Mass Effect 3 Multiplayer. I thought about posting it in its entirety here, but the idea is that the guide itself is going to be a permanent resource that can and will be updated occasionally. Indeed, when I started writing it in the weeks after ME3’s release, the goal was to send it off to GameFAQs as there were no similar resources at the time. Unfortunately, someone beat me to the punch, so who knows whether it will be accepted there now. The goal for the guide itself is to be something I wish I had available when I first started playing the game. If that interests you, check it out.
In any event, the Design page will eventually be home to other projects I have been working on that I want to be able to upload in a semi-permanent location. Most will be game-related, but some may not be. Unlike these blog posts, I will not be vouching for their peerless quality and relevancy to your daily lives.
Finally, I am going on vacation for a week, starting tomorrow. It is unfortunate that I shall miss the launch day of Diablo 3 in the process, but I will try and trooper on from the condo’s 2nd-floor beachfront balcony. I may schedule some posts ahead of time for you to read, or you may have to waste away the hours of my absence by forlornly browsing the archives. Either way, it shall be full steam ahead starting back on the 21st.

Slay the Spire: Quick Strategy
Feb 27
Posted by Azuriel
I have beaten Slay the Spire two times as the Ironclad and three times as the Silent. All of the runs were quite different insofar as specific cards and interactions go, but the overall strategy was basically the same for each one:
Avoid Losing Health
This probably sounds like I’m trolling, but I am quite serious.
Not losing HP anytime soon.
As with many games, HP is a resource in Slay the Spire. However, regaining HP comes at a much higher cost in this game. At each Campsite, you can regain 30% of your max HP, or you can upgrade a card. While sometimes necessary, each time you heal at a Campsite instead of Upgrading a card, you are forgoing dozens, if not hundreds of opportunities of using said upgraded card over the rest of the run. Even if you end up grabbing a specific card or Relic that heals you somehow, that is typically at the expense of a different selection that might have helped you in a different way. Much better to simply not need to heal at all.
So here are my tips in avoiding losing health.
Understanding and Loving Block
Blocking often feels bad, especially when it isn’t enough to absorb an entire attack. Instead of being one turn closer to ending the fight, you instead do nothing and take 2 damage, right?
Fist full of Curses, but Block still set me free.
Well, imagine instead that there was a 1-mana card that said “Gain 5 HP.” Would you play it? Yeah, you would probably play it as much as you could. Guess what. That’s what Block does any time it absorbs damage. There will be times when you will save more HP by burning down an enemy than blocking half the damage, but you also have to look beyond the current battle. If you save 10 damage now by burning down the enemy quickly, but lose 30 HP three fights from now, you have ultimately made a poor trade.
Now, there will be times where you have a fist full of Block cards while your opponent is doing nothing but buffing themselves. Those times will suck, and it’s possible you’ll take more damage overall later. However, consider the opposite case where you have a fist full of attack cards and a pile of damage coming back your way. The latter is much more dangerous than the former.
Combat is for the Fortunate
If you do not have a reliable means of avoiding damage via deck/Relic combos, you should not be taking unnecessary risks in combat. Or getting in combat at all. This means picking a route that bypasses as many regular and Elite encounters as possible. Yeah, combat gives you a chance to add cards to your deck, and Elites giving a Relic is cool, but you can also get cards and Relics in those “?” encounters, typically without losing HP. Do those instead.
This sort of route is ideal.
The biggest exception to the general rule is everything on the 1st floor. Since you are just starting a run, it behooves you to take as many risks as possible now, when failure does not sting as much, rather than later when you could lose hours of progress.
Relics Will Carry You
Your overall run will, in a large part, be dictated by the Relics you acquire. Nab the one that gives you 3 Block every time you discard a card? You should probably start picking everything that lets you discard cards. The beginning of a run is more free-form as a result, but you generally can’t go wrong with a fast cycle deck. Just make sure you pick up some Answer cards along the way.
Answer the Encounter Questions
Slay the Spire is currently in Early Access so this can change, but generally the “questions” that an encounter will pose and the subsequent answers are:
Exhibit A
Generally, you are going to want to have at least one card that applies Weaken no matter what. Several bosses have one uber-attack that will deal more than 40 damage at a time, so that one Weaken card will end up being the equivalent of “Gain 15+ block.” Would you draft a card that said “Deal 9 damage, gain 15 Block”? Of course you would.
Beyond that… well, it depends on the character you chose and the relics provided. Playing as the Silent means you have specific access to some very nice cycling cards, and can pick up cards that apply Poison. Tons of Block + Poison = eventual win. With Ironclad, you are generally more reliant on attacking, but don’t forgo Block cards on your way to stack Vulnerability (+50% damage). I had the most success with Ironclad when I kept a lean deck and upgraded the 0-cost card that buffed my Strength for the turn.
Accumulate Advantage
Some of the cards and relics you pick up during a run have an impact beyond any individual combat. For example, the Feed card gives you an increased max HP when it deals a killing blow, and the Alchemize card grants you a Potion. There are also relics that heal you when you cast a Power, or perhaps grant you a special action when you reach a campsite.
This may seem like another duh moment, but… do those things.
Specifically, engineer scenarios in which you can take advantage of them all the time. If you get a Feed/Alchemize card, start drafting card draw or extra block so that you can stall combat long enough to capitalize on them. If you get a bonus action at campsites, make sure you are not wasting the opportunity by having to heal up. You should avoid having to heal at campsites anyway (so you can upgrade cards instead), but that goes twice as much when one of your precious relic opportunities is consumed by something that is useless otherwise.
Posted in Commentary, Impressions
Comments Off on Slay the Spire: Quick Strategy
Tags: Quick & Dirty Guide, Roguelike, Slay the Spire, Strategy