Category Archives: Guide
The Outer Worlds 2 – Skill Checks and Other Tips
I have just completed a full playthrough of The Outer Worlds 2 in 70 hours, achieving the “best” (IMO) ending. Over the course of the game, I was taking notes on various Skill Check thresholds to try and better understand how many points were required for certain outcomes. Here is what I wrote down:
- Act 1 – 2, [4], 5
- Act 2 – [8], 12
- Act 3 – 7, 9, [11], 17
- Negotiations – [9]
- Companions – [14], 20
- Endgame – [7], 20
The bolded number in brackets is the predominant Skill Check level for that particular Act. So, for example, having Speech or Engineering 4 in the first area of the game is good enough to pass the vast majority of the corresponding Skill Checks. It is important to note, however, that some Skill Check levels depend on evidence collection and/or other dialog choices made beforehand.
Do I need Speech 20 in The Outer Worlds 2 for the best ending?
Technically no. There is a Speech 20 check at the very end of the game that bypasses the last fight, and delivers an easy resolution for the final dilemma. However, there are two other good options to resolve the dilemma. The second best requires only Speech 5 and talking down a particularly vexing character earlier in the game. The other option is supposedly convincing a faction leader to solve it with Speech 14. Barring that, you must either convince one of your crew, or go solve it yourself.
Was Lockpicking or Hacking Worth Taking?
I ended the game with Lockpicking 17 and Hacking 11, both of which were enough to open everything in the game except a final Hacking 20 computer at the final fight… which appears to just control a turret. If I remember correctly, the Lockpick 17 Skill Check I encountered was just a room full of forgettable loot, but since I had the Sleight of Hands perk (+10% Sneak Attack/level of Lockpick), I went ahead and kept it rather than reloading the save. Otherwise, I do not recall seeing a Lockpick check of higher than 12.
Is Sneak Worth Taking?
No… unless you are also doing a Melee-focused build. Sneak Attacks are extremely powerful and can one-shot most enemies, but you don’t actually need the Sneak skill to do so. The Treacherous Flaw will give you +100% Sneak Attack damage and Sleight of Hands gives you +10% per level of Lockpick. Between the two, I had +270% Sneak Attack damage across all weapons, which was further increased by various weapon-specific Perks (e.g. Point Blank Artist) and attachments like silencers. I routinely one-shot 3,000 HP enemies with zero points in Sneak.
That said, the Vital Striker Perk gives light weapons half of your Sneak Attack bonus damage even in combat. It does require Sneak 15 and Melee 15 though, so it is a spec-specific, late-game option.
How Useful are the Traits?
Most are functionally useless. The only good ones are:
- Brawny – Bypasses many Engineering checks
- Lucky – Bypasses a few plot/skill checks + grants extra 5% crit chance
- Innovative – Crafting twice as much ammo immensely helps in early game; bypasses a few checks too
In my playthrough, I took Brilliant and Witty (just like me IRL, tee-hee). Brilliant came up once, but otherwise solely functioned as +2 Skill Points. Witty came up as a dialog option all the time, but did absolutely nothing to affect the conversation. Plus, unless you are purposely killing entire factions, the Reputation protection doesn’t matter at all. And if you are doing that, you are probably taking the perk that grants bonus damage against factions that hate you, so Witty is double-useless.
Are there any Must-Have Legendary weapons?
The only Legendary weapon I consistently used throughout the game (once I got it) was Last Whisper. This is an absurdly powerful silenced plasma shotgun that deals +100% damage to unaware enemies (with up to 150% depending on Sneak) that automatically burns the body of anyone it kills. With a number of perks further enhancing Shotgun damage in general, I was able to consistently one-shot all non-boss enemies in the game… even with zero points in Sneak.
Other than that, The Rattler is a Legendary pistol you can (and should) purchase in the first town that holds its own for most of your time in Arcadia, with or without supporting Perks.
Are there any Must-Have Perks?
These come to mind:
- Pickpocket (Lockpick 1) – on launch you could steal quest rewards from NPCs, but that was patched out. Still, you can frequently steal valuable items and some plot items that would normally only appear after killing the NPC.
- Treasure Hunter (Observation 1) – The earlier picked, the better this Perk becomes. Every single container in the game – including piles of poop! – now can contain hundreds of bits worth of crafting ingredients to sell or fashion into useful items. Wouldn’t be surprised this gives 30k+ bits over the course of the game.
- Makeshift Armorer (Engineering 3) – Never took this myself, but if you want to add 500 armor to anything you wear, this is the Perk. The idea is that you craft expensive mods, then scrap/sell them for additional material, then repeat. Keeping Niles around as a companion means you can craft anywhere.
- Contingency Screen (Science 3) – effectively a free ~350 HP for every encounter.
Any Final Tips?
One thing I didn’t realize until very late in the game is that those Mod Vending Machines are actually kind of important. When you purchase a mod from them or a regular vendor, you get the mod and the recipe to craft the mod. This is important to know because you can find Legendary weapons later in the game that are typed to be the same as weapons you found earlier, such as Stun Baton. But when you have all the planets unlocked, good luck remembering which area sells Stun Baton mods – endgame areas only sell endgame weapon-types mods. It’s actually immensely frustrating.
I’m not saying to purchase every mod from every vendor, mind you. Just that if you think you’ll want Silencers on future guns, you may want to buy the Silencer mod for every weapon type that you come across, just in case. Or, I suppose, just have the Wiki handy.
Handheld Emulation
Let’s talk handheld emulation for a bit. I recently purchasing a Miyoo Mini+ after watching a bunch of Youtube videos, so I am, of course, now an authority on the subject. If you want to be one too, let’s go.
TL;DR?
If you’re new to the hobby, just buy one of the cheap models and live with it for a few weeks. It’s very easy to get lost in the sauce when there are like 50+ models across an entire spectrum of price-points, form-factors, and capabilities. If you find yourself not using it, great, you’re only down the cost of one AAA game or whatever. If you find yourself using it a bunch, or wishing you had a different model because you want to play X game on Y console, then congrats on the certainty.
For myself, I bought the following (prices as of today):
- Miyoo Mini+ w/ case ($55 Amazon; $40+$3 AliExpress)
- Anbernic RG35XXSP Flip ($80 Amazon; $60 AliExpress)
Why did I get another one? Although the case is nice with the Miyoo Mini+, turns out that portability takes a hit if you try to bring both. Having something with a clamshell design (RG35XXSP) seems much more intuitive and portable to me. Plus, the RG35XXSP is supposedly able to play some N64 games, and that is intriguing even though it doesn’t have analog sticks.
I haven’t received it yet, so the verdict is still out if it was a good idea.
Keep the Ceilings in Mind, Though
Unless you just like collecting gadgets, there are a few logical “ceilings” to consider. For example, I’ve bought two handhelds that cost a combined $135. That’s creeping up on the following alternatives:
- Switch Lite – $199 + $50/year sub
- Steam Deck – $399 (or $549)
- Odin 2 Portal Pro – $399
- (future) Switch 2 – $449 + $50/year sub
The Switch Lite is up there not because you can easily hack it to play ROMs – I don’t consider micro-soldering “easy” – but because the Nintendo subscription thing will grant you a Game Pass-esque access to a bunch of games up to N64. Does it have everything? Nope. But if your nostalgia is focused on Nintendo, well, it has most everything (non-Pokemon, non-Squaresoft) you could want.
Beyond that, you’re looking at $400+ and needing to decide how easily to play Steam games.
Final Thoughts
If you want to do your own research, I recommend the Retro Game Corps channel. All of his videos are very detailed, down to how the buttons feel to push, and he has covered pretty much every device.
Not to encourage any FOMO – and it’s probably being priced in already – but this particular hobby might end up collapsing soon due to the removal of the de minimis exemption:
Shipments under $800 that are sent through the international postal network will be “subject to a duty rate of either 30% of their value or $25 per item (increasing to $50 per item after June 1, 2025).”
I did a lot of Googling to try and figure out if “whichever is lower” (or higher, possibly) was accidentally left off, if both apply, or what. Assuming it’s just the 30% though, well, all of these devices are getting 30% more expensive extremely soon. Along with everything else too, of course.
Anyway. Back to the escapism.
Beginning Nightingale Tips
Here are some T1 beginning tips on playing Nightingale (post-Realms Rebuilt) that I wish I knew before.

Go Ahead and Build Your House Wherever
Nightingale is a game about portals and traveling to new places all the time. So… where is the best place to build your base? Near the Crossroads? Near a Portal? The actual answer is: wherever you want.
Fast travelling is easier than you think. Press M to bring up your map, and you’ll have two options: Travel to Respite, and Travel to Crossways. Clicking on Respite will take you to wherever you placed your Estate Carine, no matter the realm. That’s fairly straight-forward: porting home, dumping your inventory, and crafting some stuff. But how do you get back to where you were going? That’s where the Crossways comes in. There are portals in the Crossways. Specifically, these portals can only take you to the “Storied Realms” aka plot realms, but chances are that is where you are coming from anyways.
In any case, after you complete the 1st story realm you unlock the ability to craft your own portals wherever you want. So, again, don’t lose sleep over where you should build your base. Just do it.
Hold E to Collect All the Things
Did you just kill and skin a fae creature (you monster!) and see a bunch of Hide, Meat, Essence, and Bones pop out? Hold E to collect everything in one go. Chop down a tree on a slope and see the Wood Bundles start to roll away? Hold E. Mining Tin next to the water? Hold E occasionally. This method will not pick up sticks, rocks, and other interactable “nodes,” but it does work on basically anything that spawns in with the wispy glow around it.
Survivor Inventory is NOT Weight-Based
Early on, you can recruit an NPC to follow you around and fight and collect things for you. Unfortunately, they only have 15 slots of inventory, which means it’s easy to get clogged with all kinds of leaves, pieces of twine, and so on. The good news is that you can relieve them of those burdens, and instead load them down with 50kg stacks of Lumber and Ore, no problem. Extremely useful for when you strip-mining the fae realms for resources.
Don’t Let Survivors Bring a Knife to a Maul Fight
Speaking of survivors, ever wonder why your first survivor is dealing just 3 damage to those zombies trying to eat your face off? Because they’re equipped with 3-damage stone knife. Give them the Maul you aren’t using anyway, and suddenly they’ll be slaying mystical beasts while you sip tea and crumpets. Well, that’s a Tier 3 food, but you get the idea. Open the survivor’s inventory, put the new weapon inside, and then right-click it and choose equip. Don’t forget to give them your hand-me-down clothing after you upgrade as well.
Incidentally, you can also give the survivor a ranged weapon if that’s what you’re into. I recommend sticking to melee weapons though, to encourage them to take beatings on your behalf. If you do give them bows or guns, the good news is that they don’t need nor use up any ammunition.
Essence is of the Essence
When you are starting out, every spent Essence is a progression trade-off. Which crafting station do you unlock first? Is it worth unlocking (and crafting!) the Recovery spell? Once you get further into the game, the decisions become much easier, of course, but it’s also true that T1 Essence remains relevant forever as it is used to Repair even higher-tier gear.
So… pssst… interested in learning how to get some quick T1 Essence on the cheap? Check these out:
- Simple Saw Table – Paper x6 from Wood Bundle x2 [6 Essence]
- Simple Tanning Station – Straps x3 from Hide [3 Essence]
- Simple Workbench – Simple Wood Axe from Stone Block and Wood Bundle [10 Essence]
Once any of the products are created, right-click on them and choose Extract. Bam, enjoy the Essence. The Simple Wood Axe seems a clear winner, especially in the early-early game, but just note that these numbers are without any Augmentations from nearby decorations. And sometimes you just want to chop down a bunch of trees and/or clear all the Hides from your inventory, ya know?
Living the Charmed Life
There are a lot of little ways to enhance your gear in Nightingale, but one you don’t want to sleep on are Charms. These are unlocked under the Magick tab and represent conditional boons (and sometimes banes) that can be applied to tools and clothing. Key word there is apply, by the way – it does nothing in your inventory until you right-click and apply it to something. Ask me how I know.
One of the most useful ones in the early game is Charm of the Mule, which doubles your Carry Weight while reducing your Stealth by half. Seems like quite the tradeoff, but right now Stealth is pretty useless considering Bound always know where you are and using guns at all negates Stealth for several seconds afterwards. Once you get better backpacks you can drop it, if you want. Charm of the Wanderer is also great as it significantly decreases Stamina drain while gliding with the umbrella. Just note that Charms are only active when you have the item equipped. This means you are better off putting as many as possible on your clothing rather than on the items themselves.
Building from a Box
I was pleased to see that Nightingale allows you to use resources stored in chests to craft things at workstations. What struct me as odd at the time though, was how this did not extend to crafting walls, floors, or building the workstations themselves. Turns out, you can build using stored resources, but there’s a reason why you may not want to.
When you open any storage container, there is a gear-looking icon on the right called Container Permissions. It is here where you can toggle whether to allow for the resources inside that specific container to be used for building or not. The default is Not Allowed.
But… why? Well, resources are extremely important in Nightingale because they can imbue crafted items with their attributes. Buildings and Workstations, however, get zero benefit. So, ideally, you want your walls built with regular Wood Bundles from trees you chopped down on the tutorial island rather than the T3 Wood Bundle (Yew) that you could be using to grant tools +6% melee/ranged damage. The game otherwise doesn’t care which resource gets consumed, and it will consume your best resources on a whim if you’re not careful.
The good news is that you can decide on a system that works for you and just keep doing it. For example, I have several “Building: Allowed” containers where I put all the resources I don’t care about, and then everything else stays protected. Or you could do it the other way around.
Three Hots and a Cot
Food buffs are incredibly important for survival in Nightingale, as is the Comfort buff from sleeping. You can have up to three different food buffs at a time and there is never really a reason not to have them rolling. As a note, “different food buffs” is very generously defined in the game – you can get three Roasted Meat buffs as long as each was created with a different base Meat, e.g. Prey, Predator, Bug.
In the early game, I recommend finding and loading up on as many Blueberries as possible, as the Max Stamina bonus from them is significant when your gear isn’t providing a higher baseline. Also, do yourself a favor and unlock Mixed Plants immediately. The initial Roasted Berries recipe requires two berries, but Mixed Plants allows for two separate vegetables, both of which can be the same berry, doubling the attribute gain.
Semi-advanced tip: prioritize unlocking the Feast Minor Realm card if your base is in the Abeyance realm, aka tutorial island. The Feast card massively increases the duration of food buffs when eaten in that realm, and the increased duration persists when you leave. All of a sudden, your food buffs are lasting 40 minutes even while you progress the story in other realms. This is helpful no matter where your base is, but Storied Realms require you to finish them before you can apply Minor Realm cards.
So, You Want An Above-Ground Pool
[Note: I wrote this last year, but never got around to actually posting it at the time. Since I recently set up my pool again, it became a bit more topical. Enjoy.]
One of the reasons I haven’t been playing many videogames this past month is because I was setting up an above-ground pool. In the spirit of my other apropos nothing post about shipping PS1/PS2 games, let me chronical the struggles I had with getting mine set up. Maybe you can learn from my mistakes, maybe you just enjoy the schadenfreude.
Step 0: Do you really need one?
No, seriously, do you really need one? I got mine on the cheap, but a yearly pass to a sorta nearby pubic pool would only have run me $200, at worst, per year. By the time everything is done, you are likely going to be spending $1000+ and who knows if anything you bought is going to survive the five years (or more) it takes to break-even. Now, you are probably going to use a pool in your backyard on a whim more often than getting into a car and driving somewhere, but just acknowledge the math involved.
Also, do not bother with any of this late in the season. Like in August. That’d just be dumb.
Step 1: Survey your domain
It’s very important that you look at what you’re dealing with terrain-wise before you even consider pool options. Do you have a good space for one? Is it near trees? How tough is the soil? Are you going to try do everything by-the-book and actually get a permit for your pool, to include all the things the permit requires? Some of those things include having a fully-enclosed, self-locking fence, being X distance away from the home, and so on.
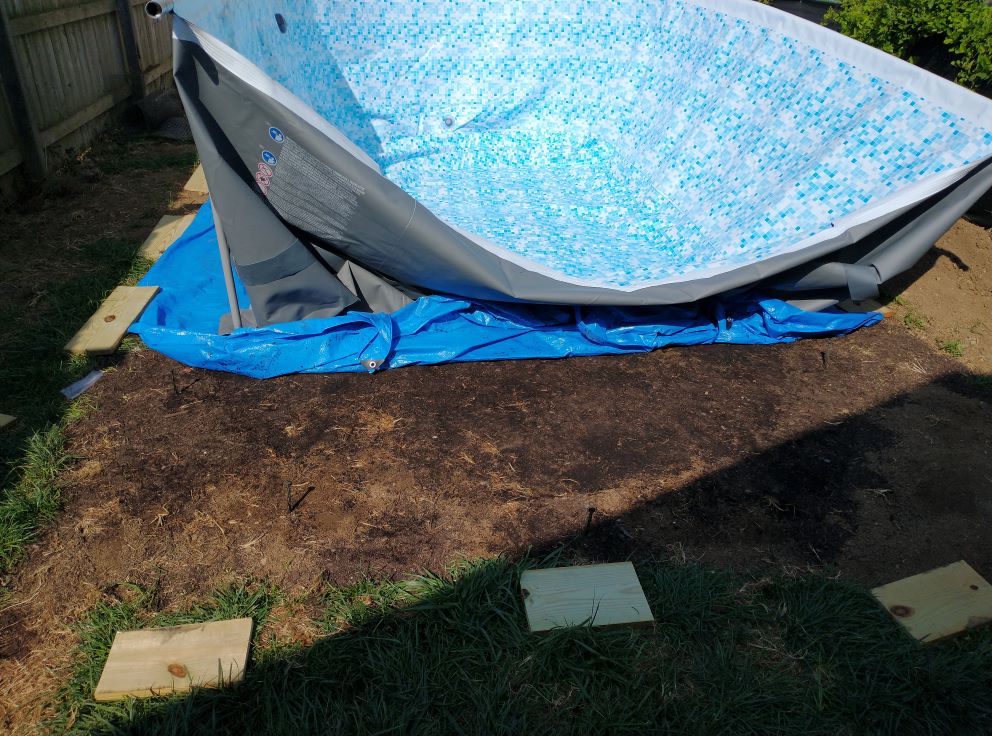
For me, my house already had a “dog run” area that was fully fenced up:

The grass looks sketchy, but that was because I had just mowed on the lowest setting. What is not obvious from the picture – or even looking at it in person – is how the ground isn’t level. Like, not even a little bit. But I’ll get into that in a minute.
Step 2: Secure a Pool
The retail price of an above-ground pool varies, but the 9’x18’x48″ pool we settled on is $800 normally. I bought mine for $100. How? Warehouse resellers. Sort of like eBay for items that people returned to Amazon, who then sold to warehouses for pennies on the dollar. I’m not going to give out the name of the one I used, but basically I saw some pictures of a very beat-up box online but the pool liner still looked wrapped in plastic, so I rolled the dice. Spoiler alert: it worked out.
Step 3: Prep the field
Do not install a pool in August. I repeat, do NOT install a pool in August.
So anyway, there I was, installing a pool in August like a moron. I borrowed a 25-year old mini-tiller from a neighbor and started to work on the 9×18 area where the pool would be located. Phase 1 was just clearing the grass out. If you have a sod remover or other fancy equipment, use that. Otherwise, make sure to till and rake that top layer of dirt/grass away and compost it elsewhere or whatever.

Step 4: Level the playing field
Mentally accept that 80% of the work in setting up an above-ground pool is leveling the ground. Don’t cut corners, don’t say “fuck it, that’s good enough,” don’t do this in August when your pasty ass is sweating buckets within the first 15 minutes of being outside.
The dirt needs to be level. I used a 3ft level taped onto a wooden 2×4, but that was sketchy. You can (and should) buy a contractor level, with longer being better – they are expensive on Amazon, but my local hardware store had a 6ft level for like $15. In any case, I took my level and… realized that the cleared area had a significant slope. Like 3 inches or more.
I recommend digging down rather than filling up. The idea is to use a tiller to get the dirt nice and frothy, and then shovel it over onto the lower end. Two birds, one shovel. The problem with just buying a bunch of topsoil and raising the low end is two-fold. First, it’s difficult to know how the topsoil is going to behave once compressed. Like, even if you tamp it down, I noticed it springing back up in a way four feet of water per square inch was not going to allow it to. Secondly, keeping the dirt and topsoil where it is supposed to be becomes tricky. If it’s just in a big pile, erosion might see the sides start to lower and things becoming increasingly uneven.
Step 5: Measure twice, dig once
Once everything seems level, measure everything again. Read the instructions, look at pictures.
My pool is 9×18 so I leveled a 9×18 area. Had I looked at the goddamn box one more time, I would have realized that while the bottom of the pool is indeed 9×18, the side support beams actually extend out another 1.5 feet on both sides. While we ended up just rolling with it, this means the side walls are bowed in and who knows if there is any permanent damage to the steel pipes or what sort of extra wear that will have done to the liner. All of which could have been avoided by looking at the box.

Step 6: Get some help setting it up
The instructions say 2-3 people can set up the pool in 30 minutes. Get at least that many people and budget 2+ hours. I’ve seen videos of people doing it themselves, but not when it’s August.
It is also important at this point – and probably before this point – to understand where things are going to be located. For example, where are the holes for the pump? Where is the drainage port? It’s a huge pain in the ass to move anything once those supports go in, so avoid having to make corrections.
Step 7: Fill and (hopefully) enjoy
At a certain point, you won’t know if everything worked out until you actually start putting in water. You are going to want to try and smooth out any wrinkles in the liner when there is less than an inch of water inside. It’s also very important to walk all along the bottom to feel for any errant rocks or pokey things that might cause issues.
For me, we ended up fully filling the pool and then had to completely empty it because the water level was a difference of 4 inches. The pool instructions say “no more than 1 inch difference” but most of what I read online suggested 2-3 inches would be fine. The issue was more than just the water level though, as we also had the side wall concern I mentioned earlier. So, after it was emptied, I put in a bunch of topsoil under the low side, dug 1-2 inches down on the side supports and filled it back up. It’s not perfect still, but we’ve successfully used it for two weeks now and it just needs to make it a few more before the likely end of the season. Next year, I will relevel things properly.
Not in August, of course. Because that would be dumb.
Addendum
To help protect the bottom of the pool, we used a giant tarp underneath. A tarp will not prevent rocks from poking your feet from inside the pool and otherwise being a hazard. No, I don’t camp a lot, how can you tell? Also, I do recommend rolling up the ends of the tarp so the support poles don’t push on them. This is primarily so you don’t have a little mosquito puddle just sitting there.
Buy and cut some treated wood for your supports to stand on and dig them into the ground a bit. I briefly thought about using paver patio stones, but was worried about what would happen if the stones snapped. A few of the wood boards are already in rough shape, so I’m glad I stuck with wood.
If you end up with wrinkles in the bottom of the pool after there is too much water in there, one lifehack solution is to buy a new old-school plunger. You know, the ones that are flat on the bottom and are terrible for plunging toilets. According to some clever Youtube videos though, they work just fine in lifting up the pool liner to help smooth out wrinkles.
Those chlorine tabs you put in bobbers are for maintaining a given chlorine level. Pool “shock” is super-concentrated chlorine to raise levels high enough to be safe. You can really optimize different chemicals (pH, alkalinity, etc) if you want to, but it’s all in service of keeping proper amounts of chlorine.
I recommend two different types of water testing kits. The first one I bought was all fancy with eye-droppers and little bottles of chemicals. Kept saying I didn’t have any chlorine though. Bought the test strip kind just to confirm and, hey, actually I had 5ppm chlorine in there. It’s possible that there was user error involved with the fancy test, but that issue is still resolved by having two different testing kits.
Solar covers do indeed work. The one I bought looks basically like a 22-foot diameter heavy-duty piece of blue bubble wrap. Threw it on, cut it into a rough oval shape with scissors, and will hopefully get another few weeks of reasonable pool use this Fall.
[Baldur’s Gate 3] Random Tips
The internet is replete with Baldur’s Gate 3 (BG3) tips, but most of them seem to be the same sort of obvious nonsense you pick up in the first 10 minutes of pushing buttons. I am… also probably going to give you a few of those too. However. Tip #3 may surprise you!
Transferring items across characters is instant, even in battle. If one of your party members is taking an unfortunate amount of damage in combat, but you just now realized they don’t have any healing potions, don’t fret. Just click on whomever has the potions, go into their inventory, right-click said potions, and choose Send To –> X. Viola! This works with anything, actually, including Alchemist Fire, Blunt weapons to give to your Barbarian to take advantage of vulnerabilities, and so on. You can also send Camp supplies out of your inventory at any time, freeing up a lot of weight.
Seize your potential (energy). Everyone finds out pretty quick that attacking from higher ground confers Advantage. What you might not know is that Throwing weapons/objects from higher ground introduces Crushing Damage to the (F=m*a) equation. And there’s no damage roll for Crushing Damage – your enemies just get slapped by science and that’s it. For example, one character threw a Javelin and dealt 10 damage from dice, and dealt an additional 9 Crushing damage for hitting someone with a 0.9kg object from a 10.2m drop. That’s a lot of extra damage not normally accounted for on the preview pane. Also, if your character gets 2 attacks, they get two throws as well. You don’t need to go full Barrelmancy here, but just understand that the lowly Javelin and similar tools/objects can pump out some serious numbers when you have the high ground.
Do not sleep on Sleep. The text: “Put creatures into a magical slumber. Select targets up to a combined 24 hit points. 18m range.” Now, you may be asking why anyone would bother with this spell over something a bit more direct, like Chromatic Orb or whatever. But here’s the thing: there is no saving throw for Sleep. If the target(s) have less than 24 HP, they just lose their next two turns… unless you hit them first, which is automatically a critical hit. Even better, the effect can be split between multiple enemies. Three 7 HP goblins giving you grief? Not anymore!
Is Sleep better than Fireball? No. Also, that’s a level 1 spell vs level 3. But it’s a great follow-up to Fireball to ensure problematic enemies (including bosses!) don’t get a chance to turn things around. It’s just as powerful on your weakest character as the strongest. And bonus tip: the Warlock version of Sleep is always automatically upcasted, letting you knock out higher HP totals for the same Short-Rest slot.
Hello Darkness, my old friend. There is a classic cheese strategy involving using the spell Darkness combined with the Devil’s Sight invocation option granted via Warlock 2: cast Darkness, stay in Darkness, ???, Profit! Basically, you can attack as normal and everyone else cannot. The cheesiness doesn’t end at combat though, as Darkness comes in real handy when doing nefarious things… like stealing. Specifically, Darkness will give you cover to pocket anything not nailed down in the environment, with relative impunity. Just note that shopkeepers will positive ID you 100% of the time if you fail a Sleight of Hand check, even fully engulfed in Darkness.
Spirit Guardians is better than you think. When I read the text, I assumed the spell would cast like a stationary whatever in a 3m range, blah blah, who cares about 3d8 damage when Wizards have Fireball? What actually happens is that the Cleric gains a 3m aura effect that deals 3d8 damage to enemies you walk by. Emphasis on walk by. Since your team is immune, your Cleric can spend all their movement walking in a straight line, zig zagging, or whatever movement set brings one or more enemies 0.1m past the edge of the aura. While you unfortunately cannot just dance back and forth to hit the same enemy multiple times (it only deals damage once per round per target), the aura will stick around an deal additional damage next turn as long as you maintain Concentration. It also reduces enemy movement speed, which generally keeps them close by.
Glyph of Warding is also better than you think. You wouldn’t know if from the awful tooltip, but Glyph of Warding is an amazing spell with seven distinct features, which can be used as traps or just straight-up fired off (if an enemy is inside). Five different flavors of 5d8 elemental damage, a large AoE pushback effect, or a no-HP cap Sleep effect. Granted, the Sleep effect (and others) provide a DEX save which is not always ideal, but it’s hard to argue with how powerful a CC that can be.
One time, at (band) Camp. I’ve talked about this before, but you can rather easily leverage the fact that you have both a large roster of party members and a means to instantly interact with them from anywhere (Camp button). More specifically, you can designate a few members (including the generic hirelings) to be buff bots to the A Team. For example, suppose your main character is a Sorcerer. Should you spend one of your limited slots on Mage Armor? No need! Smash that Camp button, add the buff bot to your party, and have them cast Mage Armor on you and/or any other companions waiting around the camp, then sit them back on the bench where they belong. Some relevant spells:
- Mage Armor
- Light
- Goodberry
- Longstrider
- Aid
- Darkvision
- Warding Bond
- Protection from Poison
- Daylight
- Death Ward
- Freedom of Movement
If you drop a character out of your party, they get super sad and automatically lose Concentration on any spells, so don’t bother trying that.
My Ward is my Bond. Just to highlight this hilarious interaction from the previous list a bit more: you can get a Hireling to cast Warding Bond on your character and then keep the hireling in camp. This will give your character +1 AC, +1 Saving Throws, and only take half damage. Granted, the hireling back in camp will be the one taking the other half of your damage, but who cares about them?
You are not Prepared… but can be! In a big departure from tabletop rules (and general balance), spellcasters with Prepared spell slots can change those slots at any time. Like, any time any time, aside from during combat. As a practical example, a Wizard could cast Mage Armor on themselves and then switch that spell out for something else. Where things get goofy is when the spells in question are Rituals. Casting a Ritual spell (outside combat) means you can get the benefit of the spell without using up a spell slot. So, to put two plus two together, simply knowing these Ritual spells at all means you can effectively cast them at will as long as you play with the UI a bit. A list:
- Disguise Self
- Feather Fall
- Find Familiar
- Enhance Leap
- Speak with Animals
- Speak with Dead
- Detect Thoughts
- Silence (weirdly)
For the most part, this perk is primarily a benefit to Wizards. But, honestly, they deserve it for how much the other spellscasters eat their lunch.
How to Sell and Ship PS1/PS2 Games
If you were wondering how my sell old games business was going, the answer is Very Good, thank you.
In fact, I am down to just two games left out of the original picture: Persona 2 and Castlevania: SotN. Everything else sold surprisingly quickly. And so I wanted to take a moment to share both how I sold the games and how I shipped them.
First, I sold on PriceCharting.com. Since that is one of the main sites to gauge how much a game is worth in the first place, it seemed easy enough to just sell it there. And just like with Wikipedia, you can always check the sources yourself (sold eBay and/or Amazon listings) to make sure the price is legit.
There are two interesting things about PriceCharting as well. One, they don’t charge listing fees or really fees of any kind. You do have to set up a Paypal account (which gets a cut) and then turn that into a business-level account and give them some rights to that in order for them to accept payment on your behalf, but it’s not that complicated. Two, PriceCharting tell you how many people have wishlisted a specific game and will then email them all if you list your game for less than the average price. Compare that with… what, listing on eBay and hoping people happen to search for it the week your auction is up?
Prior to selling anything though, you have to prepare for shipping.
After a lot of research, I went for a simple solution: USPS. If you live in the US, you can go to USPS.com and order packing material delivered to your house, for free! Specifically, I ordered Priority Mail DVD Boxes and Priority Mail Padded Envelopes. You can also order bubble wrap from USPS too, but it’s cheaper on Amazon. After a week or so, all your packaging will arrive and you will be in business.
Then just… use all of the things.

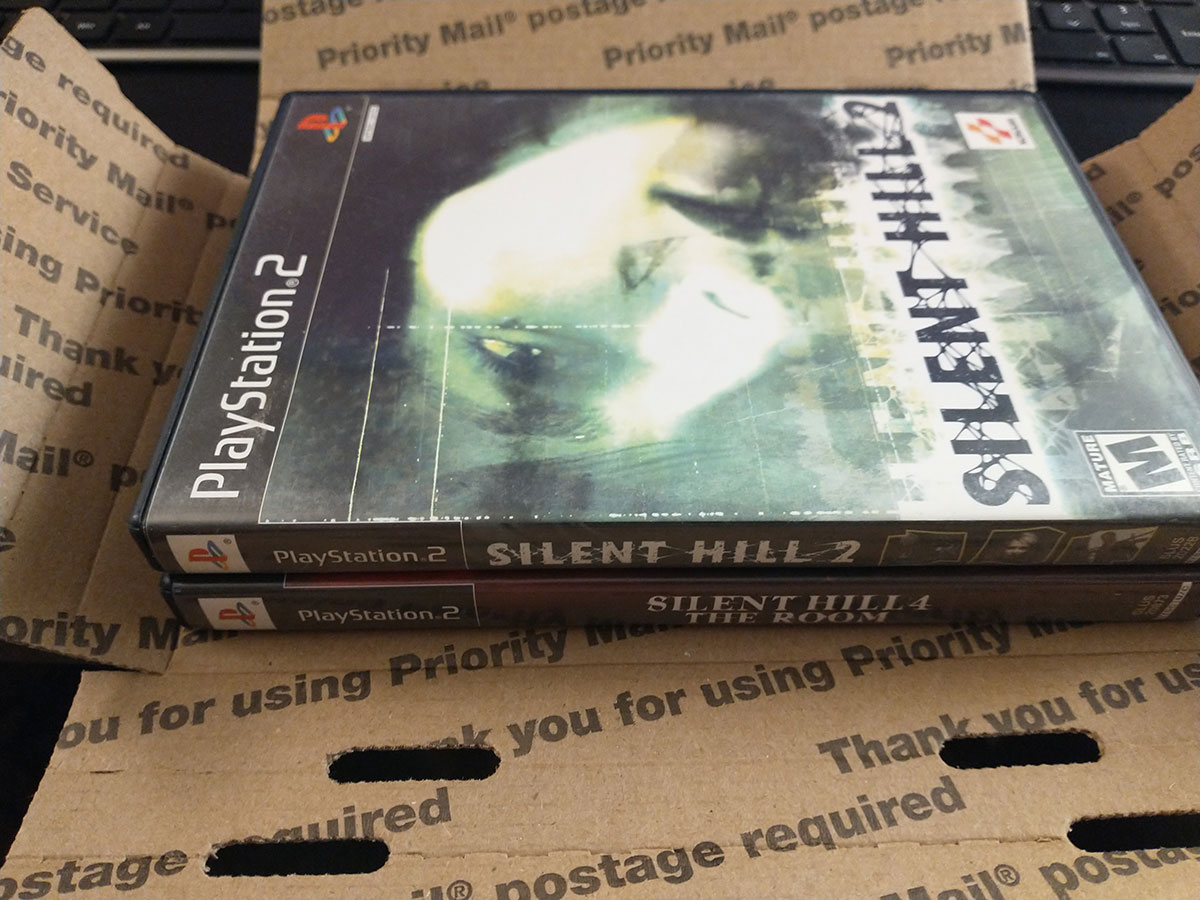
For PS1 games in jewel cases, I wrapped them up in one square (12″) of bubble wrap, then placed them inside the cardboard DVD box. I then cut strips of additional bubble wrap to stuff the DVD box some more to prevent the jewel case from sliding around too much. Once the DVD box is sealed shut, I put that inside the bubble mailer, which I then folded over and sealed. The end product looks like this:

Overkill? Maybe. The DVD box by itself seems too open to the elements for my liking, and I’m not even the one spending literal hundreds of dollars for a PS1 game. The bubble mailer would otherwise be the ideal method, but what else are you going to do to prevent it from sloshing around in there and possibly cracking the case? My shipping method combines the benefits of both for literally the same price. Specifically, a flat rate of $9.65 for 2-day shipping and a tracking number.
The Post Office probably wouldn’t be happy using their packaging this way, but ¯\_(ツ)_/¯
PS2 games in comparison are a breeze. I shipped them the same way, but the DVD boxes are built to hold them better than jewel cases, so bubble wrap is hardly necessary. Sometimes I cut a small square to place inside the game case though, to help lessen damage in case the disk comes loose.
The most advanced maneuver I had to do was the “double-double” wherein the same guy bought two double-jewel case PS1 games. Unlike the photo above with PS2 games, you can’t fit two jewel cases in a single DVD box. I did discover though that if you box up the two games separately and then cut off the cardboard “wings” of both DVD cases, you can just barely fit two of the cardboard cases inside one bubble mailer.

I ended up springing for extra insurance for that particular package, so I didn’t save much shipping-wise.
And shipping costs are kind of the rub for this hustle. Yeah, it’s absolutely worth it to sell the games if you still have them. But once you get down to the $40 range, paying 25% of that to ship it out starts to seem a bit silly. Then again, 75% of something is worth more than 0% sitting in a box, so maybe I keep things moving until it starts getting not worth the time spent driving to the Post Office.
Anyway. Might seem like a weird post, but this was precisely the sort of thing I was looking for before I started this endeavor, so… you’re welcome, internet. This is me paying it forward.
Slay the Spire: Ascension 20
I have finally “beat” Slay the Spire: meeting my end goal of reaching Ascension 20 (A20) on all four characters. There is technically a higher plane of difficulty whereby you face the secret final boss while also on A20, but I am satisfied with where I am. Specifically because games at the A20 level are already incredibly frustrating and unfun already – no need to delve further into self-flagellation.
For giggles, I’m going to post my thoughts on each of the classes, in the order that I reached A20:
The Watcher
The base mechanics of the Watcher (e.g. double/triple damage) are so powerful that I often found myself progressing despite not having any specific deck or relic combos. It does lend itself to being annoying in how much mental math you have to do lest you miscalculate and end up taking double damage in return. Or in the case of Blasphemy, outright losing the game.
Every Watcher run starts by upgrading Eruption ASAP. After that, my successful decks basically had a hodgepodge of loose synergies with Flurry of Blows (stance dancing), cards with Scrying, and Talk to the Hand. I was always happy to see Tantrum and Fear No Evil. Upgraded Blasphemy is fantastic. Omniscience is an auto-include any time it’s offered, even if I didn’t have Power cards at that point; Omniscience into Wish feels like cheating (it is).
The Defect
The only successful Defect runs I have had revolved around Orbs and Focus-stacking. The Inserter relic is always a welcome boost, and lets you save gold/deck space by ignoring Capacitor and Runic Capacitor. Inserter also allows you to take Consume with no downsides, and possibly ignore Defragment and Biased Cognition altogether. In the absence of Inserter, I focused (har har) on Biased Cognition and trying to get artifact to avoid the downsides.
Beyond that, it really came down to getting Glacier and Creative AI, even against the Awakened One. Upgraded Seek is amazing. My success with All for One decks is probably 20%; it feels more like a trap.
The Silent
The only consistently successful strategy for A15+ runs for me has been Shiv decks. Two Accuracy cards (upgraded or not) plus as many Cloak and Dagger and Blade Dances as I can draft. Always draft a Corpse Explosion if offered. Things get infinitely easier if you can snag one of the scaling attack relics (Kunai or Shuriken), or Oriental Fan or After Image. A Thousand Cuts and Envenom are generally overkill. Poison isn’t bad, but hallway fights are worse.
The Ironclad
Yuck. In pretty much every run, you are entirely dependent on which relics you pick up. Corruption + Dead Branch runs make everything worth it, but they are frustratingly rare. Upgraded True Grit is almost always good. Immolate is an amazing hallway card that is still good in boss fights. Fiend Fire can also end many hallway fights by itself with no setup (vulnerability helps).
Again though, your ultimate strategy will vary based on what relics you pick up.
Final Tips
Artifact is insanely powerful. While negating a random enemy debuff is whatever, Artifact also removes the downside of some self-buffs. For example, Biased Cognition and Wrath Form are powerful cards that have scaling downsides… unless you have Artifact. Additionally, it can also be used to make the lowly Flex Potion just straight-up give you +5 Strength for the rest of the fight. For this reason, the shop relic Clockwork Souvenir is crazy powerful.
When in doubt, upgrade your cards. In a recent Defect run, I got a Sunder and Shovel early in Act 1. Instead of upgrading the Sunder, I chose to fish at Rest sites all the way to the boss. I died. Relics can be amazing, but remember you will be playing cards in every fight inbetween, and saving a few extra HP times however many fights will generally make more of a difference than you think.
Hallway fights matter. When you look at cards like Hyperbeam or Blasphemy, you might think “These are useless against bosses.” Maybe. But if you die before making it to the boss, or end up needing to Rest instead of upgrading cards, none of it matters anyway. So if you have the chance to snag a card or two that helps in hallway fights, grab them.
My Time at Portia: Beginner’s Tips
Here are a few critical beginner tips to make your experience in My Time at Portia more pleasant.
1. Slow Down Game Speed

One of the first things I recommend doing is opening the Options screen and reducing the Game Speed. All this controls is how quickly the clock ticks in the game. So, instead of burning two hours of daylight heading over to your neighbor’s house to chat, it may only take 30 minutes to cover the same ground. This will also give you more opportunity to use all of your Stamina on digging/logging.
For myself, I pushed it all the way down to 60%. This gives me plenty of time to stock all my furnaces, talk to who I need to, and complete all my chores with plenty of time to explore a bit more before hitting the sack. If you want to burn some more daylight, you can speed it back up at any time.
2. All your Storage is Linked

Even though the game mentions this in a loading screen tip, it wasn’t until a few dozen hours into the game that I realized that all your storages are linked. What this means is that if you have one easily-accessible storage chest, you can open it and then browse the contents of all the others, even if they are inside your house (which I recommend doing to save real estate).
Why is this useful? Because you can name each chest and then put that stuff in the chest and easily find them later. I have chests for Metal, Wood, Cloth, Foodstuffs, relics from Ruins #1, Ruins #2, etc etc etc. Considering how often you have to physically put stuff on your hotbar to assemble things, it’s helpful to organize all your stuff.
3. Fishing = $$$
If you haven’t already learned this from the Fishing Tournament in the first month, Fishing is one of the most lucrative endeavors in the game. As soon as you craft your first fishing pole, you can purchase bait from Sophia’s store and then head to the fishing hole near the waterfall. Goliaths are the common catch there and each one has a book value of 350g. The King Goliaths are very rare and hard to reel in, but their book value is 5000g. I recommend not selling those until you have two, because…
4. Breed Fish for Easy Cash
At a certain point, you’ll be able to craft a fish tank. If you plop two fish of the same type (and rarity) into the tank and feed them regularly, eventually you’ll get a 3rd fish. There’s a distinct lack of any kind of useful interface with the fish tank, but basically you can dump in as much food as you want and the fish feed themselves until it runs out. As long as they aren’t hungry, another invisible timer will be counting down until a third fish appears in the tank. Just make sure you don’t accidentally pull a fish out of the tank until they have bred, because it resets to timer even if you put it back.
For practical purposes: put in two King Goliaths (or other 5000g fish pairs), load it up with food, and then 7-8 days later you will have a 3rd 5000g fish. Rinse and repeat for some nice passive income.
5. Don’t Overthink Relationships
There are a few dozen members of the Portia community, and quite a few reasons why you might want to cozy up to all of them. For example, store discounts, extra stat buffs, periodic presents, or because you want to make one of them your beau. Just don’t go too crazy with it though.
Each star or heart container represents 100 relationship points. Talking with townsfolk confers… +1 point each day. Sparring with them confers… +1 point. Playing Rock-Paper-Scissors… yeah, +1 point. While there are Skills that can be unlocked to boost these numbers, they pale in comparison to the other avenues to raise relationships. Giving gifts, for example. Most townsfolk appreciate certain food dishes, and giving them it on the daily is worth +10 points each time.
Additionally, about midway through the game, you “unlock” the ability to go on Play Dates with most townsfolk, once per person per week. If you plan out things right, you can fairly easily score +25 to +40 points in an evening. This isn’t even counting the bonuses (+20 to +35) that come from quests, or them viewing relics you place in your yard, or when you complete their Commissions.
In short, don’t get hung up on talking to everyone everyday.
6. Embrace the Dig
Early on you will unlock some Abandoned Ruins. While these locations have buried relics to chase, the biggest draw is just to find a mineral vein and dig. And dig. And dig some more. While you do need Wood to power the Furnaces that turn all of the copper (etc) ore into usable bars, the vast majority of your time in MtaP will be spent digging. So embrace it.
Also, Pro Tip: you can trade up to 999 Rock for Wood at a 1:1 ratio at A&G Construction. While you will want to keep some Rock around to turn into Bricks on occasion, this conversion will save you a lot of time if you don’t have to split your time between digging and logging.
7. Note the Economy
Prices in Portia fluctuate: down to the low 70% all the way to 135%. Every vendor is affected by the same multiplier shown in the upper-right of the vendor window. Changes are typically gradual, so you’ll have some idea of the direction things are moving. Needless to say, if you are wanting to sell things, you will get more bang for your buck saving it for high-price days. Just keep in mind that each vendor has a maximum amount of money they have each day, so you can’t exactly unload 50,000g+ of goods all at once.
On low-price days, I recommend stocking up on items from Sophie’s Store like fish bait, dough balls, and random cooking ingredients like Sugar and Rice and Cumin. You can also save a few thousand Gols by waiting for these days to purchase new armor from the clothing store.
Fell Seal Complete, plus tips
Just beat Fell Seal: Arbiter’s Mark after almost 60 hours.
Quality of the gameplay remained high throughout the campaign. I could probably have shaved ~20 hours or so off the time to complete, but I enjoyed getting most of my team to a point where they had OP combos and synergies. The plot itself is nowhere near Final Fantasy Tactics, but the dialog is surprisingly humorous and there are some slight twists. The main thing that could be improved was the lack of different battle music, but luckily what exists is not annoying.
There is some “post-game” areas and New Game+ options – and some DLC just dropped – but I do not anticipate coming back. I got my fill of the systems and progression; anything else would be going through the motions, like grinding out the rest of a Civilization match.
Gameplay Tips
I would not consider the following to be “spoilers,” but if you want to know nothing else about the game systems, you should probably skip this part. This is merely the text I wish I was able to see as I started playing the game.

Units gain AP after battle in two ways. Everyone who participates in the battle get a large chunk (110ish for random encounters, twice that for Story) of AP for their primary class. There is a second, smaller “Vicarious” AP gain (~40) that is doled out to each battle participant based on the primary classes of the other participants. So, for example, if you have a Knight, two Wizards, a Mender, a Mercenary, and a Scoundrel in a battle, then the Knight will get some AP towards its own Wizard, Mender, Mercenary, and Scoundrel classes, and so on with the other 5 people.
The above is useful to know because some of the best-in-slot Passive abilities comes from Classes that are only unlocked after some esoteric prerequisite classes. For example, if you want to unlock the Assassin, the chain goes:
- Assassin
- Gunner 4
- Mercenary 4
- Knight 4
- Ranger 4
- Scoundrel 4
- Gunner 4
That doesn’t actually seem that bad for a martial class, aside from the ranged portions. But something like the Warmage or Fellblade will require some Mender and Wizard levels, which can be awkward for some of the story characters. Luckily enough, all you really need is for there to be A Wizard or Mender in the party for 10-15 battles, and you’ll have enough AP to level the class to the minimum to unlock the higher classes. Characters get that Vicarious AP even if they have not yet unlocked the the class in question; it will be waiting for them once they do.
It’s not immediately obvious, but Kyrie is the main character of the game – she will be required for the vast majority of story missions. The other story characters can be unavailable for 1-4 missions.
Debuffs are very important throughout the whole game (including the final boss). Some boss-esque characters have 999+ HP that is much easier to chew through when you give them Bleed/Poison (% HP loss), for example. There are very deadly characters that are NOT immune to Sleep or Berserk, which means you can essentially delete their turns while you mop up the flunkies.
At the beginning of each battle, before deploying units, you can actually go into the unit screen and re-equip or change up abilities or whatever else based on what it looks like you’re facing. Is there water on the map and enemies who can move your units around? Equip some Flippers on your guys that can’t swim. Poison water around? Equip the rings that give immunity to Poison. And so on.
The most useful classes I found were Knight, Fellblade, and Assassin, surprisingly in that order.
The Knight’s Defensive Hit is probably the most damaging attack you will have for the early game, especially if you stack armor. Knight also has Taunt, which inflicts Berserk 100% of the time from two squares away, which can turn an enemy mage into an ineffectual melee attacker or make an enemy bruiser kill his own team. Life Font (gain HP when moving) is something I slotted into all of my characters, which pretty much removes the need for a dedicated healer.
Fellblade was pretty much my “default” class for all my characters due to versatility and debuffs. Sleep Slice to delete enemy turns, Poison Slice for high HP targets, Evade Magic as a counter-ability to ignore magic-users entirely, and Black Blade as a backup attack that deals magical damage and inflicts Blind. Plus, the Malice passive makes sure your debuffs have a good chance to stick.
Assassin is pretty much a splash class. What you’re really going for is Dual Wield, which enables some crazy damage. The ranged Blind and Sleep abilities are nice, but usually only have a coin-flip chance to succeed. Sabotage can be incredibly powerful in certain situations though. Specifically, if there is water in range and an enemy unit who cannot swim – Assassin hops in water, use Sabotage to switch places with enemy, instant death for them.
The sort of ultimate damage combo is a character with Dual Wield passive and Warmage class. Use Infused Edge, and your character will get two attacks plus an elemental bonus attack (or other spell). Personally, I was fine with Dual Wield + Attack Expert (Scoundrel’s passive +Attack based on level) and two weapons that had debuffs on hit. Indeed, I strolled into the final battle with story characters having primacy classes of Scoundrel and Knight.
Don’t forget the lowly Rock. It has a 100% chance to hit and always deals the full damage (50 when maxed out). This is useful for monsters that have crazy defense values like those jellyfish spellcasters, or even enemies with 30% evasion.
The crafting system is… annoying. Always go to Component View to see what your other crafting options are before using a resource you don’t think you can easily farm back. SAVE YOUR QUALITY THREAD. It’s a mid-tier Component used in an endgame armor (light helmet) and is supremely difficult to get any more once you’re in said endgame.
Quick & Dirty Guide to Starbound (Frackin’ Universe)
Frackin’s Universe (FU) is a Steam Workshop mod that revitalizes (and complicates) the entire Starbound experience. It is not recommended for a first playthrough – go beat the base, vanilla game first. Then, just when you think you’ve had enough, come back, load the mod, and play what feels like Starbound 2.0.

Beyond FU itself, I highly recommend the following (compatible!) mods:
- Character Extender (required)
- Improved Containers
- Frackin’ Music
In particular, Improved Containers will change your Starbound life. They added a button to automatically stack anything you’re carrying into an existing stack in a container. Great for off-loading one of the dozens of new ore types introduced in FU after coming back aboard your ship.
Beginning Recommendations
Play or skip the tutorial. When it asks whether you want the default ship or the Build Your Own Ship (BYOS) option, choose BYOS. This allows you to skip a huge block of vanilla Starbound progression and immediately construct a ship of your dreams.
Incidentally, you can construct your dream ship out of any materials lying around. Including dirt. Despite floating in deep space, you are free to destroy the walls and background tiles of your ship at any time; there are no decompression mechanics in Starbound. Just note that “loose” items/blocks fall to the bottom of the screen, and walking onto a spot without background tiles puts you in an airless, zero-g environment. This will likely be fatal to you at the start of the game, so construct your ship from the other side of a wall first.
Get off the starter planet ASAP. Complete the required quests first, but try to get to a different Lush or whatever planet when you can. Tungsten Ore is an especially vital part of early-game progression, and the starter planet probably doesn’t have any.
Get a Mining Laser ASAP. It is better than Mining Picks, Mining Drills, and the best, most upgraded Matter Manipulator any day. You will still want to upgrade the latter over time though, as the Mining Laser burns through both normal and background blocks, which can be problematic in certain edge cases. Like when the background is full of lava, for example.
Roughly 99% of your deaths will be related to fall damage. That is not so much a recommendation as it is a fact. Mitigating fall damage is super important, but you won’t have very many options at the start, especially considering how dark FU is generally. Until you can get armor/Augments to assist with the issue, your best bet is to focus on unlocking Physics Field tech in the Tech Console. That way you can press F if you notice yourself falling to prevent all damage.
Cheese the lighting system by printing lighted signs. One of the FU changes is that you no longer emit a minimum aura of light. Combined with the fact that EPP upgrades are not cumulative, you will often be in a situation where you need to craft thousands of torches to see anything. Alternatively, once the Pixel Sign maker is up at the Outpost – unlocked after the first artifact – you can create a white, lighted sign that practically shines with the force of a thousand suns.
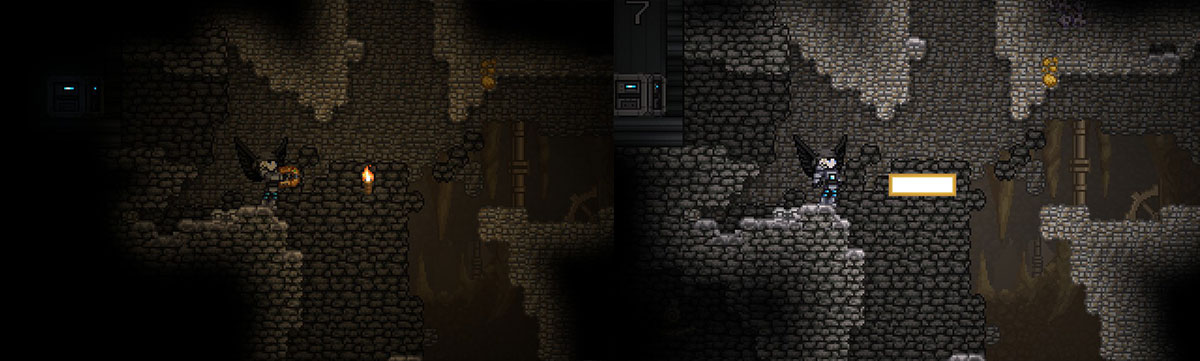
It also costs nothing but the effort of spam-clicking the print button. Torches are still useful in that they don’t require background tiles to work, but signs are otherwise better when you can use them.
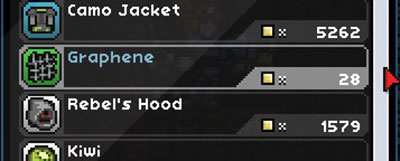
Check every vendor you see. Most of the time, a vendor’s inventory is randomly set when you meet them. This can sometimes result in fortuitous situations like a vendor selling unlimited amounts of, say, Graphene for 28px a pop.
Base Recommendations
Build your first base on an Ocean planet. If you are anything like me, you’re concerned about where your “real” base should be located. So you go planet to planet, looking for the perfect spot, and meanwhile junk and crafting benches continue to accumulate wherever you placed them (probably on your ship). Eventually, by the time you find the ideal location, you’re overwhelmed by all the items you have to move, so you stick with your first “choice.”

I recommend an Ocean planet base for two reasons. First, it’s a planet. Ship bases are perfectly viable options, but you essentially forgo easy power generation from Solar/Wind stations, and easy materials from Atmospheric Condensers. Second, Ocean planets have infinite water tiles. There are craftable Wells and other water sources wherever you are, but nothing beats the convenience of holding down left-click and soaking up as much water as you need. Or automating it all later.
Keep a Sifter up and running 24/7. A full stack of 1000 Sand will keep a Sifter occupied for quite some time, but the end result will be a dozen or more different materials, some of which can be loaded back in an Alternator to power the Sifter to continue generating free goodies. The Centrifuge is similarly useful, but certainly less perpetual… unless you have Solar panels on an Ocean planet.
Farming Recommendations
Did you build a base on an Ocean planet? Lobsters are EZ-Mode. Craft some Lobster Traps and watch as they magically fill up with free food. Lobsters stack to 99, do not require cooking to eat (but you can if you want), and actually sell for a decent amount (1980px per 99 stack). While there is an indication of freshness, lobsters do not appear to spoil; this may be a bug that is fixed later.
Rice is the easiest vegetable crop to manage. Uncooked rice stacks in your inventory, never goes bad, and you only need a Campfire to cook it. Wheat is similar, but Rice does not need to be replanted (assuming you aren’t using Growing Trays). You forgo any fancy buffs, but it is incredibly straight-forward. If you haven’t found rice on a planet yet, “purchase” it from a Greenhouse.
Grow Trays/Hydroponics are niche tools. On paper, they sound amazing: drop in three seeds, a stack of water, maybe some Fertilizer, and off you go. The problem is that there isn’t a good visual indication of when the product can be harvested. Or when it runs out of water. Or when all of the output slots are full of spoiled food.
Where Grow Trays excel is when they are used either with a stackable product, such Silk, or with a food item that normally despawns when harvesting, such as Wheat. In most other situations, I prefer planting crops in dirt.
Aeroponic or Hydroponic Tubing is strictly better than dirt, once you unlock them. They are kinda expensive considering dirt and the broken sprinkler are so early in the tech tree, but there are benefits to be able to pack more plants into a smaller area (sprinklers need height to water everything). Just keep in mind that you do have to “till” the tubing before planting.
If you want the most-filling food, then you’ll want Ultimate Juice. Incidentally, it also provides +20% Jump/Energy/Health/Run Speed and a Rage effect. This requires six different crops to craft though: Boneboo, Feathercrown, Oculemon, Neonmelon, and Toxictop. Finding these crops before reaching the endgame will be a challenge.
Critical FU Functionality
Frackin’ Universe adds a lot of very complicated systems. Here are the most important/useful ones.
Power – Both Power Generators and Batteries (when charged) output X number of Watts. Plugging a 4W battery into an Arc Smelter (req. 40W) isn’t going to work. That said, wattage is cumulative on a wire. Connect ten 4W batteries to that Arc Smelter – or preferably, to a Wire Relay – and you will be in business. Just note that if you are using 40W, that is 40W less on the wire. If you have multiple stations running simultaneously, you will need a power surplus to keep all the lights on.
Terminals – A Terminal is a clickable interface that grants you access to an “Item Network.” Linking all your storage units together into an Item Network means you can use Terminals to search for and retrieve your items from a single location, e.g. the Terminal itself, instead of having to manually look for it across all your storage units.
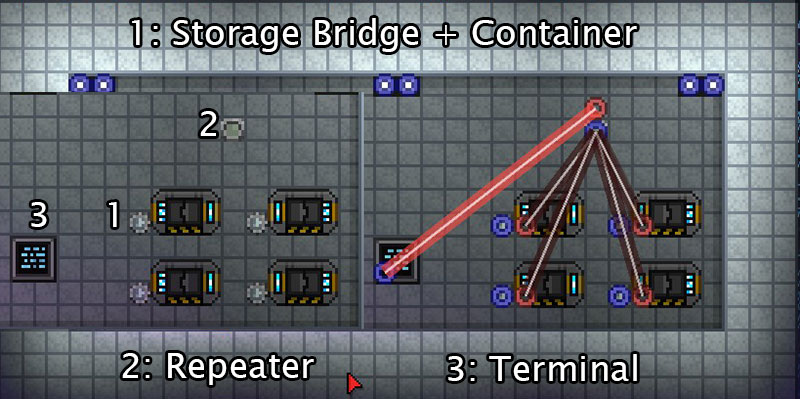
What you’ll need:
- Storage unit(s) full of stuff
- Craft and place Storage Bridge near storage unit(s)
- (optional) Craft and place Repeater to hook into multiple Storage Bridges
- Craft and place Terminal near crafting stations
- Connect the blues to the reds, e.g. Storage Bridge to Repeater/Terminal
Item Movement – If you want to take something from one container and physically put it into another container, you want an Item Transference Device (ITD). If you click on the ITD, you will get a bunch of pseudo-programming options that I have zero interest in learning or explaining. Instead, all you really need to know is that it basically works out of the box. Connect the red circle of your container to the blue circle of the ITD, then connect the red circle of the ITD to the blue circle of the other container. Bam. All items that appear in the first slot of the first container will get moved.
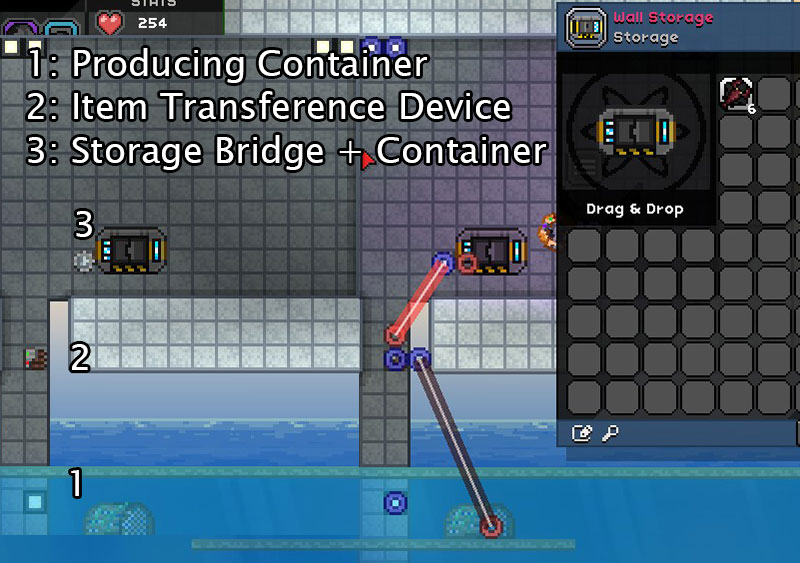
For me, the most practical use of an ITD was moving items from a Lobster Trap or Growing Tray to a box automatically. If the box is actually refrigerated storage, then all the better. Red, blue, red, blue, done. If you want something more fancy, you are on your own.
Survival Recommendations
One of your quick-slot items should be Dirt. If you find yourself in trouble, close off the tunnel you’re in with dirt; it will block melee and the majority of ranged attacks while you heal yourself or escape. While it’s a kinda cheesy move in vanilla Starbound, the enemies in Frackin’ Universe are exceedingly more deadly. Some enemies can pass through walls though, and explosive damage can penetrate tiles, so take care.
Always deploy with your Mech on new worlds. Depending on how much (if any) time you spend with the Mech-building side of things, your Mech will not make you invulnerable to planet effects or damage for long. That said, it will absolutely extend your life by a few precious seconds in case you get beamed down in the middle of a USCM camp full of snipers that can one-shot you. Just note that if your Mech explodes, you die with it. So either beam back up to your ship or bail.
Craft a few dozen flags and plant them everywhere. Flags are cheap to craft and act as bookmarks that allow you to get back to where you want to be quickly. Think you might die or encounter a tough fight? Plant a flag. If you come across a planet with a lot of good resources, plant a flag and name it “Penumbrite (Acid, Hot)” or whatever. This will save you oodles of time if you find yourself in a situation of needing more of X resource but being in a Y system instead.
Get an X (Radiation, etc) Ball Wand/Staff. Regardless of your fighting style, having a Wand/Staff with Radiation Ball (or whatever) will change your life. Specifically, it will allow you to attack enemies around corners/from range with guided death. Even better, you can dig a 1-block hole in a wall or floor and then squeeze your orb of death through it to murder your foes with impunity.
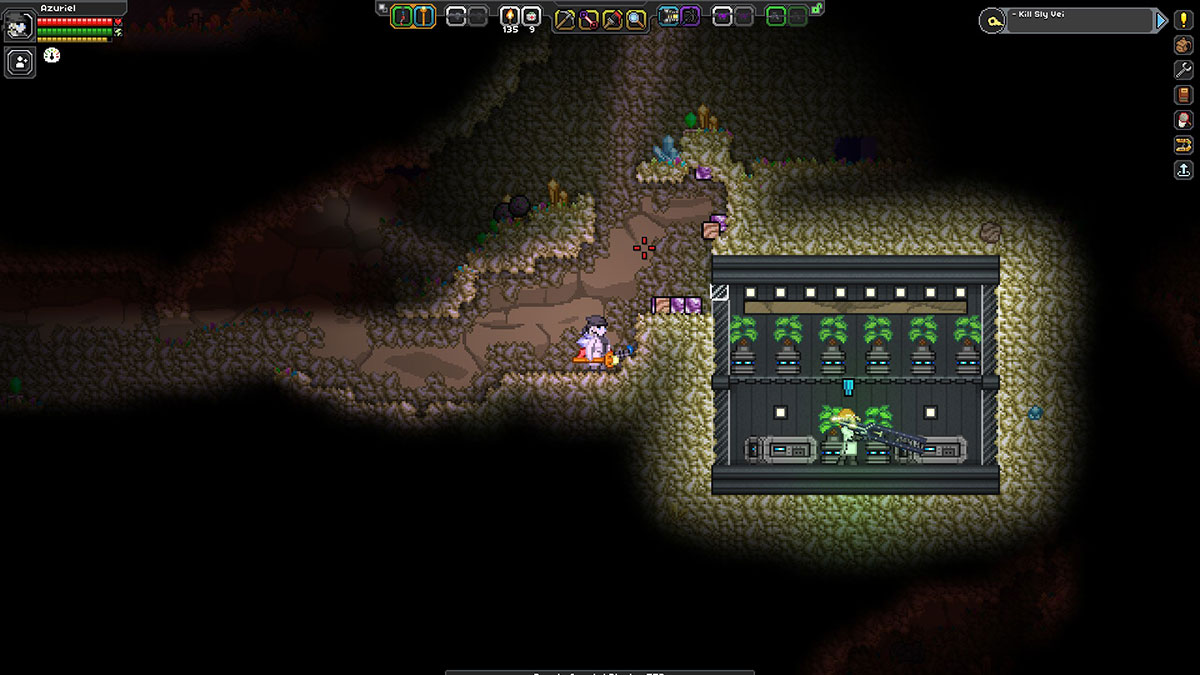
I snaked a Radiation Ball right through the one-tile gap to fry that guy.
Cheap? Sure. Effective? Hell yeah.
Armor Combinations – There are over 100 sets of armor added with Frackin’ Universe, so determining what you want to wear can be a challenge. For the most part though, it’s best to craft a bunch of mannequins and just have specialized sets ready for each planet you beam down on. That said, here were my go-to options:
Nautilus Armor / Kraken Armor / Leviathan Armor
This armor series eventually grants you Acid, Poison/Bio, Gas, Pressure, and Oxygen immunities once you reach the end. If you combine this with the Thermal Shell EPP, you will be immune to the most common damage types. A Field Generator EPP will make you further immune to Radiation, at the expense of making lava a concern again. This will cover just about everything aside from Shadow and Insanity, which can handled with EPP Augments.
Valkyrie Armor
With this set, you get Oxygen, Gas, Pressure, and Radiation protection, plus technical immunity to fall damage (you float downwards). This seems like considerably less protections than the same-tier Leviathan Armor set, and it is, but the Valkyrie gear boasts a 500% weapon damage modifier instead of 276%. Definitely a glass-cannon set, with half the armor of Leviathan and a third of War Angel.
Sunwalker Armor
This is a “War Angel-lite” tier-6 set that provides Radiation, Heat, Cold, Breath, and Pressure immunities. Additionally, there is an extra 40% Radiation resist and a +15% bonus to Plasma weapon damage.
War Angel
Basically an endgame armor, this nevertheless makes you immune to Pressure, Cold, Heat, Radiation, knockback, and all fall damage. On top of that, it provides 35% Physical Resist, so you’ll be taking less damage from mobs. Oh, and 93 Armor and tons of extra HP. Definitely a tanky set. Chain Swords deal 250% extra damage in your hands with this set as well.
EPP and Augments – Much like with Armor, there are dozens of different types of EPPs and Augments to slot into them. The ultimate goal is find a combination that works for your play-style and providing the necessary protection to survive whatever planet you’re on. That said, some of the choices are better than others.
[EPP] Thermal Shell
Providing protection against heat, cold, lava, and burning on top of 20% Fire and Ice Resistance, the Thermal Shell is one of the most useful EPPs in the game. Many armors can give you heat immunity, but none of them will save you from taking damage in lava, which is weird. Even the Field Generator, which appears to be a strict upgrade to the Thermal Shell given how it includes Radiation protection, makes you vulnerable to a lava bath once again.
[EPP] Repulsor Field Pack
While outclassed in the midgame, the Repulsor Field Pack is a fantastic early-game EPP since it provides 20% Physical and Fire Resistance. The “penalty” to Cosmic Resistances isn’t particularly relevant until much later in the game.
[EPP] Plasma Light Pack
The final word in backpack light generation, the Plasma Light Pack doesn’t appear until the endgame and may end up being a fool’s errand to chase after. While it provides Breath and Pressure Immunities, most armors offer the same by then.
[Augment] Immunity I & Immunity Field
Pretty much the final word with Augments, Immunity I provides protection against Heat, Cold, Gas, Radiation, and Proto-Poison at a base level. Immunity Field is a recent, stronger addition that grants a 2nd level protection to those same qualities while adding on Radiation Burning, Poisoning, and Liquid Nitrogen immunities. Still does nothing versus Shadow/Insanity/etc damage, so be wary of what planets you are beaming to. Although having a specialized armor set against those qualities with a Thermal Shell with an Immunity Field Augment to handle the rest will do you well.
