Advanced Ark Guide
A lot of the fun of survival games is learning from your early pain and suffering, figuring out how everything works, then coming back and steamrolling those same challenges. If you are just looking for some early-game direction, I recommend reading the Spoiler-Free Beginner’s Guide. It gives you a leg up, but not the whole body.
The rest of this guide? The whole damn body. Read at your own risk of adventure.
General Base Considerations
First things first: build two beds. You can stick two practically on top of each other, while still fitting in a 1×1 Thatch hut. Beds have a ~5 minute respawn cooldown, but it’s per bed, so having two will effectively remove the cooldown. This is a good idea whether you’re at an outpost or your main base.
Second… go ahead and double or triple up on everything, wherever you are. A stack of 200 Metal Ore takes over 30 minutes to smelt in one Refining Forge. Split that stack across two Forges, and now it only takes 15 minutes. Chances are good if you managed to collect a whole stack of Metal Ore, the extra 125 Stone and 65 Hide for Forge materials are not going to be a limiting factor here.
Resources are cheap, time is not.
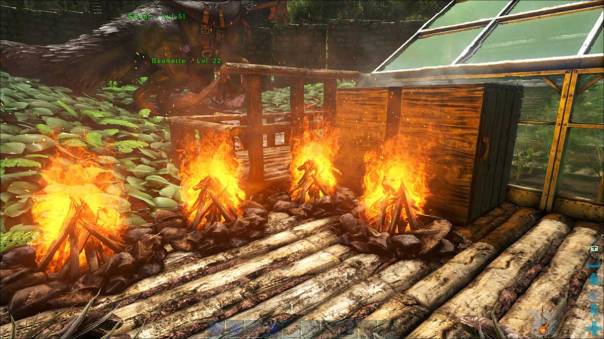
Similarly, if you’ve unlocked the Preserving Bin and have a dino capable of harvesting a bunch of meat, go ahead and throw down 3-4 Campfires at a time and light them all up. Stacks of Cooked Meat are always going to be useful, either as general walking-around food or Cooking Pot materials, and the collected Charcoal will useful for Gunpowder.
Third, take a moment to reflect on your base layout and location. How far are you from water? Are there strategic resources nearby? Is this area defensible? There is nothing particularly stopping you from recreating a primary base elsewhere… other than the logistics of either moving all your old stuff and/or tamed dinos. Better to get it right the first time though.
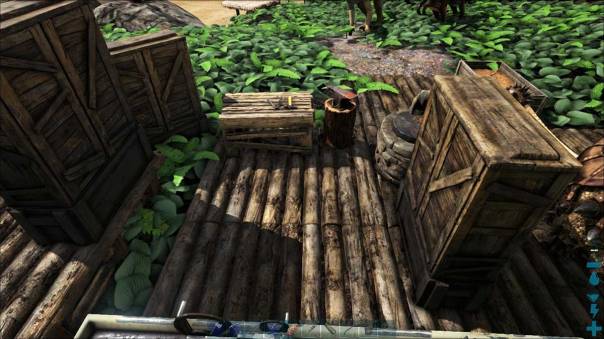
As far as layout goes, there are some obvious-in-retrospect ways of arranging things. For example, you are going to want most of your crafting stations and containers within reaching distance of each other without moving – this will allow you to move hundreds of pounds of resources between containers, e.g. double your max carrying capacity. Likewise, you will want there to be room for you to do the same thing when removing items from tamed dinos to your containers.
This was my base setup originally:
Not like this.
While everything was within reach, I actually had to hop over my Smithy to get out of the circle, and I was constantly running out of room for stuff. After watching some Youtube videos of other setups though, I realized that yeah, you can arrange your Large Storage Containers like this instead:

Doubles as a good OCD test.
Four times the storage and more room to move around. I removed the Refining Forge entirely, because my main base is nowhere near natural Metal deposits, and it’s much more efficient smelting on-site, and either bringing back the Metal Ingots or finished products.
Base Locations
Speaking of that, where should you be building a base? The answer is: wherever you want.
But, really, here are some other considerations:

Consideration 1: Metal Nodes
The above map displays Metal Nodes around The Island map, along with the Obelisks. No matter what you plan on doing in Ark, you will need Metal eventually, for weapons, ammo, structures, tools, or even just saddles. It’s not impossible to build your main base over near, say, the Red Obelisk, but you will be performing some serious long-distance trucking to get those ingots.
Another consideration? Check where beacons come down. That’s right, there are specific, set locations where beacons spawn on the regular. Most of them will be filled with garbage, especially if you build up in the southern areas of the Island. But, hey, free is free. If it’s all the same to you, I’d suggest going over to that next ridge where they spawn before setting down roots.
Finally, consider where some more esoteric resources might be available. Giant Beaver Dams, for example, are great sources of Cementing Paste and Wood. While the specific spawn locations are not fixed, there are some rough guides. Giant Bee Hives can spawn pretty much anywhere, and can technically be moved, but if you manage to find one near a potential base location, that area should be considered prime real estate. Oh, and if you’ll be needing Sap, maybe choose something closer to the Redwood Forest area.
Countering Dinos
When you are just starting out, just about everything is scary and can kill you. Once you figure out “the trick” for specific tiers of dinos though, they start becoming speed bumps instead of brick walls. Less scary, but can still kill you if you’re sloppy.
Here are the tiers:
Slingshot: This tier encompasses any dino encounter that can be defeated by simply backpedaling at normal speed. This includes any passive creature like the Dodo, but also more dangerous ones (once provoked) like the Trike and Turtle (Carbonemys), provided they could catch you. Which they shouldn’t be able to.
Spear: The simple spear provides enough knockback to keep the target at bay until death. Quintessential example being the Dilo (Dilophosaurus), aka the spitting one. Insects and most fish belong to this group too. Troodan, notably, do not, since they can leap back at you.
Bola: Too fast or large to be affected by the spear’s knockback, but small enough to be rooted by a Bola. Most common contender in this tier is the Raptor. While the Bola can trivialize encounters with these dinos, keep in mind that it takes a few seconds to wind up the throw, and most of these dinos are especially dangerous if they get the jump on you on the ground.
Platform: Encompassing the rest of Ark’s carnivores unaffected by the Bola, you will likely need to be on a platform (e.g. cliff face, rock, structure) in order to safely take it out. Alternatively, sometimes a platform can be substituted with a Wooden Spike Wall instead. This works well with creatures like the otherwise deadly Therizinosaur, who will happily attack the 3500 HP wall while you re-feather its head with arrows.
All of the above assumes you are trying to take down a dino unassisted, using common weapons around the level of the beast you are encountering. Facing down a Carno on foot with nothing but a Crossbow is scary. Doing so while wielding a Pump-Action Shotgun and 400+ HP with armor? Much less so. Hell, add two Trikes to your bodyguard detail and you can take out a large chunk of the food chain using just a Spear yourself.
Taming Dinos and Utility
It always bear repeating: Ark is a dinosaur taming game. What balance exists in the game is dependent upon it; a lone survivor isn’t one for long. Here is some early-game progression:
- Unlock the Slingshot at level 5. Go tame a few Dilos.
- Unlock the Wooden Club at level 8 and Bola at level 9. Tame some Raptors.
- Farm Hides for a while, using your Bow (level 10) and/or dino buddies.
- Unlock the Trike Saddle at level 16, craft it, and go tame a Triceratops.
- Unlock Mortar and Pestle (level 6) if you haven’t already, and use the Trike to collect hundreds of nacroberries in less than a minute so you can turn them into Narcotics.
- Tame another Trike, and leave both parked in your base for protection.
- Unlock Tranquilizer Arrows at level 21. Enjoy your ability to tame damn near anything.
Along with their normal characteristics, many dinos have “secret” talents that elevate their value far beyond normal. For the most part, you will need to have a saddle created for the dino in order to take advantage of their skills, but sometimes you do not. Here is a non-exhaustive list, based on the level at which you can craft a saddle for them:
- (Lvl 6) Phiomia: Force-feeding Stimberries will create Medium Feces on demand.
- (Lvl 16) Trike: Excellent tank/base defense, gathers 100s of berries at a time.
- (Lvl 18) Raptor: Best early-game mount, and protector while exploring.
- (Lvl 20) Equus: e.g. wild horse, has reduced Stone weight and is fast. Saddle acts as Mortar & Pestle.
- (Lvl 30) Iguanodon: Infinite Sprint on four legs, high jumping on two. Can turn plant into seeds.
- (Lvl 31) Mammoth: Wood gathering machine, and makes Wood weigh 75% less.
- (Lvl 34) Doedicurus: Stone gathering machine, and makes Stone weigh 75% less.
- (Lvl 36) Ankylo: Metal gathering machine, and makes Metal weigh 75% less.
- (Lvl 37) Sabertooth: Efficient at gathering Hides, Chitin, and Keratin. Decent speed.
- (Lvl 38) Pteranodon: First flying mount. Pretty speedy too. Can grab tiny dinos.
- (Lvl 40) Beelzebufo: e.g. giant toad, huge jumps, turns insects into Cementing Paste, fast in water.
- (Lvl 43) Pelagornis: Flyer that can land on water. Harvests fish easily. Fishing Pole from saddle.
- (Lvl 61) Castoroides: e.g. giant beaver, Wood gathering machine, gathering Wood automatically while Wandering. Wood, Stone, Thatch, and Fiber weigh 50% less. Fast swimmer. Saddle is mobile Smithy.
- (Lvl 62) Argentavis: Fantastic flyer with lots of Stamina and Carry Weight. Can pick up most medium-sized dinos, including Raptors, Titanboas, etc. Best everyday flying mount.
- (Lvl 69) Therizinosaur: Insanely versatile, bordering on OP. High health, high DPS. Left-click harvests Meat and Wood incredibly fast. Right-click harvests 100s of Fiber from bushes. C attack harvests Hide and Chitin from corpses, Berries from bushes. Each level-up also allows greater specialization in harvesting types (Delicate vs Power) via Interact Menu.
As you might expect, higher levels give you access to better options. Do note however, that your ability to actually find and/or tame these dinos are not assured at the level you could. For example, while you unlock the saddle at level 34, the Doedicurus curls up into a defensive ball after losing health, which makes knocking them out difficult without having Tranq Darts (unlocked at level 62). One of the few ways around that is to use a Beelzebufo’s attack, which adds Torpor while dealing little damage. But even then, the Beelzebufo saddle is only unlocked six levels after the other one.
Then there is the matter of finding these dinos. The Mammoth and Equus are relatively low level tames, but they are not commonly found in the South, which is where you might be spawning as a newer player. So, if you want to be taming creatures when you unlock their saddle, you might have to, ahem, hoof it yourself and find them.
Cooking Like a Pro
There are two types of recipes: Standard and Custom. It’s a good idea to utilize both.
Standard Recipes
All recipes below require there to be water in the cookpot, in form of a filled waterskin.
- Enduro Stew (+melee, +healing): Mejo (10), Carrot (5), Potato (5), Stimulant (2), Cooked Meat (9)
- Focal Chili (+crafting, +movement): Mejo (10), Yellow/Blue/Red (20), Lemon (5), Cooked Meat (9)
- Lazarus Chowder (+underwater): Mejo (10), Corn (5), Potato (5), Narcotic (2), Cooked Meat (9)
- Calien Soup (+hot area): Mejo (10), Yellow/Red (20), Lemon (5), Stimulant (2)
- Fria Curry (+cold area): Mejo (10), Blue (20), Corn (5), Carrot (5), Narcotic (2)
- Medical Brew (+40 HP): Red (20), Narcotic (2)
- Sweet Vegetable Cake (special): Fiber (25), Corn (2), Carrot (2), Potato (2), Stimulant (4), Sap (4), Giant Bee Honey (2)
As you might expect, the feasibility of having a ready stock of most of these items is dependent on having a robust Greenhouse situation and/or playing on a server with Crop Growth cranked up. Medical Brew is the exception, needing only some Narcotics and 20 Tintoberries, both of which can be harvested enmass by a Trike or other herbivore. The catch is the 2 hour spoilage timer, although it lasts longer when refrigerated.
Custom Recipes
While custom recipes might sound both cool and complicated, it is really neither. The steps are:
- Craft a blank Note.
- Place Note and ingredients in Cooking Pot.
- Click Make Recipe
- Ensure Recipe note is in Cooking Pot with ingredients, then start fire.
The final output is an item with a percentage of the effects of the individual ingredients. What percentage that ends up being is based on your Crafting Speed stat at Step 3 only. A full optimization would require a level-capped player to consume a Mindwipe Tonic, place all of their upgrades in Crafting Speed, consume a Focal Chili, and then pen some recipes before using another Mindwipe Tonic to get their stats back. Thereafter, whoever uses that recipe will get the full benefits no matter their Crafting Speed. Because that makes sense.
For the rest of us, the “hidden” benefits of custom recipes (with the help of Focal Chili) still makes things worthwhile. For example, a custom recipe for 20 Raw Meat creates an item that grants 43 Food and 32 HP. That may seem pitiful considering a single piece of Cooked Meat restores 20 Food and 8 HP. The upside is that the custom recipe doesn’t need to be cooked, weighs 0.3 pounds, and lasts for 48 hours in your inventory, rather than 20 minutes.
So, really, custom recipes are mainly about saving space and avoiding spoilage. Did your Mammoth get bogged down with hundreds of pounds of berries when it was harvesting lumber? A 10 lb stack of Tintoberries can get refined down to a 1.1 lb paste that grants you 53 Food and 15 HP.
Bonus tip: Stimberries and Stimulants are great for giving a Stamina boost at the expense of thirst. Cut out the downside by creating a custom food (as opposed to drink) recipe of, say, 50 Stimberries. That’ll give you 27 Food, 8 HP, and ~89 Stamina back without the thirst. Just note that these gains are capped at basically 1/second, but it should still aid in your sprint out of danger.
Harvesting Specialty Resources
Beyond the basic building resources like Stone and Wood, there exists a lot of specialty resources to craft more advanced items. Gathering these special resources is sometimes a pain, depending on the method. Here are some of the best.
Cementing Paste
The default method of creating Cementing Paste is x4 Chitin/Kreatin + x8 Stone. This is incredibly inefficient though, as it would require 200 Chitin/400 Stone for an Assault Rifle, or even 2400 Chitin/4800 Stone for a Wooden Tree Platform.
The best and easiest source are wild Beaver Dams. These are built by Castoroides, and are located on land or in the water. While accessing the inventory of a Beaver Dam will cause all nearby Castoroides to go hostile, each one usually contains 150+ Cementing Paste. Since items do not respawn inside containers, it’s best to loot (and drop) the rest, so that the Beaver Dam collapses and another one can spawn later.

Basically, any water feature not the ocean or swamp.
The second best source is from the Beelzebufo mount. Using Right-Click against insects will result in 5-15 Cementing Paste apiece, along with some Chitin. The biggest challenge is finding a stable enough insect population. The good news is that the mount is adept at navigating the same areas where Beaver Dams spawn, so one can double-dip in farming.
Third, there is a “passive” form of collection: from tamed Achatina, e.g. giant snail. These creatures will slowly accumulate both Achatina Paste (same properties as Cementing Paste) and Organic Polymer up to 100 apiece in their inventories. The catch is that Achatinas only eat Sweet Vegetable Cake, which requires both Sap and Giant Bee Honey, which are themselves specialty resources.
(Organic) Polymer
The default method of Polymer production is x2 Cementing Paste + x2 Obsidian. This isn’t too terrible by itself, although it requires the construction of a Fabricator, which uses Gasoline as its fuel. Organic Polymer can be substituted for Polymer in all situations, and the Ghillie Suit actually requires Organic Polymer specifically in its construction.
Note: You will want a Wooden Club or Metal Sword for harvesting Organic Polymer. A tamed Pelagornis will also work effectively. Hatchets or Picks will give you none.
The best and easiest farming target are Kairuku, aka penguins. Each iceberg in the NW corner of the Island has a dozen or so, and they react basically like the Dodo when attacked or threatened. Tragically, the babies have the most Organic Polymer, so club them first.

They are basically… ahem, sitting ducks.
If you are far from the North, the alternative source will be from Hesperornis, aka duck-like birds. You can typically find them swimming around shorelines and rivers hunting for fish. While they have zero offensive capabilities, note that that they frequently exist in otherwise dangerous areas. Keep an eye out for Sarcos, Spinos, and other river terrors.
Considering that Organic Polymer spoils extremely quickly (~30 minutes) and is unaffected by most preservation techniques, be sure and have the other materials/blueprints ready to go for when you collect this resource. The last thing you want to happen is collecting a bunch and then scrambling to find the other materials.
Obsidian
Black rocks on mountains. Go mine them.
Oil
There are several different sources of Oil in Ark, with different levels of ease of acquirement.
The first would be the Oil Rocks up in the NW corner of the Island, and scattered about in other snowy regions. While the environment is hostile, mining them is almost as easy as clubbing seals for Organic Polymer. The tricky part is actually traveling all the way up there, so be sure to stock up via boat or wagon train once you’ve made the effort.
Second would be the Oil nodes located in many places in the ocean. These are usually closer to home, but often require long dives in hostile waters. Cook some Lazarus Chowder and bring a dino that can breathe underwater. Underwater caves are another source, but chances are that you won’t be needing this guide if you are advanced enough to be plumbing those depths.
Third, is from killing/harvesting Trilobites and Leeches. You actually get a respectable amount of Oil from each kill, but the trouble is actually finding a suitable amount of targets. In that regard, be sure and stop what you are doing and kill them if you happen to spot any, no matter what else you might have been doing.
Finally, there is a quasi-passive source: Dung Beatles. These animals have to be tamed and brought out of the caves they inhabit, then be fed a constant source of Feces (tame a Phiomia) before it is turned into Fertilizer and a bit of Oil. While it ain’t nothing, Medium Animal Feces is turned into x2 Fertilizer and x4 Oil after 15 minutes. This might be enough Oil to keep the lights on (via Gasoline), but not for those endgame Industrial stations that need 400+ to craft.
Sap/Giant Bee Honey
These are combined because the only real reason you might need either is for Sweet Vegetable Cake, so they go hand-in-hand.
For Sap, there is no reasonable way to avoid crafting at least one Tree Sap Tap. Then you have to specifically place them high up in a Redwood Tree. Being able to collect the Sap will require either a Wooden Tree Platform (600 Cementing Paste!) or constructing your own janky scaffolding out of Wooden Pole and ladders. Once that’s done, visit it periodically to collect your 20 Sap.
Giant Bee Honey can be harvested from Giant Bee Hives, tamed or wild. The taming process to set up your own Hives in convenient locations is quite difficult, and requires a lot of prep work – Bug Repellent, Ghillie Suit, hand-feeding Rare Flowers to the Queen Bee, etc. If you don’t need a constant source of Sweet Vegetable Cake, it might be better to just note the locations of wild hives and swipe their honey when needed; a Ghillie Suit and fast escape mount are recommended.
Final Thoughts
Ark is a fascinating sandbox experience, even when just played in Single-Player. No matter how powerful you end up feeling, the game world is ready to remind you to take it seriously or suffer the sometimes absurd consequences. While even a low-level Argentavis mount can effectively (albeit slowly) murder the meanest Alpha predators with impunity, all it takes is one Microraptor sailing out of trees to knock you off your mount into a pool of Megapiranha before you realize how dangerous the world still is.
Hopefully the above guide is enough to give you the edge necessary to survive out there. Or at least live that much longer.
Posted on September 26, 2017, in Guide and tagged Ark, Crafting, Pro Tip, Quick & Dirty Guide. Bookmark the permalink. Comments Off on Advanced Ark Guide.
