Quick & Dirty Guide to Fallout 4
Just now picking up Fallout 4? I envy you.
Here is all the spoiler-free info I wish I had before I started playing.
The Baseline SPECIAL
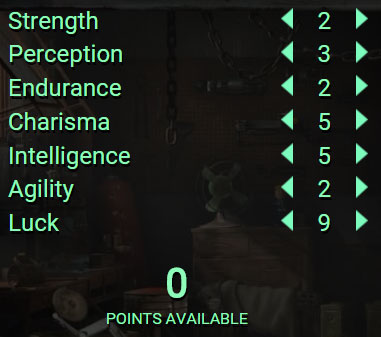
If you are new to the series or just want a character build that works, I consider this the baseline:

TL;DR
The leftover points can be put wherever, but you’ll probably want to get Endurance to at least 3.
Why is this the best? Simple: it unlocks the largest amount of the best Perks in Fallout 4.
Strength – 3
Unlocks Armorer, the first rank of which will let you squeeze out some extra mileage from whatever armor you manage to loot; Armorer also becomes important if you decide to go the Power Armor route. The rest of the Strength tree is useless for anyone but melee character builds and can thus be ignored. Note, however, that Strength impacts your Carrying Capacity.
Luckily, Companions are easy to come by and can carry ~200 lbs of wasteland junk.
Perception – 4
Unlocks both Rifleman and Locksmith. Rifleman is probably one of the more absurd Perks in Fallout 4 simply because it increases the damage of pretty much all the weapons in the game: sniper rifles, shotguns, laser muskets, etc. Meanwhile, Locksmith will, of course, allow you to pick locks. Two things of note though: bobby pins are pretty common (no reason to take Rank 4), and you can recruit a companion that can unlock Master-level locks. As in, if you take that companion, you won’t need Locksmith at all. You’ll miss out on the XP and other companion banter however.
As an aside, Perception governs VATS accuracy, so you might want to dump some extra points in if you end up using VATS a lot.
Endurance – 1
Basically, there aren’t really any good Perks in this tree other than Toughness, which only needs Endurance 1 anyway. You should be able to easily reach your health regen needs via farming, resting, and so on.
Optional: Endurance 3 will unlock Life Giver, the third rank of which grants passive regeneration at level 16. Since you’ll probably want Endurance to be higher than 1 anyway just so you won’t be one-shot by grenades and such, this isn’t much to ask.
Charisma – 6
This is technically optional, but Charisma 6 unlocks Local Leader. The first rank of Local Leader makes it so that all of your Settlement Workbenches becomes shared stashes (for components only). Basically, if you want to engage with the Settlement minigame with any kind of seriousness, you’re going to need this Perk. Charisma also improves prices when buying/selling stuff with vendors by about 5% per point.
Optional: Charisma 1, if you are fine either Fast Traveling all the time, or otherwise don’t plan on doing much with Settlements. Just note that Charisma impacts your dialog success rates. You can generally cheese these with chems and reloading saves though.
Intelligence – 6
This is enough to unlock Science, Scrapper, and Gun Nut, e.g. the crafting trifecta. While it is possible to just get Gun Nut at Intelligence 3, you will be hurting for screws, a crafting component that is otherwise sparse in the wasteland; the first rank of Scrapper will get you screws for days by salvaging crappy pipe guns that drop from 99% of the NPCs you kill. Meanwhile, the first rank of Science will unlock a plethora of both gun mods and Settlement options.
Agility – 3
It’s enough to unlock Sneak. Keep in mind though, that Sneak is less useful in Fallout 4 than in games past, because non-aware hostile mobs do not show up on the compass ribbon. You can certainly hear them talking to themselves, but the likelihood of you actually using Sneak successfully indoors (for the delicious Sneak Attack Criticals) is pretty small. Outdoors, Sneak is almost superfluous as you can generally just crouch and snipe from afar.
Luck – 2
It has been said that Luck is one of the more powerful stats in Fallout 4, and that may well be true. However, unless you are willing to commit a lot of stat points, two is enough to unlock the first rank of Scrounger, which will pretty much solve your ammo problems for good. Plus, sell your unneeded ammo for cash.
Optional: Luck 8 for Grim Reaper’s Sprint or Luck 9 for Four Leaf Clover. Grim Reaper’s Sprint has always been pretty powerful in the other Fallouts, and it’s technically possible for you to unlock it at level 2, if you wish. Going all the way to Luck 9 will allow you to leverage a pretty absurd amount of Perk synergy: Four Leaf Clover procs will give you an auto-critical, which you can bank for whenever with Critical Banker, which do an impressively high amount of damage with Better Criticals, and will likely kill your target and possibly proc a full AP bar via Grim Reaper’s Sprint, letting you pump out more bullets and restart the process with Four Leaf Clover.
Advanced Tips
Been around the Wasteland a bit, eh? Okay, here are my observations from playing the game:
Free Stat Points
The stat Bobbleheads are back again, and picking them up increases the relevant stat by 1 point. In other words, if you have a specific character build you are going for, you can budget your SPECIAL stats accordingly. For example, my baseline recommendation has Charisma set to 6 for Local Leader. If you don’t anticipate using Local Leader until after you find the Charisma Bobblehead, you can set Charisma to 5 and use that extra stat point elsewhere.
Also, there is a “You’re SPECIAL” book laying on the floor in your former house in Sanctuary. Pick it up and you’ll get a free stat point you can place wherever you want.
Advanced Stat/Perk Planning
The Baseline I recommended originally simply gives you complete access to most of the best Perks right away. If you instead follow the Bobblehead route (e.g. relying on the free stat to meet requirements) though, you can do some goofy things… like this:
Almost makes me want to reroll right now…
Or maybe not put it all in Luck, but split it into Perception and Agility. Or whatever.
In fact, you can go even further down the optimization route with the understanding that not only will there be “dead levels” in there where your best Perk choice will just be leveling up a stat, but also that you don’t necessarily even need a particular Perk until later in the game. For example, Science won’t be used for much until you start routinely encountering enemies with laser weapons. You won’t want to unlock Local Leader until you have a decent stockpile built up, so maybe use Charisma as a dump stat until the end of your 20s.
Collect that Junk… Intelligently
Nearly every piece of lootable debris can be broken down into useful crafting components, which will be important if you engage in the Settlements system at all. There are two tricks here that you should pay attention to though.
The first is “Tag to Search.” If you open your Pip-Boy and browse over to the Junk tab, one of the options should be Component View. This will show all the components your currently held Junk will break down into. If you notice any with Aluminum, Screws, Leather, Oil, Adhesive, Copper, or whatever you might be low on, go ahead and tag those. Within a few hours, you’ll start to have a Pavlovian response to Office Desk fans, Lighters, and similar items.
The second tip is to not just rely on scavenged items in the world. Vegetable Starch is a Cooking recipe that makes 5 Adhesive per batch. Cutting Fluid is a Chem Station recipe for Oil. But also do not discount your everyday friendly shop keepers in Diamond City and beyond:
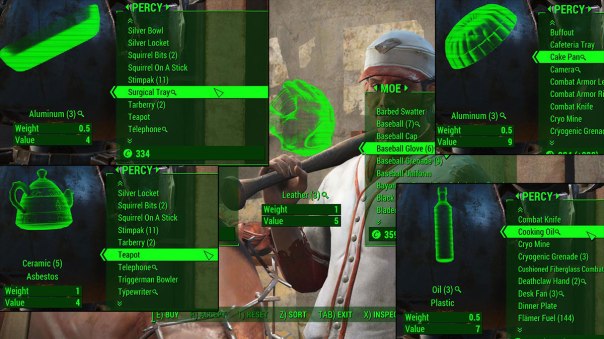
Mouth literally watering.
I used to have a Leather problem. Then I realized that I can get Moe to part with 6 Baseball Gloves for 5 caps apiece. That’s 18 pieces of Leather for 30 caps. The other vendors are not as lucrative in say, Oil or Aluminum, but it certainly beats revisiting already-cleared factories scrounging the floor for cans or spending an insane amount of caps for “shipments of X” at several thousand caps apiece. Do a little browsing each time you offload your raider loot, and it will all add up.
Mod Shuffling
After doing some weapon upgrading, you might notice your inventory filling with random-seeming weapon mods. What is actually going on here is that whenever you replace one mod with another, the old mod is not destroyed, but removed and stored. You can take advantage of this fact to both access better mods than you may be able to craft, or even use it to bypass the need for Gun Nut entirely (although you’ll want it for other reasons).
If you come across a weapon with a mod you want – say, a Silencer – head over to the crafting table and act like you are creating a new mod for that slot. In fact, that is exactly what you are doing: replacing the current mod with hopefully the “None” or “Standard” version. Voila! Now you have a Silencer despite not having Gun Nut maxed out. Just keep in mind that mods are base-weapon specific. A Silencer for a Pipe Gun is different than a Silencer for a rifle.
Keep a Charisma Suit Handy
Caps are more important in Fallout 4 than they have ever been, and Charisma is your ticket to getting more of them. Before offloading your latest haul of raider loot, equip your Charisma Suit, e.g. all the items with bonuses to Charisma. It should not take you too long to find clothes with at least +2 Charisma, and you can stack two additional points from both Sunglasses and Pompadour wig. Each point of Charisma improves prices by about 5%, which absolutely adds up over the course of the game.
Speaking of Charisma, vendors, and caps…
Better Living Through Grape Mentats
One of the most insane chems in Fallout 4, Grape Mentats are a craftable variation on the standard Mentats that provides you with +5 Charisma and a 10% buying/selling bonus from vendors. Whether you stroll into Diamond City laden with raider loot or are eyeing a vendor’s Legendary equipment selection, you will want to take some Grape Mentats.
How much of a difference does it make? This much:
- At Charisma 9: item costs 2331 caps.
- As above + Grape Mentats: item costs 1366 caps.
- As above + Cap Collector perk: item costs 1301 caps.
As you can see, Grape Mentats “stack” with Cap Collector, but not very well. Which is fine, because Grape Mentats are easy to make and have no prerequisites. The ingredients are: Hubflower x2, Mentats x1, Whiskey x1. Given that the latter two are everywhere in the game (including on vendors), the only difficult part is actually getting Hubflowers.
Luckily for you, I have found a few good locations:
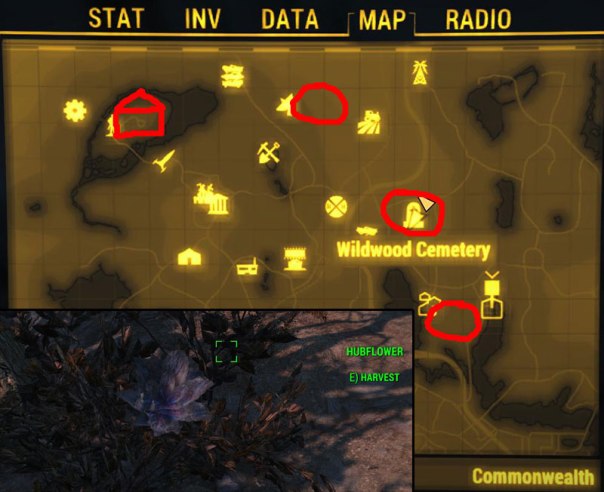
You can never have enough.
The circled areas generally have 4+ Hubflower nodes in a small area. Said nodes do respawn eventually, on an unknown timetable.
Avoid the Designer Perk Traps
Certain Perks have always been hit-or-miss in the Fallout series (Nerd Rage! is still awful), but there are some that are worse than others this time around specifically due to decisions the designers have made.
For example, rethink your desire for a Sneak build. Sneak Attack Criticals are still in the game, but achieving them is incredibly more difficult this time around, and almost entirely superfluous. Non-aware enemies no longer appear on compass ribbon, so you almost have to make some noise to even know enemies are present. Sneak also requires heavy investment before you can move faster than an agonizing crawl, and you are likely to be instantly spotted indoors anyway. Making matters even worse, Fallout 4 has Legendary item prefixes that will double the damage of the weapon when used on enemies with full health, and another that adds an additional projectile. Why run around slow all the time when you can have a gun that basically gives you Sneak Attack Criticals by default?
Another subtle trap is Nuclear Physicist in the Intelligence tree. Take it if you want the Radiation weapon damage boost, but do not take it for the Fusion Core boost. Getting 25%/50%/100% longer duration on Fusion Cores sounds like something you’d want for a Power Armor build… right up until you realize that Fusion Cores can easily be bought from damn near every vendor in the Commonwealth. With Grape Mentats, I can buy Fusion Cores for 240 caps. So at Rank 3 of Nuclear Physicist (which requires level 26), I’ve spent three Perks all so I can… buy Fusion Cores for 120 caps. Rank 2 Cap Collector will get you infinitely more caps for two Perk points in comparison.
Other traps include Sniper and Penetrator in the Perception tree. While they perform exactly how they are described, the point is that they sound cool, but aren’t actually that useful. For example, if you are in a position to use a sniper rifle, you will typically be much better off waiting for your target to peek their head over cover and shoot them outside of VATS anyway.
Power Armor Decision
After one of the first quests in the game, you are given your very own suit of Power Armor. Deciding on whether or not you are going to try using it full-time is one of the more important decisions you can make. And, yes, you can use Power Armor all the time throughout the entire game. The only limiting factor is Fusion Cores, which aren’t actually that limiting at all in practice. But the question, again, is whether you want to use Power Armor all the time.

I’m tired of your shit, Preston.
The benefits are pretty clear: an insane amount of armor right off the bat, allowing you to tank damage and most non-water sources of radiation. Additionally, Power Armor automatically sets your Strength to 11 with a corresponding increase to Carrying Capacity. The individual pieces of Power Armor do take damage and need repair, but it generally only takes a few pieces of steel to get them back up and running again. From a mechanics standpoint, Power Armor can’t really be beat.
…unless you don’t like skipping most of the other gameplay.
While in Power Armor, you do not receive any of the benefits of other armor you might be wearing. For example, I came across a piece of Legendary leg armor that increases my movement speed by 10%. I bought a Legendary arm piece that reduces damage taken by Human by 15%. Incidentally, this is why I say you’ll want to make the Power Armor decision early: to prevent you from spending 2000+ caps on gear instead of Fusion Cores. Running around in Power Armor all the time basically means all those items – and any you might pick up along the way – are functionally useless.
The more damning for me personally though, is simply how Power Armor feels while playing. You walk slower, all the time. Power Armor doesn’t impact your Sneaking ability from what I can tell, but you will certainly hear your own mechanical footsteps all the time. A large part of your screen will be taken up by the Power Armor UI, even if you aren’t wearing the helmet piece. And if you do wear the helmet piece, 100% of your character’s spoken dialog will be filtered through the face mask. At first, it’s amusing, but you lose a lot of the voice-acting nuances and emotion this way IMO.
It’s a tough decision, so take your time. It’s not the end of the world if you change your mind – you can command your companions to don the Power Armor in your stead (assuming they don’t already have their own suit) – but there is no real reason to “level up” both paths.
Posted on November 17, 2015, in Miscellany and tagged Crafting, Fallout 4, Guide, Perks, Power Armor, Quick & Dirty Guide. Bookmark the permalink. 7 Comments.

My experience so far on survival is that sneaking is absolutely necessary. you just can’t go toe to toe with even simple raiders, and ghouls will destroy you. The latter practically require some terrain exploiting for more than one at a time.
LikeLike
I may have to increase the difficulty then, although I wonder if it will matter at this point. Right now, I basically destroy everything with one or two shots from the Overseer’s Rifle. I don’t even bother with VATS anymore, as my Power Armor just soaks damage.
LikeLike
I have to agree with Matt, on the harder difficulties you need to be able to sneak to stand a chance in many fights. I just fought Fist (super mutant boss with minigun) and without being able to sneak around and set up a series of traps for him to walk through, there’s no way I could have done it. As it was it took me several tries to get it right.
Agility has the added bonus of giving you more VATS points. Before I dumped a few points into Agility I couldn’t get off more than 1 or 2 shots in VATS before running out, and VATS against annoying, deadly enemies like ghouls that attack in groups are far more easily dealt with if you cripple the legs of a few of them in VATS at the start of a fight.
Great tips, though. Very useful.
LikeLike
the last part of that second paragraph was supposed to read:
“and annoying, deadly enemies like ghouls that attack in groups are far more easily dealt with if you cripple the legs of a few of them in VATS at the start of a fight.”
That’s what I get for not proofreading.
LikeLike
This is excellent stuff, especially the part about the Grape Mentats. I just arrived in Diamond City yesterday as the last thing I did, so I guess I still have a chance to get the most out of it.
Btw, I’ve discovered that you can rotate the model shown on the loading screen. Just hold down left mouse button and move the mouse around. Okay, it’s not much of a tip, but it’s something to do if you’re bored waiting for the next area to load.
LikeLike
Another thing is that since INT boosts experience earned, it might be best to max it out right away. Of course you would then need to boost other stats to access perks, so it may balance out. As for me, I boosted AGI & PER, because I’m a sneaky thief type you know. I’m really starting to dislike the “allocate stats wherever you want before you know anything” meta. To be fair those two stats aren’t bad and I’m not really gimped in any major way.
LikeLike
More tips to be found here:
http://www.beforeiplay.com/index.php?title=Fallout_4
LikeLike